|
Better Camera - UVN! (with a
cup of Matrix on the side)
by
Ben Kenwright
Well this is the most popular method for camera's....and you'll see it used
in things like DirectX and OpenGL. At first it will look a bit crazy the
code...and of course we'll have to use some matrix math here so its easier to
work with! But it was only a matter of time before matrix's popped up.
It allows us to combine our maths operations into a single matrix and then we
can apply that single matrix to all our vertices :) That's where the real
power of matrices come from...the ability to combine them, so we can do all our
tricky maths in one fast go. We will use a 4x4 matrix class, and keep
things simple. Sometimes people use 4x3 or 3x3 for space and speed
etc...but the 4x4 I think will be better. I dont' want to go into all the
theory of homogenious w values or Vector3 or Vector4. What we want is a
working model :)....code that works...and does what we want...and the Matrix4
will meet all our needs.
So this is what a basic matrix is, under all those built in functions and
wrappers:
| Basic Matrix4: |
|
class
Matrix4
{
public
float[][]
m;
}; |
Thats all there is to it....of course this is java, so we of course need to
allocate room for the array...but I just wanted to show you that our 4x4 Matrix,
is just a bunch of floats. How we use these floats is the next part.
As we are working with Java, its object orientated, so its only obvious that
we make the Matrix4 class contain its own useful little methods, like
multiplying matrix's together...and building a rotation matrix.
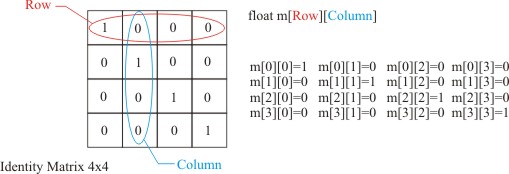
Just to sort this out now - get this clear in your heads! Columns and
Rows! You have to make sure you know which are which, and stick with that
system. As I've found that opengl uses a different system to directx...and
you can on occasion be looking around on the net or in your 3d maths books on
how to do things, and get mixed up with which is which. So I would
recommend doing this a few times on paper and do a few simple demos with basic
matrices.
We'll have to review Matrix theory! So hold on...this is where it gets
scary....so drink lots of coffee and try to remember - its only an array of
numbers....nothing more. First we give you an identity matrix:
| Identity Matrix Setup |
|
 |
As any matrix multiplied by an identity matrix, we end up with what we
started with. Usually, when we start with a new Matrix, we set it to an
identity matrix first, then convert or modify it to our needs.
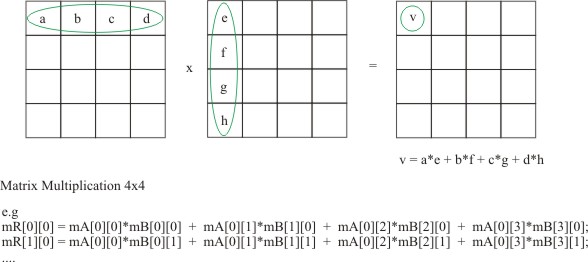
So now that we have a matrix...lets say, two identity matrix's...how do we
combine them?...well its simple:
| Matrix Multiplication Basics |
|
 |
Of course, you have to really really think about matrix multiplication to see
how you would apply it to code. Basically we can do it with a few for
loops, making sure we keep track of columns and rows...which I've done in our
Matrix4 class - adding a simple multiply member function. Of course you
could optimise it later on, as it is just a combination of Dot Products if you
think about it long enough :)
| Matrix Code: |
|
/*********************************************************************************************/
/*
*/
/* class
Matrix4
*/
/* You can't do much in 3D these days without using matrix's...it basically
makes it easier */
/* to work with data, and to combine operations into a single one
:) */
/*
*/
/*********************************************************************************************/
class
Matrix4
{
public
float[][]
m;
// Constructors
public
Matrix4()
{
m =
new
float[4][4];
}// End Matrix4() default
constructor
public
Matrix4(float
m00,
float
m01,
float
m02,
float
m03,
float
m10,
float
m11,
float
m12,
float
m13,
float
m20,
float
m21,
float
m22,
float
m23,
float
m30,
float
m31,
float
m32,
float
m33)
{
m=
new
float[4][4];
m[0][0]=m00; m[0][1]=m01; m[0][2]=m02; m[0][3]=m03;
m[1][0]=m10; m[1][1]=m11; m[1][2]=m12; m[1][3]=m13;
m[2][0]=m20; m[2][1]=m21; m[2][2]=m22; m[2][3]=m23;
m[3][0]=m30; m[3][1]=m31; m[3][2]=m32; m[3][3]=m33;
}// End Matrix4(..)
static
public
Matrix4 multiply(Matrix4 a, Matrix4 b)
{
Matrix4 result =
new
Matrix4();
for(int
col=0; col<4; col++)
{
for(int
row=0; row<4; row++)
{
result.m[row][col] = 0;
for(int
i=0; i<4; i++)
{
result.m[row][col] += a.m[row][i] * b.m[i][col];
}// End for loop i
}// End for loop row
}// End for loop col
return
result;
}// End multiply(..)
// Matrix Multiplication
//
// a b c d e - - -
// - - - - f - - -
// - - - - x g - - -
// - - - - h - - -
//
// m00 = a*e + b*f + c*g + d*h
......
}// End Matrix4(..)
|
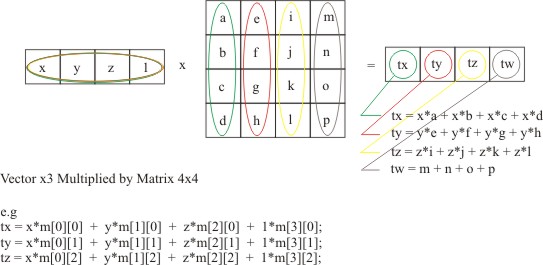
One further question that might be on your mind, before going onto Cameras
and Matrices - is the combination of our Vector3 with a Matrix4. Well in
reality we should have a Vector4, with a homogenous w in there so that its
mathematically correct. But we can use the assumption that it is always 1,
in Vector3...and we can make our functional code work and do what's its suppose
to...saving us a bit of space - as we don't' really use the w - and if we do,
we'll just introduce a Vector4 class :)
| Vector3 multiplied by Matrix4 |
|
 |
As we use this ability to multiply a Vector3 by a Matrix4, so we can apply
our Matrices to our actual vertices data. As we have all our vertices,
stored as Vector3 values - and we build up our Matrix, which performs all our
tricky rotation, transition and camera operations into a single matrix - then we
apply it to all our vertices using our Vector3 mul member function :)
Sounds simple eh?... well it is :)
| Vector3 member function Matrix
Multiplication |
|
static
public
Vector3 mul( Vector3 a, Matrix4 b )
{
Vector3 result =
new
Vector3();
// We assume a vector of 4 with
w = 1
result.m_x = a.m_x*b.m[0][0] +
a.m_y*b.m[1][0] + a.m_z*b.m[2][0] + 1*b.m[3][0];
result.m_y = a.m_x*b.m[0][1] + a.m_y*b.m[1][1] + a.m_z*b.m[2][1] +
1*b.m[3][1];
result.m_z = a.m_x*b.m[0][2] + a.m_y*b.m[1][2] + a.m_z*b.m[2][2] +
1*b.m[3][2];
// w = a.m_x*b.m[0][3] + a.m_y*b.m[1][3]
+ a.m_z*b.m[2][3] + 1*b.m[3][3];
return
result;
}// End mul(..)
// mul(...)
// a - - -
// x y z w * b - - -
// c - - -
// d - - -
//
// tx = x*a + y*b + z*c + w*d
|
So where where we?...hmmm... Oh yeah - onto a better camera.
| UVN Camera Model: |
|
Translation matrix =
| 1 0 0 0 |
| 0 1 0 0 |
| 0 0 1 0 |
| -x -y -z 0 |
Rotation matrix =
| Ux Vx Nx 0 |
| Uy Vy Ny 0 |
| Uz Vz Nz 0 |
| 0 0 0 1 |
CameraMatrix = Translation*Rotation
|
Where U is the "right" vector, V the "up" vector and N the direction you are
looking.
If you think about it, we have a more realistic camera - as we now have a
look at point and a right and up vector. We can still use our previous
method, of and an angle and location to build or UVN matrix model.
| Building Camera UVN Matrix: |
|
static
public
Matrix4 BuildCameraMatrix( Vector3 rot,
Vector3 pos )
{
Matrix4 matCam =
new
Matrix4();
/* ROTATION MATRIX */
Vector3 vUp =
new
Vector3(0,1,0);
Vector3 vForward =
new
Vector3(0,0,1);
Vector3 vRight =
new
Vector3(1,0,0);
vForward = Vector3.rotatey( vForward, rot.m_y );
vRight = Vector3.rotatey( vRight, rot.m_y );
//vUp = Vector3.cross( vRight, vForward );
//vUp
= Vector3.normalize(vRight);
matCam.m[0][0]=vRight.m_x;
matCam.m[1][0]=vRight.m_y;
matCam.m[2][0]=vRight.m_z;
matCam.m[3][0]= 0;
matCam.m[0][1]=vUp.m_x;
matCam.m[1][1]=vUp.m_y;
matCam.m[2][1]=vUp.m_z;
matCam.m[3][1]= 0;
matCam.m[0][2]=vForward.m_x;
matCam.m[1][2]=vForward.m_y;
matCam.m[2][2]=vForward.m_z;
matCam.m[3][2]= 0;
matCam.m[0][3]=0;
matCam.m[1][3]=0;
matCam.m[2][3]=0;
matCam.m[3][3]= 1;
/* TRANSLATION MATRIX */
Matrix4 vPos =
new
Matrix4();
vPos = Matrix4.identity(vPos);
vPos.m[3][0] = -pos.m_x;
vPos.m[3][1] = -pos.m_y;
vPos.m[3][2] = -pos.m_z;
/* Combine Rot and Trans Matrix to create the Camera Matrix */
matCam = Matrix4.multiply( vPos,
matCam );
/*
| Ux Vx Nx |
| Uy Vy Ny |
| Uz Vz Nz |
Where
U is the "right" vector, V the "up" vector and N the
direction you are looking.
*/
return
matCam;
}// End BuildCameraMatrix(..)
// Camera Matrix
// | right.x up.x forward.x 0 |
// | right.y up.y forward.y 0 |
// | right.z up.z forward.z 0 | ; (rotation4x4)
// | 0 0 0 1 |
|
We can use this simple function, so pass our Eulers angles and our cameras
position, and it will build us our UVN camera matrix. I've excluded the
two lines that build the vUp value - as for our demo's we only seem to move
around the world in the x-z directions....so we can assume that our up vector of
(0,1,0) doesn't change. But if it did, we could use the cross product of
vForward and vRight.
So for each object we have this:
Mat = matRot * matTran * matCamTran * matCamRotation
We could also do a Perspective matrix and further combine our matrix's, but
I'm choosing to keep our perspective code separate at this time.
| Applet Demo -
Download Applet Source Code |
|
...etc....
Vector3 m_EyeAngle =
new
Vector3( 0, 0, 0 );
Vector3 m_EyePos =
new
Vector3( 0, 0, -10 );
Vector3 m_BoxPos =
new
Vector3( 0, 0, -1 );
public
void
update(Graphics g)
{
// Clear screen
offScreen.setColor(Color.white);
offScreen.fillRect(0,0,this.getSize().width,this.getSize().height);
Dimension appletSize =
this.getSize();
int
width =
appletSize.width;
int
height =
appletSize.height;
ResetAllCoords( m_tri,
m_NumTris );
Matrix4 matWorld =
new
Matrix4();
matWorld = Matrix4.translate( m_BoxPos.m_x, m_BoxPos.m_y, m_BoxPos.m_z
);
Matrix4 matCam = Camera.BuildCameraMatrix( m_EyeAngle,
m_EyePos );
// Combine all our matrices to
gether, into a single matrix...which we'll apply
// to all our vertices.
Matrix4 mat =
new
Matrix4();
mat = Matrix4.identity(mat);
mat = Matrix4.multiply(mat, matCam);
mat = Matrix4.multiply(mat, matWorld);
// Lets rotate all of the
triangles and translate them back into the horizon
for(int
i=0; i<m_NumTris; i++)
{
m_tri[i].transform( mat );
}
// Just for test purposes we do
a wire floor - we recalculate the UVN cam matrix
// again inside this function :) Not efficent, but it was easier this
way for
// debugging :)
RenderWireFloor(myImage, m_EyeAngle, m_EyePos);
CalculateNormals( m_tri, m_NumTris );
CullTriangles( m_tri, m_NumTris );
SortRenderOrder( m_tri, m_NumTris );
RenderAllTriangles( m_tri, m_NumTris );
// Flip our back buffer
g.drawImage(myImage,0,0,this);
}// End of update(..)
...etc.... |
The 3D applet code is sure coming along - we're starting to build up a quit a
little library of mini routines and principles here. But thats all it is
basically, small math stages, which allow us to take data and go to the 3rd
dimension :) You'll be rewarded in the end, when you get that doom level
applet running in your browser! Yup, your browser, isn't that cool eh?
And then if you extend these principles to DirectX and OpenGl you can really
push up the Frames Per Second (FPS) and number of poly's into the hundreds of
thousands or even millions :).
|