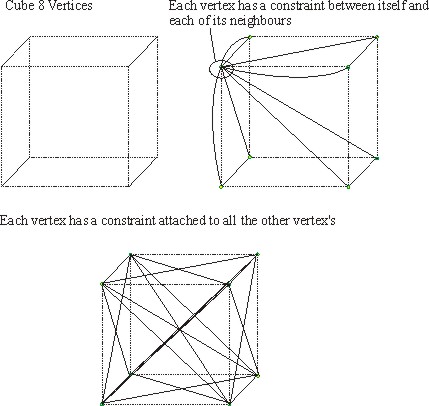
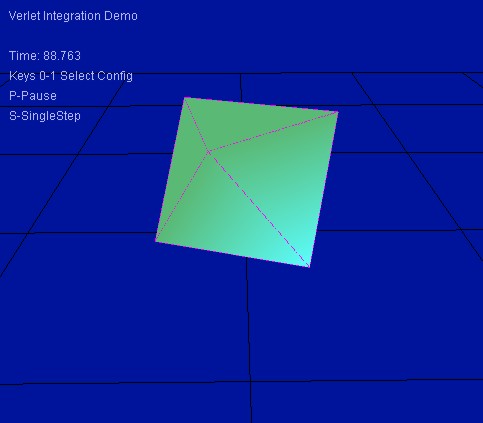
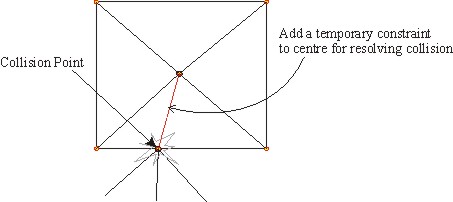
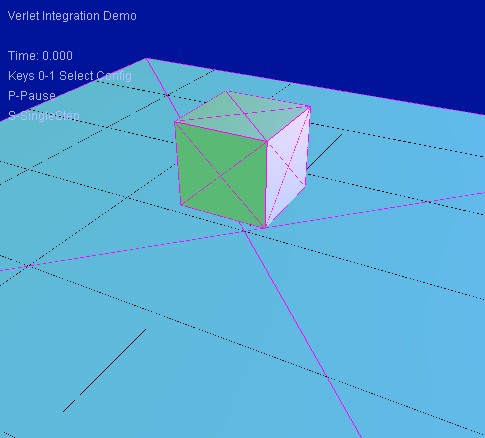
www.xbdev.net
xbdev - software development
Thursday April 18, 2024
home | contact | Support | Physics.... Squishy, Bouncy, Springy, Rigid, ...Bodies... | Verlet... Approximating forces....
>>


Verlet...

Approximating forces....


Verlet Integration

by Ben Kenwright


Basics

Euler isn't the only method for integration, and for different physics systems which deal with cloths or lots of spheres....then you'll find Verlet Integration amazing....its simple, its stable and best of all, its easy to understand.

But then again, it does depend on what you want to do with it....as I said, for constraints and for things like cloth/hair then its great...for complex convex rigid bodies...well its a lot more complicated....but you'll see why.


The equation for verlet integration is relatively easy to remember...and is really easy to use...also importantly its 'FAST' and 'STABLE'.. and it doesn't require us to use or update any velocities....instead we remember our previous position.  The integration step is as follows:


x' = 2.x - x* + a (dt.dt)

x* = x


Where x is our current position, x* is our previous position

You'll find that the majourity of times it used for particle or cloth simulations as it can be used to simulate large number of items with very little overhead...just the previous position.


Drag/Damping can be added by modifying the above equation slightly to:


x' = 1.99x - 0.99x* + a*.(dt.dt)


To introduce bounce in our collisions is a bit more difficult...as Verlet method is usually used for constraint situations, or situations where items are allowed to move under force... for simple bounce of particles we can say at the collision with the floor or wall we swap the previous and current position, inverting its direction...i.e.


temp = prevPos

prevPos = curPos;

curPos = temp


This demo program simple shows Verlet Integration - So its a single sphere interacting on the ground, and 100 smaller spheres which are randomly dropped...sort of like a particle system.


Download Source Code [19k]


An alternative method to creating bounce is


prevPos = 2*curPos - prevPos


Of course if your only interested in stopping the object from penetrating, or constraining it, then simply set the curPos to the position you want, and it will fix itself...for example if it penetrates the floor then when your collision detection detects its penetrated the floor, set it to the floor height and the Verlet Integration will correct itself.


Cloths!


Linking together an array of points allows us to build up a cloth demo very easily...and extra code can be added in as well so that the cloth doesn't penetrate the floor.


Download Source Code [21k]


Code Snippet for cloth simulation

// Some defines to determine how our cloth will look

static int  g_width          = 30;

static int  g_height         = 30;

static float g_gap                  = 0.5f;

static float g_disOffFloor  = 15.0f;


// Some helper containers

struct Constraint

{

      int         index0;

      int         index1;

      float restLength;

};


struct Points

{

      D3DXVECTOR3 curPos;

      D3DXVECTOR3 oldPos;

};


// The actual cloth class

class Cloth

{

public:


      int               m_numPoints;

      Points*           m_points;

      int               m_numConstraints;

      Constraint*  m_constraints;


      Cloth()

      {

            float gap = g_gap;

            int w   = g_width;

            int h   = g_height;

            m_numPoints = w * h;

            m_points = new Points[m_numPoints];


            // Put points together

            for (int x=0; x<w; x++)

            {

                  for (int y=0; y<h; y++)

                  {

                     m_points[x + y*h].curPos = D3DXVECTOR3(x*gap, g_disOffFloor, y*gap);

                     m_points[x + y*h].oldPos = D3DXVECTOR3(x*gap, g_disOffFloor, y*gap);

                  }

            }


            // Build linking constraints

            m_numConstraints = (w)*(h)*2 - w - h;

            m_constraints = new Constraint[m_numConstraints];

            int i = 0;

            for (int y=0; y<h; y++)

            {

                  for (int x=0; x<w; x++)

                  {

                        if ((x+1) < w)

                        {

                              m_constraints[i].index0 = x   + y*w;

                              m_constraints[i].index1 = x+1 + y*w;

                              m_constraints[i].restLength =

                                                                   D3DXVec3Length(&(m_points[x].curPos - m_points[x+1].curPos));

                              i++;

                        }


                        if ((y+1) < h)

                        {

                              m_constraints[i].index0 = x   + y*w;

                              m_constraints[i].index1 = x+w + y*w;

                              m_constraints[i].restLength =

                                  D3DXVec3Length(&(m_points[x].curPos - m_points[x+w].curPos));

                              i++;

                        }


                        if (i>m_numConstraints) DBG_HALT;

                  }

            }


            if (i!=m_numConstraints) DBG_HALT;


      }


      ~Cloth()

      {

            delete[] m_points;

            delete[] m_constraints;

      }


      void VerletIntegrate(float dt)

      {

            for (int i=0; i<m_numPoints; i++)

            {

                  D3DXVECTOR3 oldPos = m_points[i].oldPos;

                  D3DXVECTOR3 curPos = m_points[i].curPos;

                  D3DXVECTOR3 a = D3DXVECTOR3(0,-9.8f,0);


                  curPos = 2*curPos - oldPos + a*dt*dt;


                  m_points[i].oldPos = m_points[i].curPos;

                  m_points[i].curPos = curPos;

            }

      }


      void SatisfyConstraints()

      {

            const int numIterations = 10;


            for (int i=0; i<numIterations; i++)

            {

                  for (int k=0; k< m_numConstraints; k++)

                  {

                        // Constraint 1 (Floor)

                        if (g_floorCollisions)

                              for (int v=0; v<m_numPoints; v++)

                              {

                                if (m_points[v].curPos.y < 0.0f) m_points[v].curPos.y = 0.0f;

                              }


                        // Constraint 2 (Cloth)

                        Constraint* c = &m_constraints[k];

                        D3DXVECTOR3& p0 = m_points[c->index0].curPos;

                        D3DXVECTOR3& p1 = m_points[c->index1].curPos;

                        D3DXVECTOR3 delta = p1-p0;

                        float len = D3DXVec3Length(&delta);

                        float diff = (len - c->restLength) / len;

                        p0 += delta*0.5f*diff;

                        p1 -= delta*0.5f*diff;

                  }


                  // Keep these two points contraints to there original position

                  float gap = g_gap;

                  m_points[0].curPos          = D3DXVECTOR3(0,                g_disOffFloor, 0);

                  m_points[g_width-1].curPos  = D3DXVECTOR3((g_width-1)*gap,  g_disOffFloor, 0);

            }

      }


      void Update(float dt)

      {

            VerletIntegrate(dt);

            SatisfyConstraints();

      }


      void Render(IDirect3DDevice9* pDevice)

      {

            if (0) // If we want to draw little spheres for our points

            for (int i=0; i<m_numPoints; i++)

            {

                  // Just for debug, draw a sphere

                  static debugsphere ball(pDevice);

                  ball.Draw(pDevice,

                                m_points[i].curPos.x,

                                m_points[i].curPos.y,

                                m_points[i].curPos.z,

                                0.2f);

            }


            // Draw a wire mesh for our constraints

            for (int i=0; i<m_numConstraints; i++)

            {

                  Constraint* c = &m_constraints[i];

                  DrawLine3D( pDevice,

                                    m_points[c->index0].curPos,

                                    m_points[c->index1].curPos,

                                    0xffff00ff);

            }

      }


};


Creativity!...Hair


Using the Verlet constraints you can build tons of cool things....one idea is to link lots of single points together to form strands...I put lots of them together on a model head and did a collision detection with a sphere for the models head...its simple and easy to do....then let gravity do the rest.  To further make things look more outstanding, I mixed in the cloth effect, so I threw the cloth over the models head and let it drop....looked pretty good.

To take to to the next extreme would be to add textures to the hair/cloth so the models head looks that good.


Demo of hair...strands.


Its only a simple demo, and the model is just a raw dump of a 3d models head so it could give you some amazing ideas.  You could apply this principle to a pony tail on the back of the head or tree's swaying in the wind...you set up the basic constraints and then apply some random forces and gravity :)


Download Source Code [49k]


Squishy Objects!


Well now we can't resist taking a few cubes, or other shapes and linking them together so that they hold there shape!...These objects can represent rigid body's and you set up some basic information using the shapes orientation and position to get the rigid body information from.


Taking a simple shape such as a cube, we can construct a set of constraints to maintain the shapes, shape....i.e. so it continues to look like a cube.  Ignoring repeating constraints it means our cube will have 8 x 7 = 56 constraints....as we have 8 Vertices....and we can't link a constraint to itself, so instead of 8x8, we get 8x7 which is 56.  Of course a lot of the constraints are duplicated, so with a few extra checks we can get it down to 24...assuming we only have a link once between two vertices.


The below demo only uses simple shapes so I just link between all the vertices and keeps the code very simple.


Just because I'm lazy and didn't want to check for duplicate constraints, I simply looped around all the vertices and linked a constraint to all the other vertices....so some constraints are duplicated making the objects very rigid, but you see how its done.  For things like Cube's and Pyramids its not to bad...but for more complex shapes you can see the number of constraints is a bit much.


Download Source Code [22k]


Rigid Bodyies (Using Verlet)

Using the principle of Verlet Integration and Constraints, its possible to make a rigid body system.  The principle is pretty hacky I think, but it works okay, and with a bit of work and produce some really amazing effects.  The idea behind creating a rigid body system using Verlet Points, is to construct a Rigid Body as above connecting all the vertices, together to form a solid shape.  Usually this shape is simplified with a cube or some other convex shape.  Then we simply do collision detection with the shape, and we add/remove constraints to the shape to represent the collisions.  To determine the shapes position and orientation, we use the vertices them selves to determine the actual shapes position and orientation.  For example, if we have a cube, the centre of the cube would be calculated by taking an average of all 8 vertices.   Also to work out the rotation matrix, we'd use certain reference vertices.....the 4 front and 4 back face vertices can be used to work out the Z direction....the 4 top and 4 bottom vertices can work out the Y up direction....and then Cross product the Z and Y to get the X direction...using this we'd build up the rotation matrix:


                                    [  dirX.x,   dirY.x,  dir.Z.x. ]

RotationMatrix3x3  =   [  dirX.y,   dirY.y,  dir.Z.y  ]

                                    [  dirX.z,   dirY.z,  dir.Z.z  ]


Using the position and rotation matrix we can then Render the shape, or use it for some collision detection scheme.


To solve the collision problem with the sides of the cube, we add temporary collision constraints to the object at the point where the collision is, then update the Verlet integration and remove it.  So we can do more than just vertex collisions...we can do edge-edge.


This method does have problems which I found out through trial and error, as it can lead to the object sliding a lot due to the fact that if only one side of the object is hitting the floor or another object, then the added constraint to the centre can push the object to the right, and then on the next frame push it again and again...leading to it slide across the floor.


To fix this you would only add an extra vertex if its a edge-edge, else you'd actually modify the original corner vertices.  Because in principle for rigid bodies, you only really need to do, edge-edge and vertex-face for it to work.


Seeing in believing, so  I quickly did a demo to test out the theory....sometimes what you think and what you actually write are pretty different......just a few cubes together...even the floor is an actual cube :)


Basic Cube Verlet Rigid Body Demo - To show a very simple example, I modified the above examples with some cube collision detection to try and show how you'd go about creating a Verlet Integration system for Rigid bodies.


Download Source Code [29k]


Some further ideas I thought about while writing this, was to subdivide the rigid body cubes into 4 sphere checks for the edges and a large sphere for the body, which would deal with a lot of the rigid body cases, and allow you to stack cubes, and make them roll about and things in a stable manner....not 100% perfect, but it would give excellent results.


Please email me any comments or feedback, as I'm always open to doing further improvements and any ideas.   As this tutorial was pretty rushed hopfully there wern't to many mistakes and hopefully give you some insight to the fun and simplicity of Verlet Integration with Constraints.


Fun things to maybe try:

o - GPU Verlet Integration

o - Do some Tree's and Grass effect (swaying in the wind)

o - Ragdoll Limbs

o - Bridge Effect

o - Waterfall (mix of particles, wobbly surface etc)


Advert (Support Website)

 
 Visitor:
Copyright (c) 2002-2024 xbdev.net - All rights reserved.
Designated articles, tutorials and software are the property of their respective owners.