www.xbdev.net
xbdev - software development
Wednesday February 5, 2025
Home | Contact | Support | glTF File Format The JPG of 3D Formats ...


glTF File Format Tutorials

Unlocking the power ...


Textures, Images and Materials


The glTF file format has materials, textures and images. The mesh has an index into a material, the material has as index into a texture - and the texture has an index into an image. The image has the url or offset in the binary file for the image data.

Below shows a simple example of the gltf file contents.

{
  
"meshes": [
    {
      
"primitives": [
        {
          
"attributes": { "POSITION"},
          
"material"}
      ]
    }
  ],
  
"materials": [
    {
      
"pbrMetallicRoughness": {
        
"baseColorTexture": { "index"}
      }
    }
  ],
  
"textures": [ { "source"}
  ],
  
"images": [ { "uri""image.png" }
  ]
}


Looking at the Toyko Model


As an example, let's load and go through loading and viewing the textures/materials for the toyko model.


Output for the gltf tokyo model loaded and the image/texture images dumped - and related information meshes/hierarchy and a pre...
Output for the gltf tokyo model loaded and the image/texture images dumped - and related information meshes/hierarchy and a preview of the render.


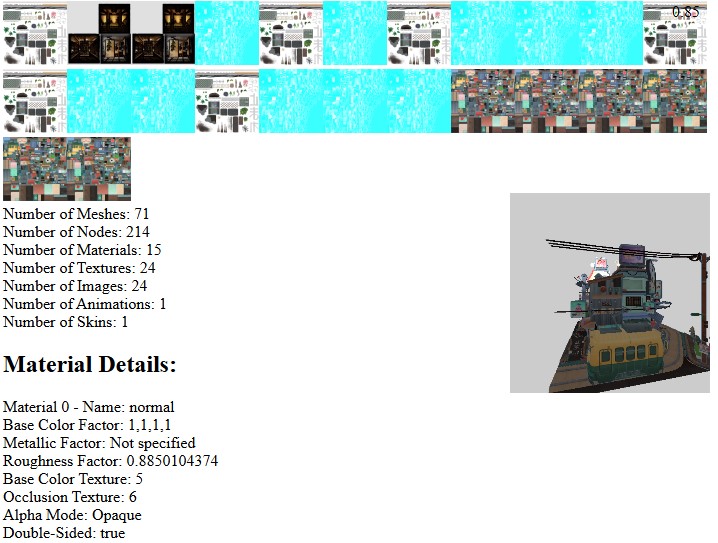
The Tokyo model is a complex model with lots of materials and meshes so makes a good test case, below gives a dump of some of the elements within the file:

Material Details:
Material 0 Namenormal
      Base Color Factor
1,1,1,1
      Metallic Factor
Not specified
      Roughness Factor
0.8850104374
      Base Color Texture
5
      Occlusion Texture
6
      Alpha Mode
Opaque
      Double
-Sidedtrue
Material 1 
Namemetalmat
      Base Color Factor
1,1,1,1
      Metallic Factor
1
      Roughness Factor
0.65
      Base Color Texture
13
      Occlusion Texture
12
      Alpha Mode
Opaque
      Double
-Sidedtrue
Material 2 
NamePlastic_Soft
      Base Color Factor
1,1,1,1
      Metallic Factor
Not specified
      Roughness Factor
0.65
      Base Color Texture
15
      Occlusion Texture
14
      Alpha Mode
Opaque
      Double
-Sidedtrue
...
      
      
Texture Details:
Texture 0 Source Index0Sampler: Default
Texture 1 Source Index1Sampler: Default
Texture 2 Source Index2Sampler: Default
Texture 3 Source Index3Sampler: Default
Texture 4 Source Index4Sampler: Default
Texture 5 Source Index5Sampler: Default
Texture 6 Source Index6Sampler: Default
Texture 7 Source Index7Sampler: Default
Texture 8 Source Index8Sampler: Default
Texture 9 Source Index9Sampler: Default
Texture 10 Source Index10Sampler: Default
Texture 11 Source Index11Sampler: Default
Texture 12 Source Index12Sampler: Default
Texture 13 Source Index13Sampler: Default
Texture 14 Source Index14Sampler: Default
Texture 15 Source Index15Sampler: Default
Texture 16 Source Index16Sampler: Default
Texture 17 Source Index17Sampler: Default
Texture 18 Source Index18Sampler: Default
Texture 19 Source Index19Sampler: Default
Texture 20 Source Index20Sampler: Default
Texture 21 Source Index21Sampler: Default
Texture 22 Source Index22Sampler: Default
Texture 23 Source Index23Sampler: Default


Image Details:
Image 0 URItextures/alpha_baseColor.pngMimeTypeUnknown
Image 1 
URItextures/alpha_metallicRoughness.pngMimeTypeUnknown
Image 2 
URItextures/interiors_baseColor.jpgMimeTypeUnknown
Image 3 
URItextures/interiors_emissive.jpgMimeTypeUnknown
Image 4 
URItextures/Material_5511_baseColor.jpgMimeTypeUnknown
Image 5 
URItextures/normal_baseColor.jpgMimeTypeUnknown
Image 6 
URItextures/normal_metallicRoughness.pngMimeTypeUnknown
Image 7 
URItextures/glassmat_metallicRoughness.pngMimeTypeUnknown
Image 8 
URItextures/glassmat_baseColor.jpgMimeTypeUnknown
Image 9 
URItextures/alpha_0_baseColor.pngMimeTypeUnknown
Image 10 
URItextures/alpha_glass_baseColor.pngMimeTypeUnknown
Image 11 
URItextures/alpha_glass_metallicRoughness.pngMimeTypeUnknown
Image 12 
URItextures/metalmat_metallicRoughness.pngMimeTypeUnknown
Image 13 
URItextures/metalmat_baseColor.jpgMimeTypeUnknown
Image 14 
URItextures/Plastic_Soft_metallicRoughness.pngMimeTypeUnknown
Image 15 
URItextures/Plastic_Soft_baseColor.jpgMimeTypeUnknown
Image 16 
URItextures/Material_5516_baseColor.pngMimeTypeUnknown
Image 17 
URItextures/Material_5516_metallicRoughness.pngMimeTypeUnknown
Image 18 
URItextures/paintmat_metallicRoughness.pngMimeTypeUnknown
Image 19 
URItextures/paintmat_baseColor.jpgMimeTypeUnknown
Image 20 
URItextures/Material_5512_baseColor.pngMimeTypeUnknown
Image 21 
URItextures/Material_5512_metallicRoughness.pngMimeTypeUnknown
Image 22 
URItextures/glass_transp_metallicRoughness.pngMimeTypeUnknown
Image 23 
URItextures/Material_5518_baseColor.pngMimeTypeUnknown

Mesh Details
:
Mesh 0 NameObject224_normal_0
        Primitive 0
:
                
PrimitiveMode4
                Number of Vertices
309
                Number of Indices
429
                Material
normal
                Material Index
0
Mesh 1 
NameObject224_metalmat_0
        Primitive 0
:
                
PrimitiveMode4
                Number of Vertices
87
                Number of Indices
117
                Material
metalmat
                Material Index
1
Mesh 2 
NameObject688_normal_0
        Primitive 0
:
                
PrimitiveMode4
                Number of Vertices
342
                Number of Indices
288
                Material
normal
                Material Index
0
Mesh 3 
NameObject687_normal_0
        Primitive 0
:
                
PrimitiveMode4
                Number of Vertices
342
                Number of Indices
288
                Material
normal
                Material Index
0
...


After all the data has been loaded in the gltfLoader (parsed everything) - there is a list of images (
parsedData.images
). We then add an extra function called
loadImages(..)
which loads all of the images.

The
loadImages(..)
handles both binary and ascii version of the file - so if the data is ascii the images are either inlined using base64 or are links to external images (usually in the same path at the gltf file). While the binary versions (in the glb file) have the images within the file - so we use the binary data and the offset to extract the images.

The images are loaded and decoded and stored in the
parsedData
structure so they can be used later.

// Utility function to load images
async loadImages(parsedDatagltfPath) {
    if (!
parsedData.images) return;

    const 
imagePromises parsedData.images.map(async (imageindex) => {
      
          
// console.log('image:', image, 'index:', index );
        
        
if (image.bufferView !== undefined) {
            
// Handle embedded images in GLB
            
const bufferView parsedData.bufferViews[image.bufferView];
            const 
buffer parsedData.buffers[bufferView.buffer];
            const 
byteOffset bufferView.byteOffset || 0;
            const 
byteLength bufferView.byteLength;

            
// Check if buffer.data is correctly populated
              
console.assert(buffer.data'data is not populated correctly');
         
            const 
imageData = new Uint8Array(buffer.databyteOffsetbyteLength);      
            const 
blob = new Blob([imageData], { typeimage.mimeType });
              
              const 
img = new Image();
              
img.src URL.createObjectURL(blob);
            
await img.decode();
            
              
parsedData.images[index].imageObject img;
          
              
// debug show the image (thumb) - check it's decoded correctly
            
document.body.appendChildimg );
            
img.style.width '64px';                
        }
        else
        {
              
// Fetch can be used for both the inline and external file - 
            // just got to fix up the url so it's correct
              
let imageUri image.uri;
            
console.log('imageUri:'imageUri );
            if ( 
gltfPath && !imageUri.startsWith('data:') && !imageUri.startsWith('http')) {
                
imageUri gltfPath image.uri;
                
            }
            const 
imageResponse await fetch(imageUri);
            const 
imageBlob await imageResponse.blob();
          
            const 
img = new Image();
            
img.src URL.createObjectURL(imageBlob);
              try {
            
await img.decode();
            }
              catch ( 
error )
            {
                  
                  
console.log('either cannot load image or it cannot be decoded:'image.uri );
                  
console.log('cannot decode image..'image.uri);
            }
            
parsedData.images[index].imageObject img;

            
// debug show the image as small thumb for debugging
            
document.body.appendChildimg );
            
img.style.width '64px'
        }
    });

    
await Promise.all(imagePromises); // Wait for all images to be loaded
}


Loading the Images into the GPU


Once we have the data ready we can setup or renderer to use it. The WebGPU shader lets use create an Array of Textures so we can pass all the textures through to the shader and access them using an index.

This is relatively straightforward as shown below - the only aspect to be careful about - if you use an array of textures - all your textures have to be the same size! You also have to make sure that your images are the correct size - otherwise, when you map your textures onto the mesh you'll end up with the textures not looking correct.


You can see an example of incorrect image scaling - on the left is if we do not
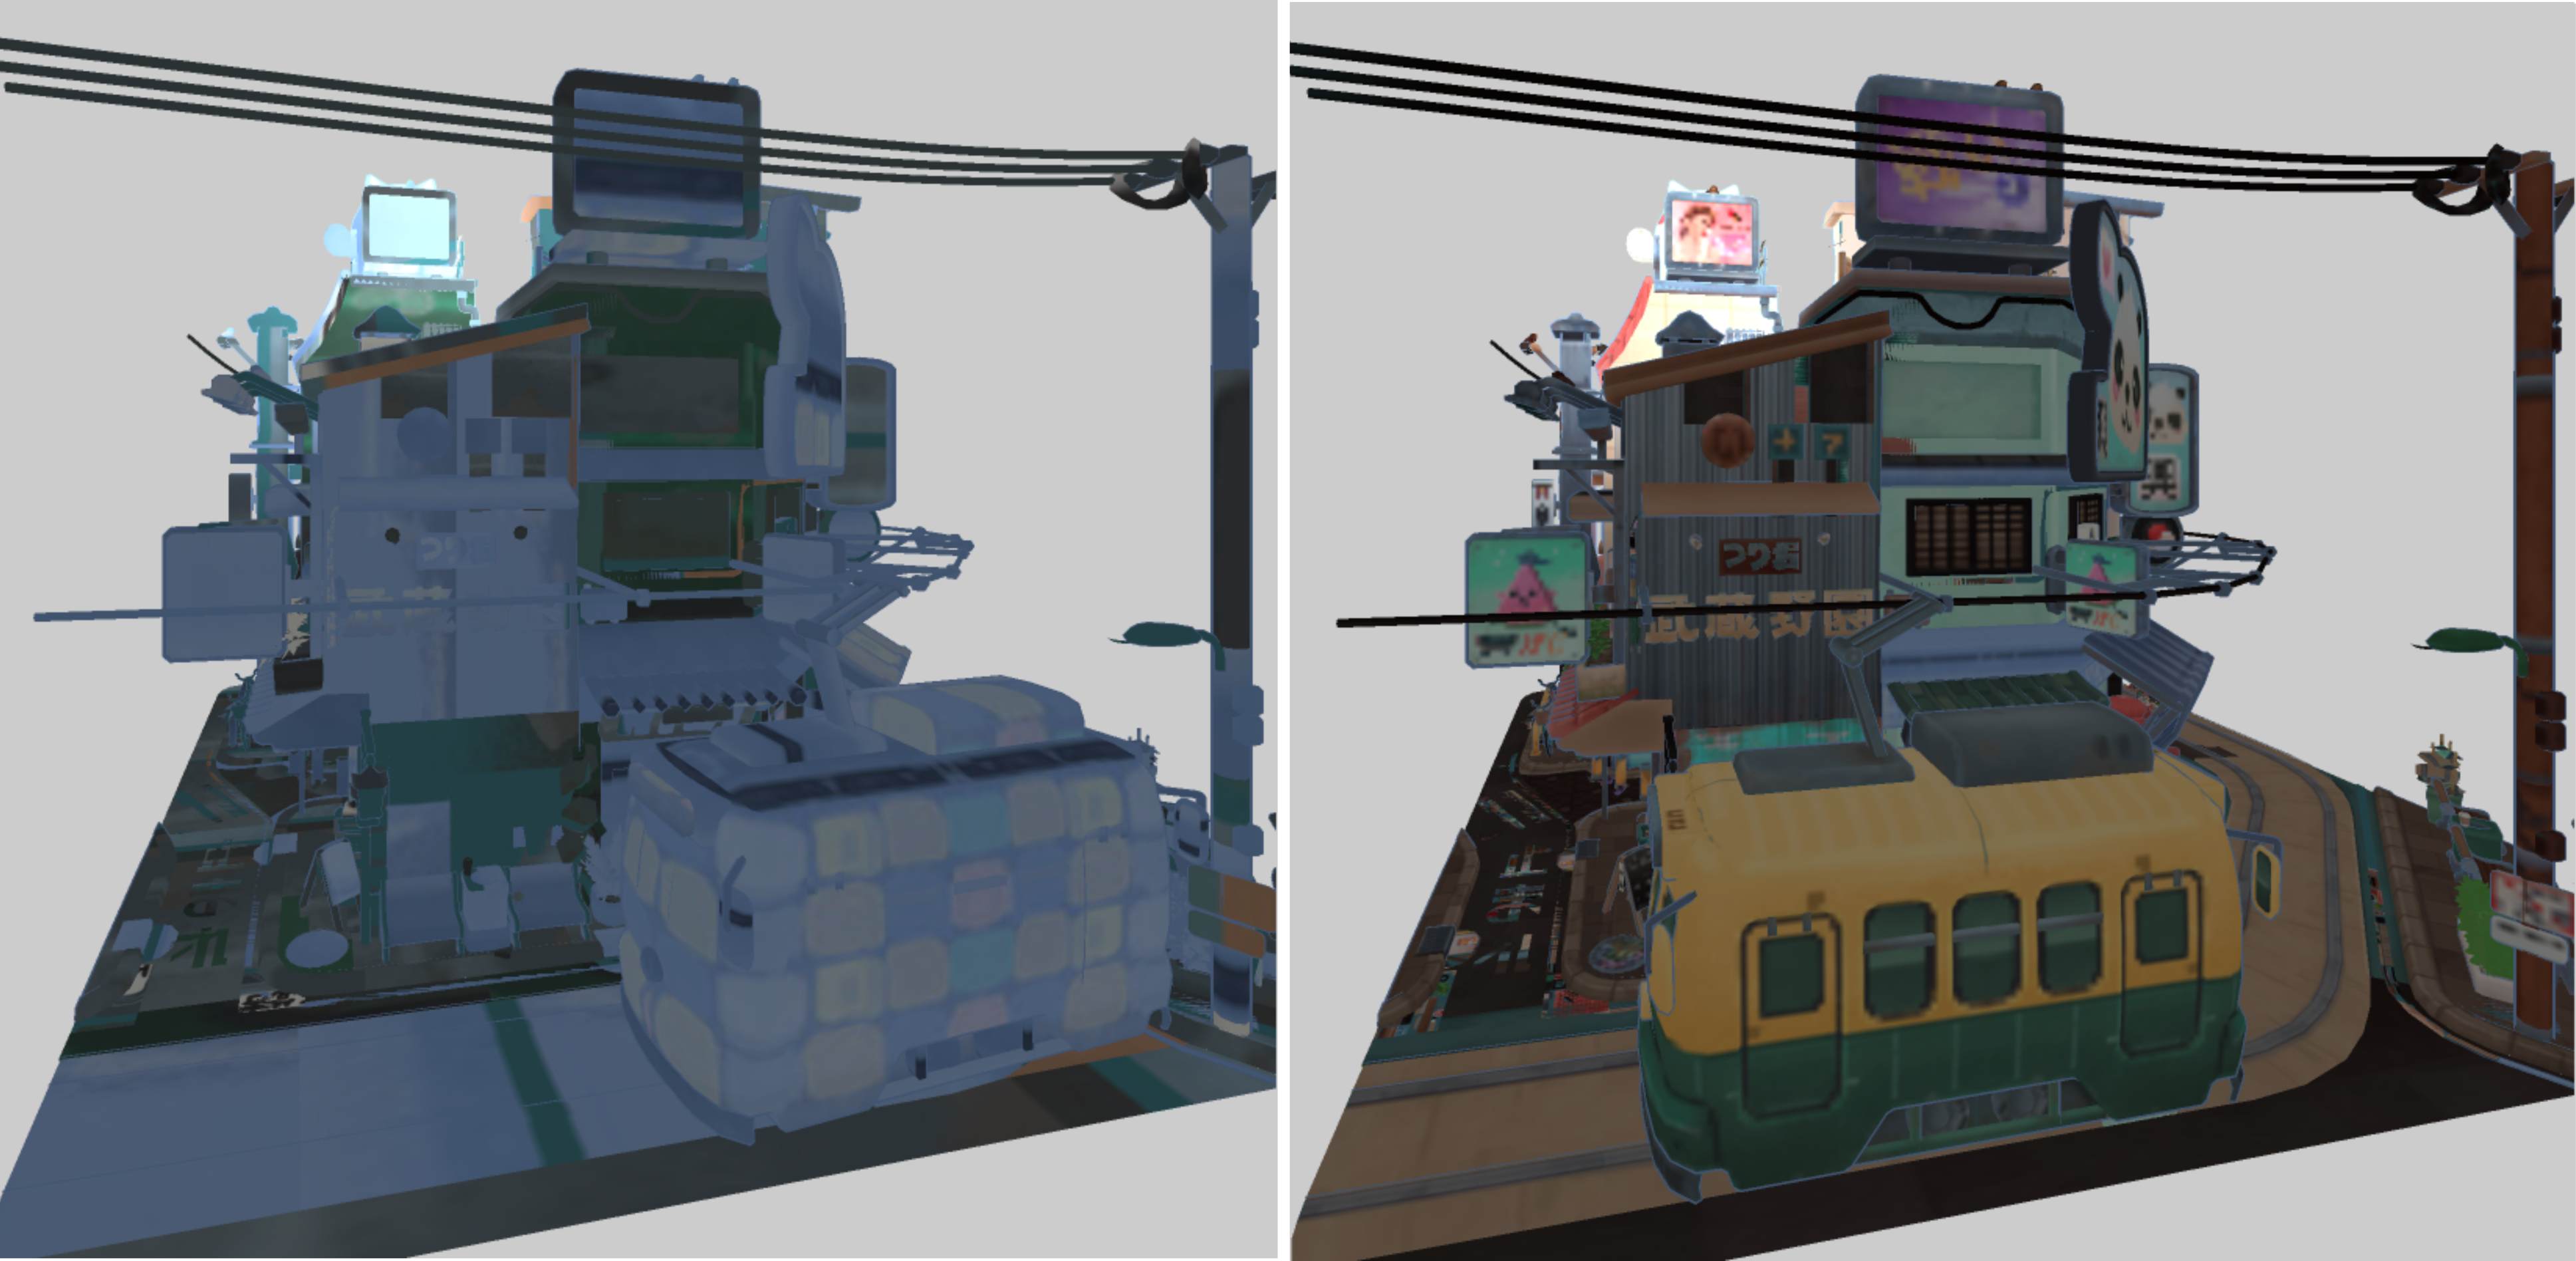
You can see an example of incorrect image scaling - on the left is if we do not 'resizeImage(..)' to the same size as the image array size - while the image on the right uses the corrected image size for the array.


    // Helper function for resizing the images
    
const resizeImage async (originalImagenewWidthnewHeight) => {
        
// Create a canvas element
        
const canvas document.createElement('canvas');
        
canvas.width newWidth;
        
canvas.height newHeight;

        
// Get the 2D drawing context
        
const ctx canvas.getContext('2d');

        
// Draw the original image onto the canvas with new dimensions
        
ctx.drawImage(originalImage00newWidthnewHeight);

        
// Create a new Image object
        
const resizedImage = new Image();

        
// Set the source of the new Image to the data URL of the canvas
        
resizedImage.src canvas.toDataURL();
          
await resizedImage.decode();

        return 
resizedImage;
    }

    
// create the texture of ararys which we pass to the shader through the bind group
    
let layerCount    parsedData.images parsedData.images.length 1
    const 
textureWidth  512;
    const 
textureHeight 512;
      const 
textureArray device.createTexture({
            
size: [textureWidthtextureHeightlayerCount],
            
format'rgba8unorm',
            
usageGPUTextureUsage.TEXTURE_BINDING GPUTextureUsage.COPY_DST GPUTextureUsage.RENDER_ATTACHMENT,
    });


// process the images and copy them across to the texture array (if we have images)
      
if ( parsedData.images )
    {
          
layerCount parsedData.images;
        for (
let i=0i<parsedData.images.lengthi++)
        {
            
let img  parsedData.images[i].imageObject;
              
let img2 await resizeImageimg512512 );

            const 
imageBitmap await createImageBitmap(img2);
            const 
bitmapWidth  imageBitmap.width;
            const 
bitmapHeight imageBitmap.height;
            
console.assertbitmapWidth==textureWidth && bitmapHeight==textureHeight );
          
            
device.queue.copyExternalImageToTexture(
                { 
sourceimageBitmap },
                { 
texturetextureArrayorigin: { x0y0z} },
                { 
widthtextureWidthheighttextureHeightdepthOrArrayLayers}
            );
        }
    }
  
    
// Create sampler - used for sampling the texture in the fragment shader
    
const sampler device.createSampler({ magFilter'linear'minFilter'linear' });


Managing Materials, Textures and Images


Once all the data is parsed and ready - you can create a material buffer on the GPU which can store all the material data. Each mesh has a material index - so you can lookup the correct material in the fragment shader as needed.

For the example below, we define a maximum nunber of materials and create an uniform array - for testing the materials are just an array of vec4s - but this can be extended as needed for more information to be passed to the shader.

The material index is stored in the w component of the vertex - as by default each vertex is a vec3 - but we use vec4s and store the material index in the last component. Pass this value through to the fragment shader so we can lookup the material in the array of uniform materials.

        struct Materials {
              
data      : array< vec4<u32>, 100 // maxMaterials
        
};
        @
group(0) @binding(4) var<uniformmaterials Materials;
        
        @
group(0) @binding(2) var textureArraytexture_2d_array<f32>;
        @
group(0) @binding(3) var textureSamplersampler;
        
        @
fragment
        
fn fmain(@location(0vnormal  :vec3<f32>,
                 @
location(1vposition:vec3<f32>,
                 @
location(2vcolor   :vec3<f32>,
                 @
location(3vcoords  :vec2<f32>,
                 @
interpolate(flat )@location(4)vmid     :u32,
                 ) -> @
location(0vec4<f32> {

            
let matId:u32 vmid;
            
let texId:u32 materials.datamatId ].y;
            
            var 
texColor      textureSample(textureArraytextureSamplervcoordstexId);
            ...


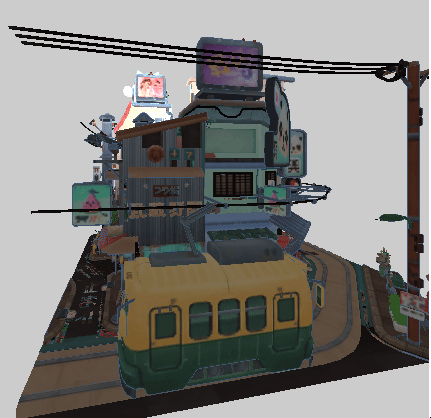
The Tokyo scene with basic decal shading is shown below (including the animation). Padding more material information to the shader you can add further lighting calculations to increase the realism of the scene.


An output with the animation for the Tokyo scene.


Things to Try


• Add in additional materials (pass them to the fragment shader and implement the calculation)
• Accesss additional texture data (e.g., specular and normals)
• Modify the camera so you can fly around the Tokyo scene
• Put the camera in the front of the tram car and update it so it moves with the tram (feels like you're inside at the front of the tram car)
• Add a skymap (cubemap) so you can add atmospheric feeling (sun/sky moving/reflections)
• Add in some shadows (simple shadow map)


Resources and Links


• Tokyo Model Dumped with Textures/Materials (LINK)


Ray-Tracing with WebGPU kenwright WebGPU Development Cookbook - coding recipes for all your webgpu needs! WebGPU by Example: Fractals, Image Effects, Ray-Tracing, Procedural Geometry, 2D/3D, Particles, Simulations WebGPU Games WGSL 2d 3d interactive web-based fun learning WebGPU Compute WebGPU API - Owners WebGPU & WGSL Essentials: A Hands-On Approach to Interactive Graphics, Games, 2D Interfaces, 3D Meshes, Animation, Security and Production Kenwright graphics and animations using the webgpu api 12 week course kenwright learn webgpu api kenwright programming compute and graphics applications with html5 and webgpu api kenwright real-time 3d graphics with webgpu kenwright webgpu for dummies kenwright webgpu api develompent a quick start guide kenwright webgpu by example 2022 kenwright webgpu gems kenwright webgpu interactive compute and graphics visualization cookbook kenwright wgsl webgpu shading language cookbook kenwright WebGPU Shader Language Development: Vertex, Fragment, Compute Shaders for Programmers Kenwright wgsl webgpugems shading language cookbook kenwright WGSL Fundamentals book kenwright WebGPU Data Visualization Cookbook kenwright Special Effects Programming with WebGPU kenwright WebGPU Programming Guide: Interactive Graphics and Compute Programming with WebGPU & WGSL kenwright


Advert (Support Website)

 
 Visitor:
Copyright (c) 2002-2025 xbdev.net - All rights reserved.
Designated articles, tutorials and software are the property of their respective owners.