This article will go through the steps of constructing an infinite square tunnel with a minecraft-like feel (pixelated colors). We'll go through multiple simplified code samples to show what each part does - with screenshots.
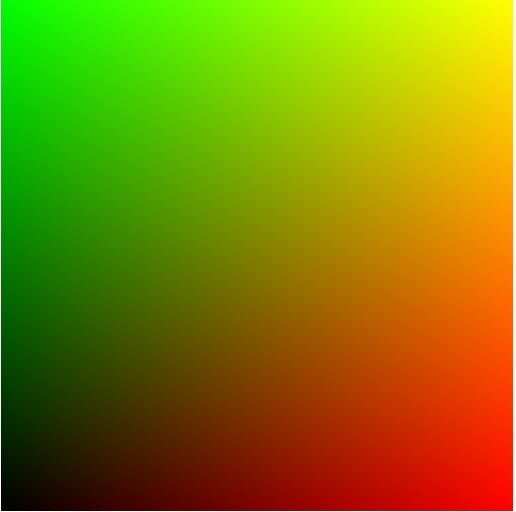
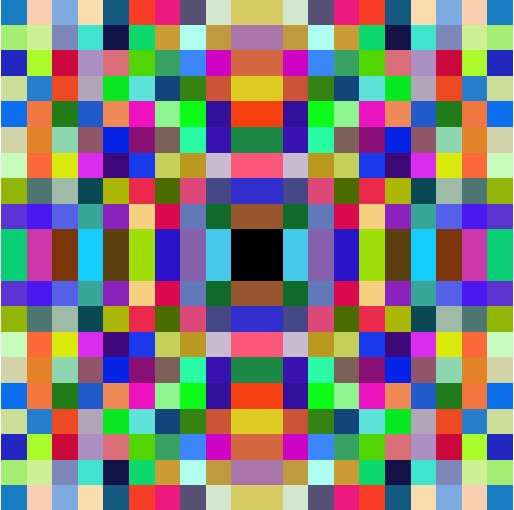
Color gradient using selected colors instead of just randomness.
fn gradient_color(value: f32) -> vec3<f32> {
    // Clamp the input value to the range [0.0, 1.0]
    let t = clamp(value, 0.0, 1.0);

    // Define gradient colors
    let colors = array<vec3<f32>, 5>(
        vec3<f32>(1.0, 1.0, 1.0),      // White
        vec3<f32>(0.75, 0.75, 0.75),  // Gray
        vec3<f32>(0.87, 0.72, 0.53),  // Light Brown
        vec3<f32>(0.65, 0.45, 0.25),  // Brown
        vec3<f32>(0.45, 0.27, 0.07)   // Dark Brown
    );

    // Determine segment and local interpolation factor
    let segment = t * 4.0; // Map t to range [0, 4]
    let index = floor(segment); // Segment index
    let local_t = fract(segment); // Local interpolation factor

    // Interpolate between two consecutive colors
    return mix(colors[i32(index)], colors[i32(index + 1)], local_t);
}


@fragment
fn main(@location(0) input_coords: vec2<f32>) -> @location(0) vec4<f32> {

    var normalized_coords = (2.0 * (input_coords) - 1.0); // -1.0 to 1.0

    var abs_coords = abs( normalized_coords  ); // 1->0->1

    var quantized_coords = floor( 10.0 * abs_coords );

    var rv = random2( quantized_coords );

    var rgb = gradient_color( rv );

    return vec4<f32>( rgb, 1.0 );
}
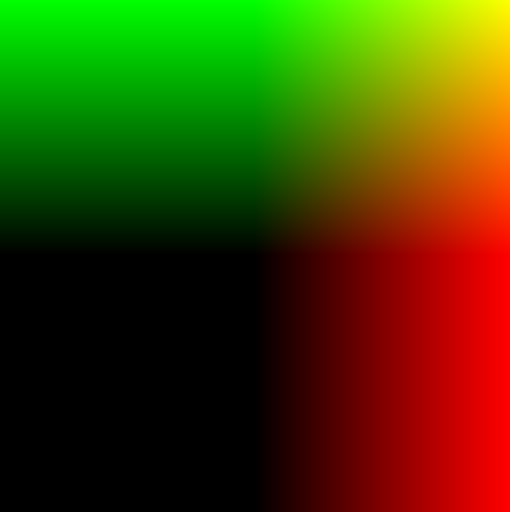
Other gradient colors - repeating values to emphasis particular colors.
Mix in a bit of green with more white and gray.
const numGradients:i32 = 8;
fn gradient_color(value: f32) -> vec3<f32> {
    // Clamp the input value to the range [0.0, 1.0]
    let t = clamp(value, 0.0, 1.0);

    // Define gradient colors
    let colors = array<vec3<f32>, numGradients>(
        vec3<f32>(1.0, 1.0, 1.0),      // White
        vec3<f32>(1.0),
        vec3<f32>(0.75, 0.75, 0.75),
        vec3<f32>(0.75, 0.75, 0.75),  // Gray
        vec3<f32>(0.75, 0.75, 0.75),  // Gray
        vec3<f32>(0.37, 0.52, 0.33),
        vec3<f32>(0.65, 0.45, 0.25),  // Brown
        vec3<f32>(0.45, 0.27, 0.07)   // Dark Brown
    );

    // Determine segment and local interpolation factor
    let segment = t * ( f32(numGradients) - 1.0 ); // Map t to range [0, numGradients]
    let index = floor(segment); // Segment index
    let local_t = fract(segment); // Local interpolation factor

    // Interpolate between two consecutive colors
    return mix(colors[i32(index)], colors[i32(index + 1)], local_t);
}
Towards Infinity
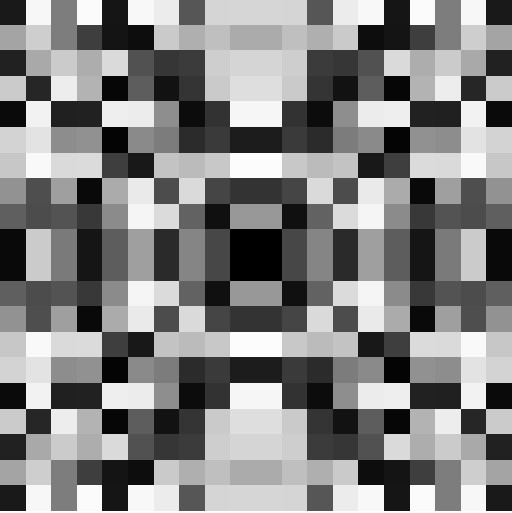
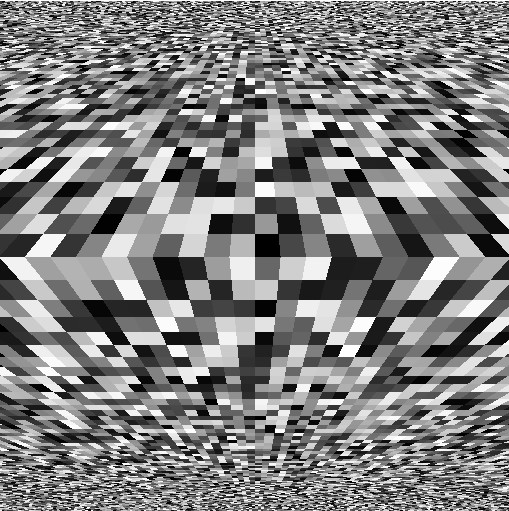
Simple example of taking a screen full of squares
floor(..)
function and the uv coordinates - then the vertical texture coordinate that goes from 0 to 1 - which is used for the
depth
(divide it by the distance so as it goes further away it gets smaller).
We need to make sur ew use the normalized coordinates with the origin in the middle of the screen so that is the far distance point.
Shows a grid of squares so they're scaled using the vertical value - as the value increases they get smaller (distance).
@fragment
fn main(@location(0) input_coords: vec2<f32>) -> @location(0) vec4<f32> {
    // Scale the input coordinates
    var pixel_coords = input_coords * 512.0;

    var vertical = input_coords.y; // 0 to 1

    // map the 0->1 to lo->hi value
    let lo = 1.0;
    let hi = 0.1;
    var block_size = lo + (hi - lo) * (vertical);

    // Calculate normalized coordinates -1 to 1 - we want to divide by the
    // normalize (0 in the middle) - so when we divide the value it goes towards
    // the middle and not the left (if 0,0 is on the left side).
    // Useful to know if you want to move the target point!
    var normalized_coords = (2.0 * pixel_coords - resolution.xy) / resolution.y;

    var quantized_coords = floor( 10.0 * normalized_coords / block_size );

    // Generate a random color based on the quantized coordinates
    var rr = random2(quantized_coords);

    return vec4<f32>( vec3(rr), 1.0);
}
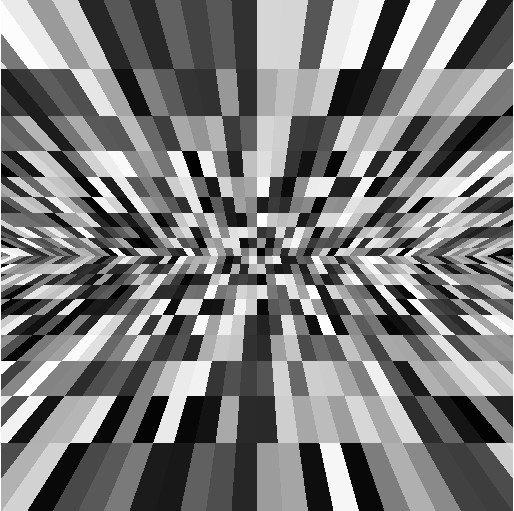
If we modify the code so instead of just going from 0 to 1 for the vertical - we use the normalized value that goes from -1 to 1 - we pass it through an
abs(..)
function - so it remains positive - which gives us 1.0->0.0->1.0 for the texture coordinate.
var vertical = abs(normalized_coords.y); // 1->0->1
Gives us the following output:
Normalized vertical coordinates instead of just a vertical value of 0 to 1 - we use 1-0-1. Works but it's the wrong way around!
This is the full code - same as before - except the modified line:
@fragment
fn main(@location(0) input_coords: vec2<f32>) -> @location(0) vec4<f32> {
    // Scale the input coordinates
    var pixel_coords = input_coords * 512.0;

    // Calculate normalized coordinates -1 to 1 - we want to divide by the
    // normalize (0 in the middle) - so when we divide the value it goes towards
    // the middle and not the left (if 0,0 is on the left side).
    // Useful to know if you want to move the target point!
    var normalized_coords = (2.0 * pixel_coords - resolution.xy) / resolution.y;

    var vertical = 1.0 - abs(normalized_coords.x); // 1->0->1

    // map the 0->1 to lo->hi value
    let lo = 1.0;
    let hi = 0.3;
    var block_size = lo + (hi - lo) * (vertical);

    var quantized_coords = floor( 10.0 * normalized_coords / block_size );

    // Generate a random color based on the quantized coordinates
    var rr = random2(quantized_coords);

    return vec4<f32>( vec3(rr), 1.0);
}
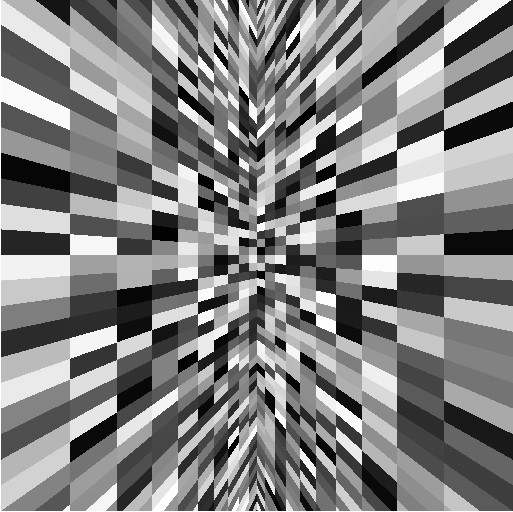
It is working - but we need to fix the values; so instead of 1-0-1 we use 0-1-0 to get the correct output.
The following will invert the coordinates and give us a better result:
var vertical = 1.0 - abs(normalized_coords.y); // 0->1->0
Vertical top and bottom fade away towards the middle of the screen (into the distance).
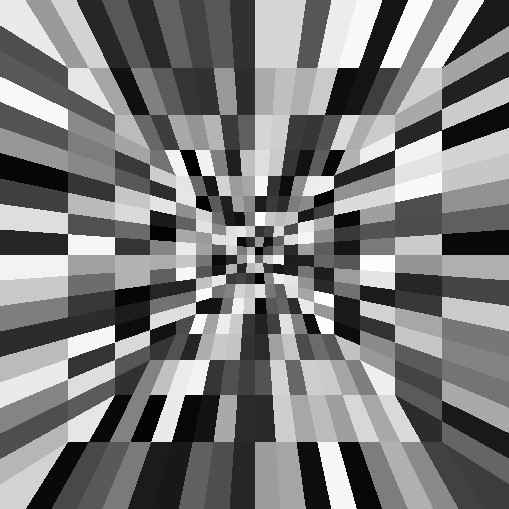
Simply a matter of changing the
.y
to
.x
to see the same thing for the horizontal.
var vertical = 1.0 - abs(normalized_coords.x); // 1->0->1
Squares fade away on the horizontal - by checking the width instead of the height for the texture coordinates.
The big step after this - is to have both the horizontal and vertical! To create a tunnel effect.
We'll check which is the biggest value - the horizontal or vertical and use this to divide as the distance.
@fragment
fn main(@location(0) input_coords: vec2<f32>) -> @location(0) vec4<f32> {
    // Scale the input coordinates
    var pixel_coords = input_coords * 512.0;

    // Calculate normalized coordinates -1 to 1 - we want to divide by the
    // normalize (0 in the middle) - so when we divide the value it goes towards
    // the middle and not the left (if 0,0 is on the left side).
    // Useful to know if you want to move the target point!
    var normalized_coords = (2.0 * pixel_coords - resolution.xy) / resolution.y;

    var delta = 1.0 - abs(normalized_coords); // 1->0->1
    var distance = delta.y;
    if ( delta.y > delta.x ) { distance = delta.x; }

    // map the 0->1 to lo->hi value
    let lo = 1.0;
    let hi = 0.3;
    var block_size = lo + (hi - lo) * (distance);

    var quantized_coords = floor( 10.0 * normalized_coords / block_size );

    // Generate a random color based on the quantized coordinates
    var rr = random2(quantized_coords);

    return vec4<f32>( vec3(rr), 1.0);
}
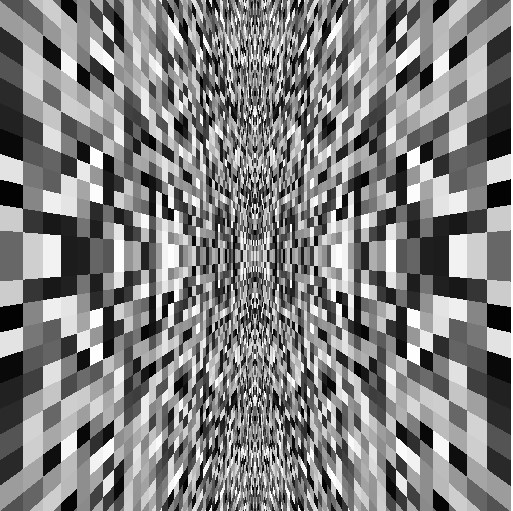
Squares fade away into the centre of the screen (origin point).
If you'll notice the squares seems stretched - and not correct, so we fix this by modifying the calculation.
@fragment
fn main(@location(0) input_coords: vec2<f32>) -> @location(0) vec4<f32> {
    // Scale the input coordinates
    var pixel_coords = input_coords;

    // Calculate normalized coordinates -1 to 1 - we want to divide by the
    // normalize (0 in the middle) - so when we divide the value it goes towards
    // the middle and not the left (if 0,0 is on the left side).
    // Useful to know if you want to move the target point!
    var normalized_coords = (2.0 * input_coords - 1.0);// -1.0 to 1.0

    var vertical = vec2(1.0,0.0) - abs(normalized_coords); // 1->0->1 - **only offset one**

    // map the 0->1 to lo->hi value
    let lo = 1.0;
    let hi = 0.2;
    var block_size = lo + (hi - lo) * (vertical);

    var quantized_coords = floor( 10.0 * (vertical) / block_size.x );

    // Generate a random color based on the quantized coordinates
    var rr = random2(quantized_coords);

    return vec4<f32>( vec3(rr), 1.0);
}
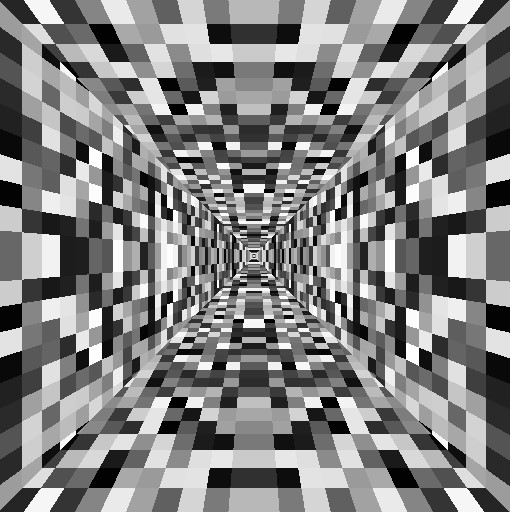
Horizontal squares mapped to disapear into the distance in the centre.
Do both the horizont and vertical, check the side using
if (abs_coords.y > abs_coords.x)
.
@fragment
fn main(@location(0) input_coords: vec2<f32>) -> @location(0) vec4<f32> {
    // Scale the input coordinates
    var pixel_coords = input_coords;

    var normalized_coords = (2.0 * input_coords - 1.0); // -1.0 to 1.0

    var abs_coords = abs( normalized_coords ); // 1->0->1

    var vertical   = vec2(1.0,0.0) - abs_coords; // 1->0->1 - **only offset one**
    var horizontal = vec2(0.0,1.0) - abs_coords; // 1->0->1 - **only offset one**

    // map the 0->1 to lo->hi value
    let lo = 1.0;
    let hi = 0.2;
    var block_size = lo + (hi - lo) * ( vec2(1.0,1.0) - abs_coords );

    var quantized_coords = floor( 10.0 * (vertical) / block_size.x );

    if (abs_coords.y > abs_coords.x) {
        quantized_coords = floor( 10.0 * (horizontal) / block_size.y );
    }

    // Generate a random color based on the quantized coordinates
    var rr = random2(quantized_coords);

    return vec4<f32>( vec3(rr), 1.0);
}
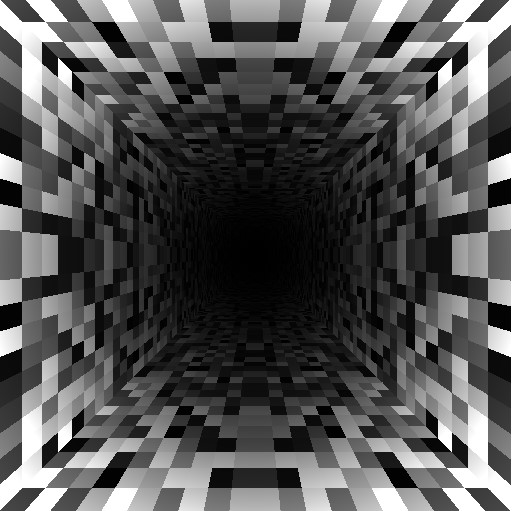
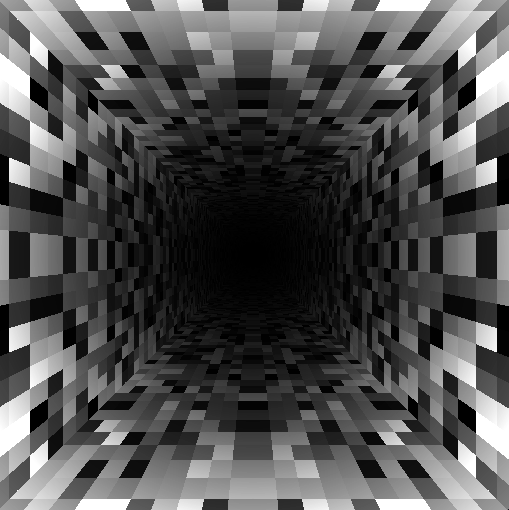
Scale the squares so they shrink away into the distance (at the middle).
Mix a bit of black in with the color - so it fades away to black in the distance - we can use the mix (lerp) function
rr = mix( 0.0, rr, pow(length(abs_coords),2) )
as shown in the following:
@fragment
fn main(@location(0) input_coords: vec2<f32>) -> @location(0) vec4<f32> {
    // Scale the input coordinates
    var pixel_coords = input_coords;

    var normalized_coords = (2.0 * input_coords - 1.0); // -1.0 to 1.0

    var abs_coords = abs( normalized_coords ); // 1->0->1


    var vertical   = vec2(1.0,0.0) - abs_coords; // 1->0->1 - **only offset one**
    var horizontal = vec2(0.0,1.0) - abs_coords; // 1->0->1 - **only offset one**


    // map the 0->1 to lo->hi value
    let lo = 1.0;
    let hi = 0.0;
    var block_size = lo + (hi - lo) * ( vec2(1.0,1.0) - abs_coords );

    var quantized_coords = floor( 10.0 * (vertical) / block_size.x );

    if (abs_coords.y > abs_coords.x) {
        quantized_coords = floor( 10.0 * (horizontal) / block_size.y );
    }

    // Generate a random color based on the quantized coordinates
    var rr = random2( quantized_coords );

    rr = mix( 0.0, rr, pow(length(abs_coords),2) );

    return vec4<f32>( vec3(rr), 1.0);
}
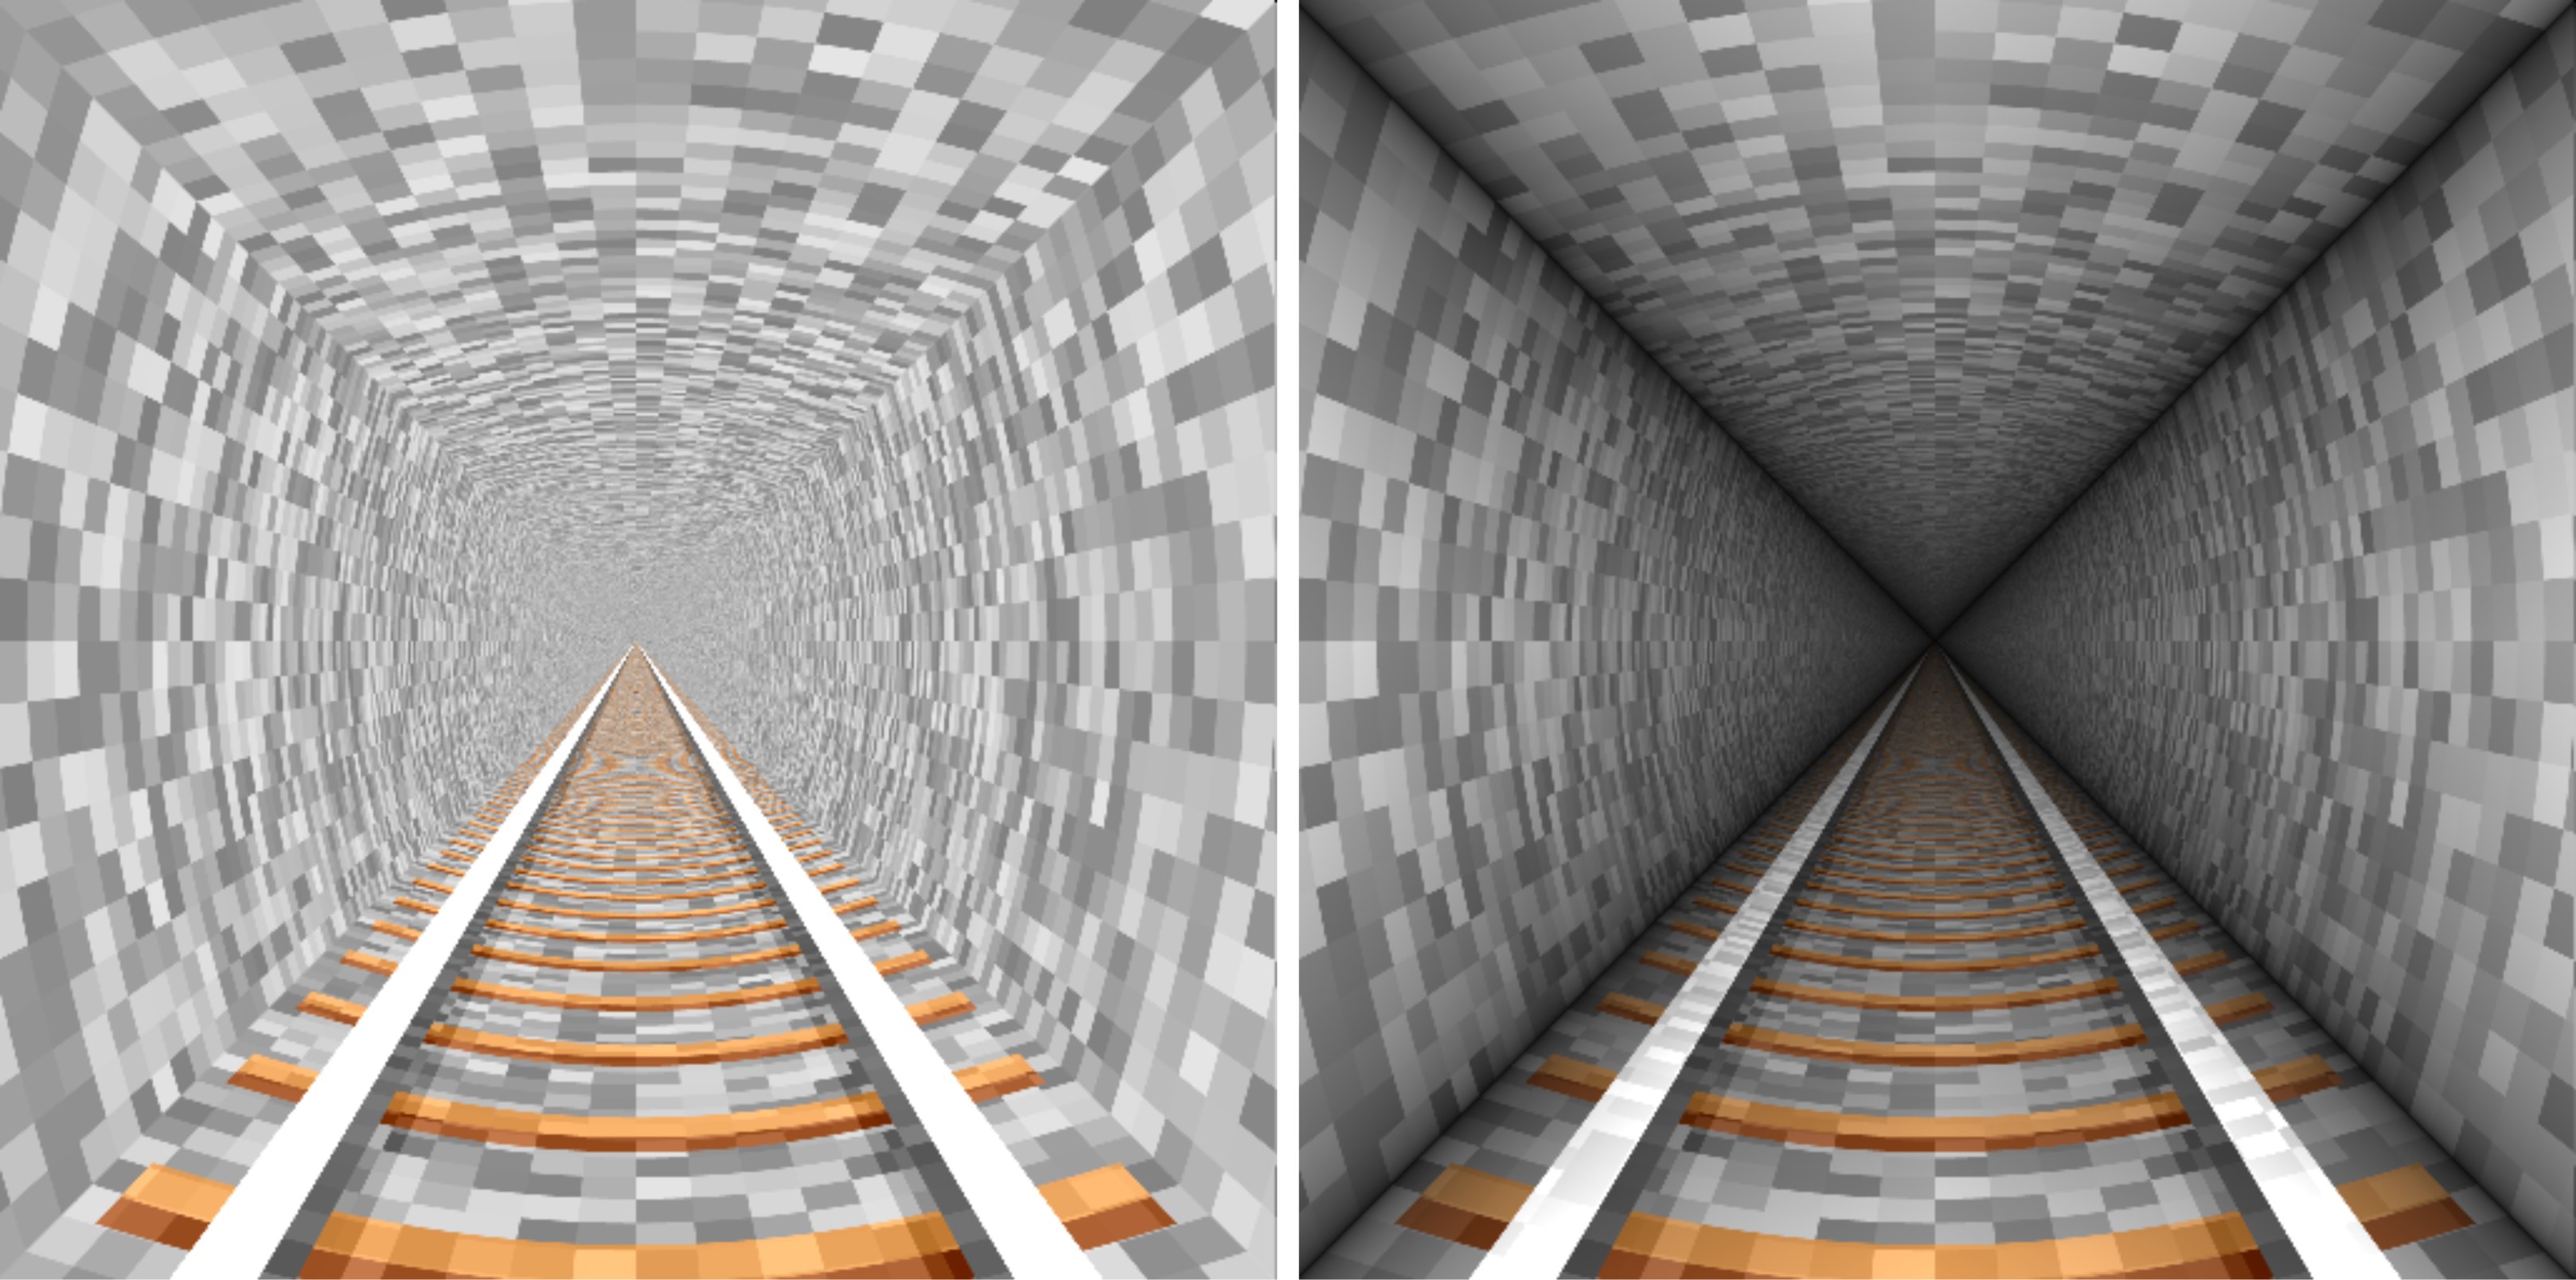
Mix in a bit of black so the squares further away fade to black.
Animation - Moving Along Tunnel
Mix in a bit of offset with the random number calculation - to create the illusion that we're moving through the pixelated tunnel.
@fragment
fn main(@location(0) input_coords: vec2<f32>) -> @location(0) vec4<f32> {
    // Scale the input coordinates
    var pixel_coords = input_coords;

    let tt = mytimer;

    var normalized_coords = (2.0 * (input_coords) - 1.0); // -1.0 to 1.0

    var abs_coords = abs( normalized_coords  ); // 1->0->1

    var vertical   = vec2(1.0,0.0) - abs_coords; // 1->0->1 - **only offset one**
    var horizontal = vec2(0.0,1.0) - abs_coords; // 1->0->1 - **only offset one**

    // map the 0->1 to lo->hi value
    let lo = 1.0;
    let hi = 0.0;
    var block_size = lo + (hi - lo) * ( vec2(1.0,1.0) - abs_coords );

    var quantized_coords = floor( 10.0 * (vertical) / block_size.x + 10.0*vec2(tt,0.0) );

    if (abs_coords.y > abs_coords.x) {
        quantized_coords = floor( 10.0 * (horizontal) / block_size.y + 10.0*vec2(0.0,tt) );
    }

    // Generate a random color based on the quantized coordinates
    var rr = random2( quantized_coords );

    rr = mix( 0.0, rr, pow(length(abs_coords),2) );

    return vec4<f32>( vec3(rr), 1.0);
}
Add mytimer uniform value to the coordinates to create a scolling effect - looks like we're constantly going down the tunnel.
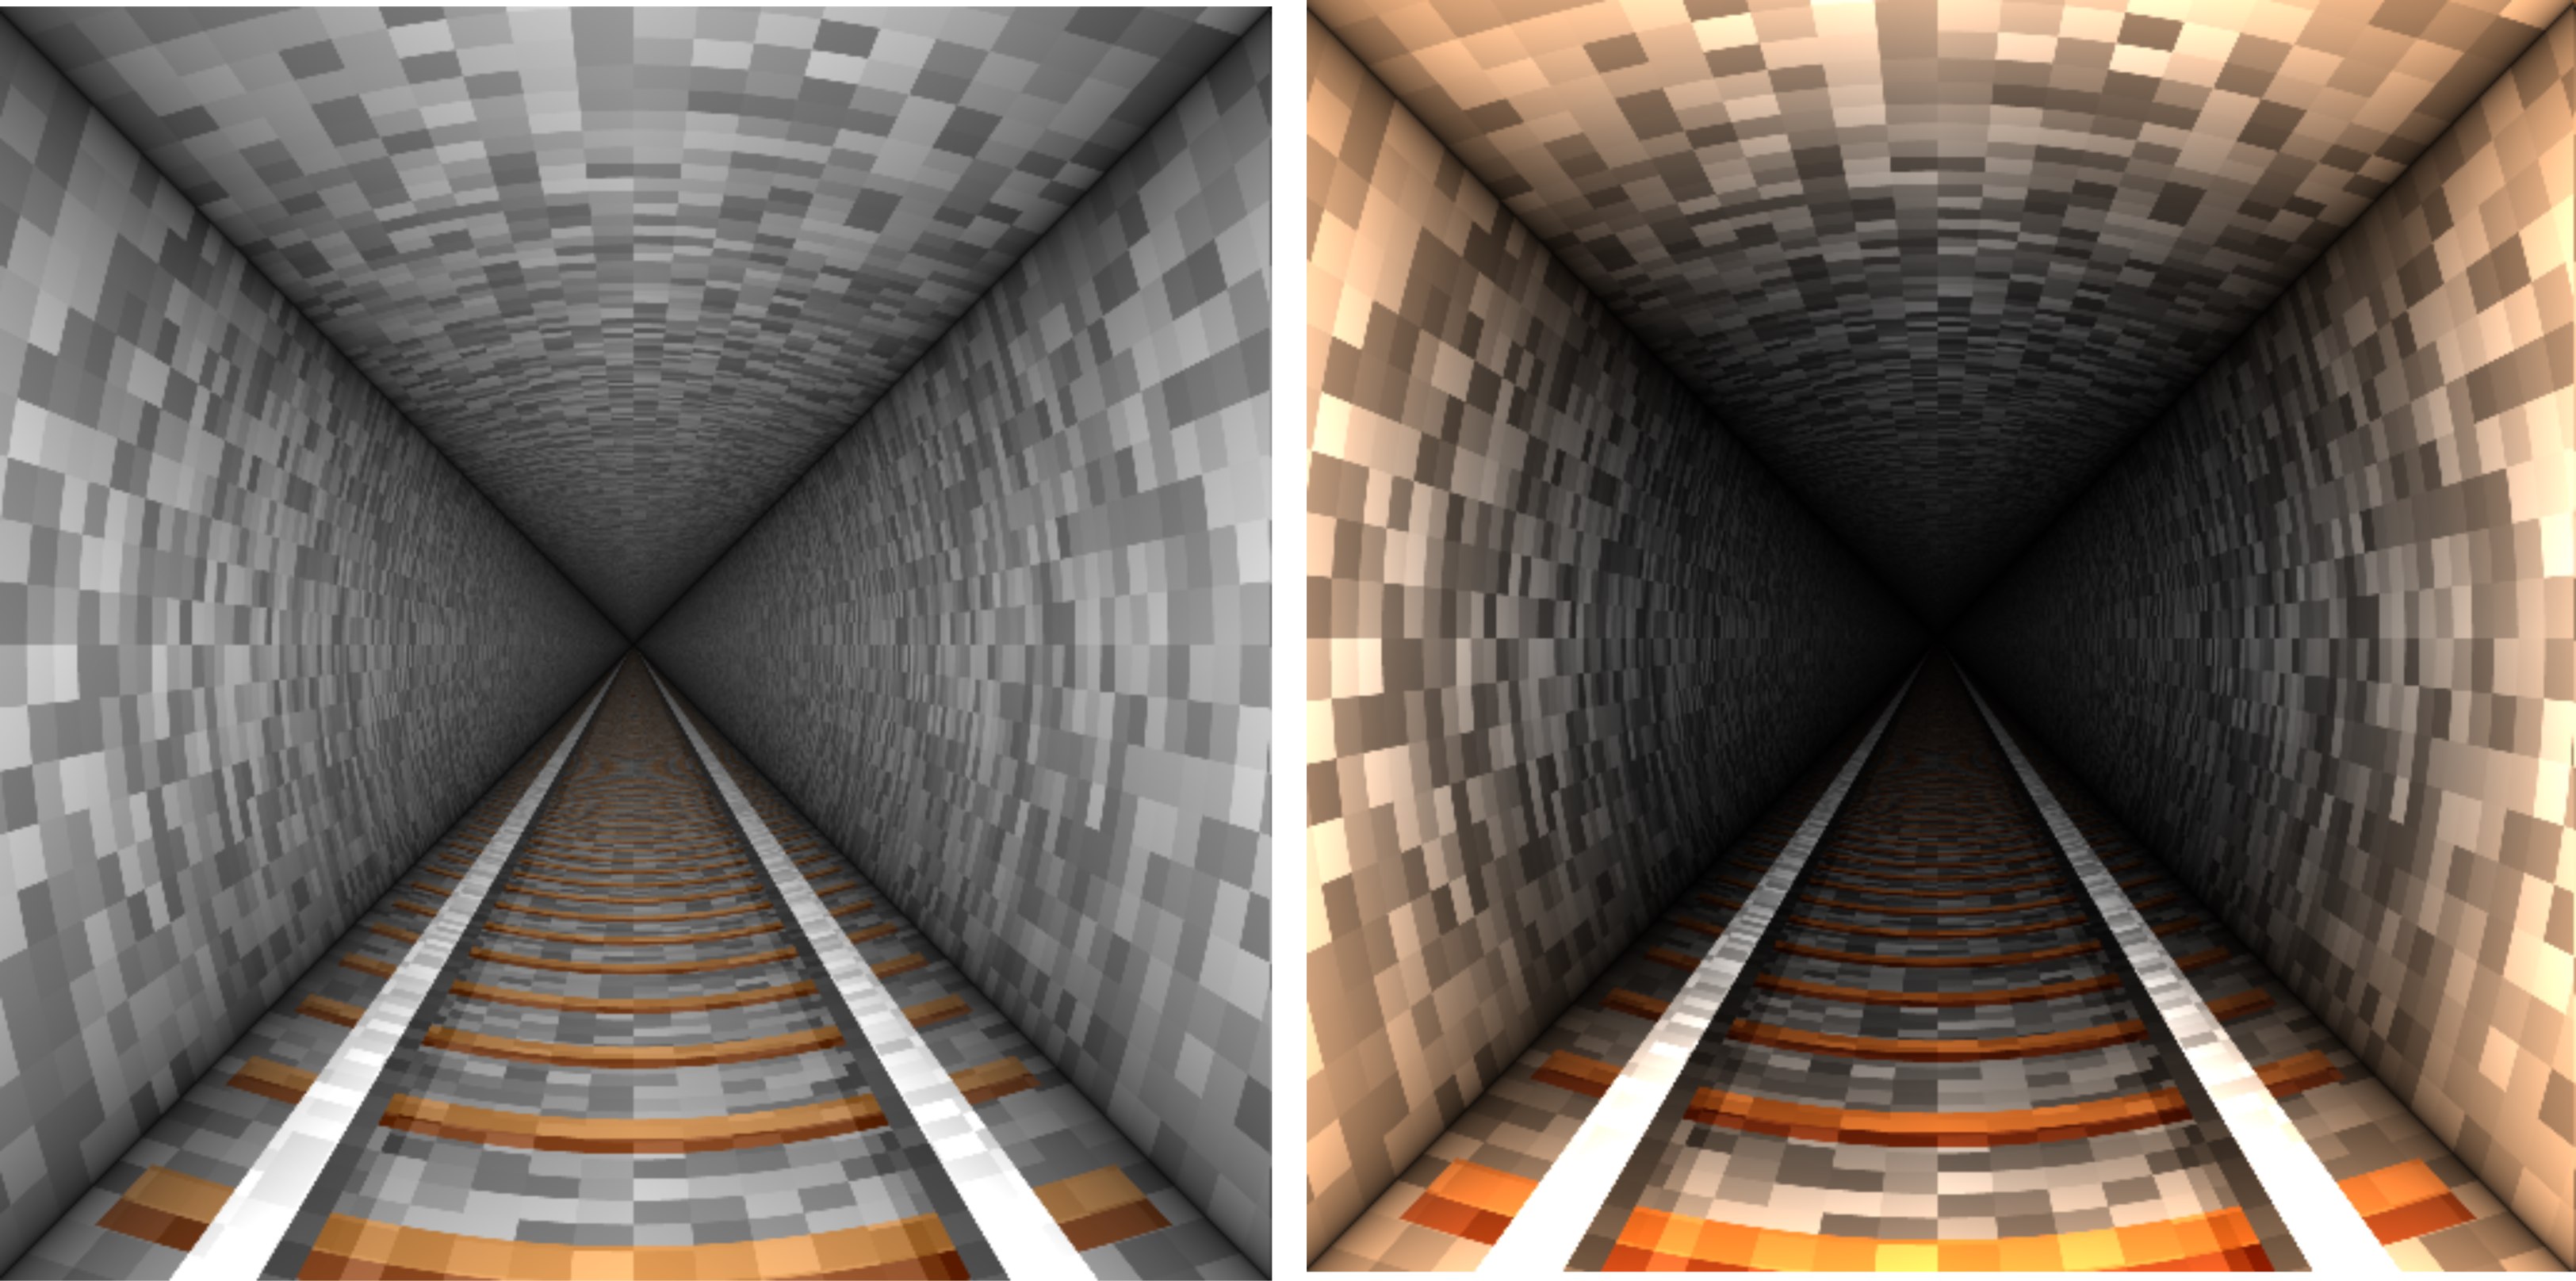
Tinker with Colors
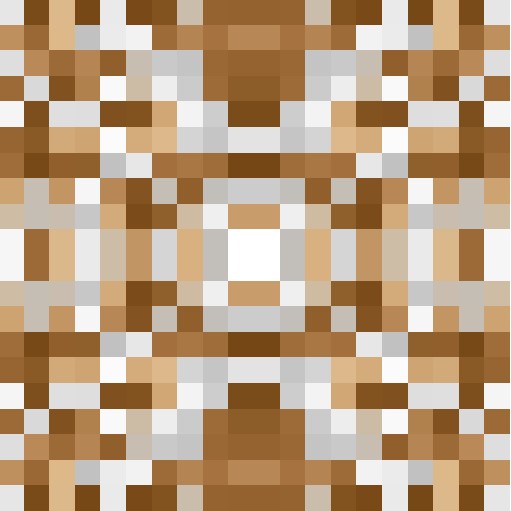
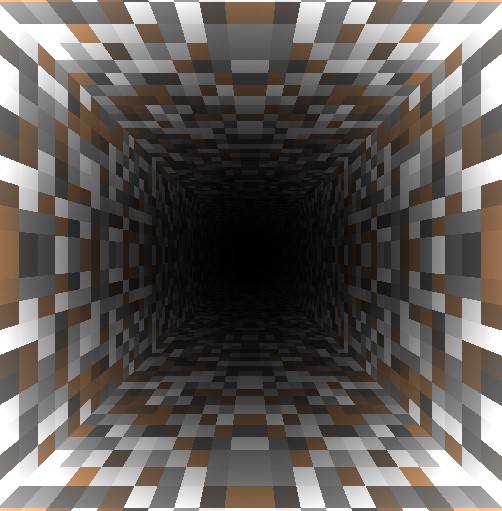
While grayscale does look good - adding a bit of color can make things more interesting - and we'll set the ground to brown - so make some of the squares brown.
@fragment
fn main(@location(0) input_coords: vec2<f32>) -> @location(0) vec4<f32> {
    // Scale the input coordinates
    var pixel_coords = input_coords;

    let tt = mytimer;

    var normalized_coords = (2.0 * (input_coords) - 1.0); // -1.0 to 1.0

    var abs_coords = abs( normalized_coords  ); // 1->0->1

    var vertical   = vec2(1.0,0.0) - abs_coords; // 1->0->1 - **only offset one**
    var horizontal = vec2(0.0,1.0) - abs_coords; // 1->0->1 - **only offset one**

    // map the 0->1 to lo->hi value
    let lo = 1.0;
    let hi = 0.0;
    var block_size = lo + (hi - lo) * ( vec2(1.0,1.0) - abs_coords );

    var quantized_coords = floor( 10.0 * (vertical) / block_size.x + 10.0*vec2(tt,0.0) );

    if (abs_coords.y > abs_coords.x) {
        quantized_coords = floor( 10.0 * (horizontal) / block_size.y + 10.0*vec2(0.0,tt) );
    }

    // Generate a random color based on the quantized coordinates
    var rr = random2( quantized_coords );


    let background_color = vec3<f32>(0.78, 0.57, 0.4);

    // mix some squares with brown
    var color = mix( background_color, vec3(rr), clamp(pow(rr+0.7, 5),0.0, 1.0) );

    // fade to black in the distance
    color = mix( vec3(0.0), color, pow(length(abs_coords),2) );

    return vec4<f32>( color, 1.0);
}
Mixing in brown color on top of the dark grayscale squares.
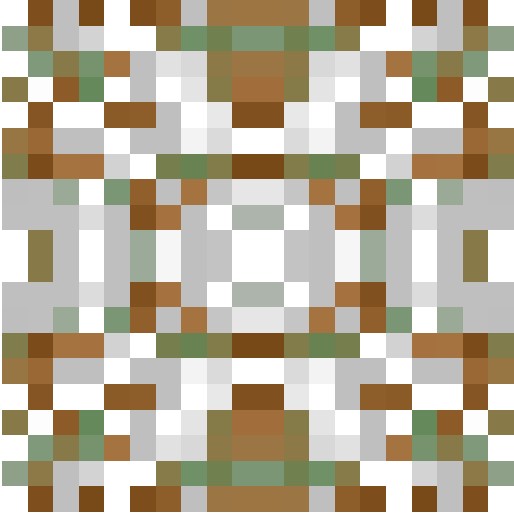
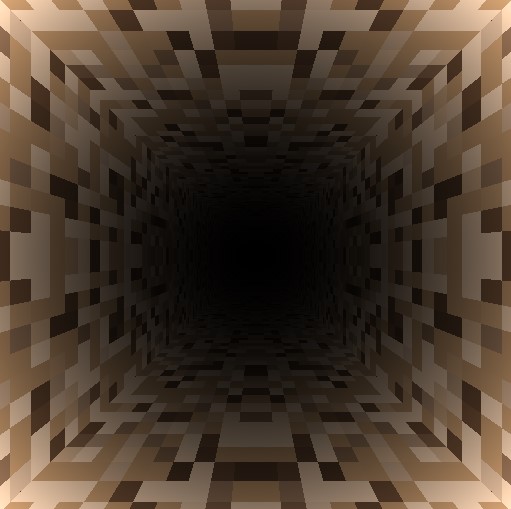
We can use a color gradient from the random value instead of just blending to give greater control over each squares color.
Brown color gradient - with a touch of green.
const numGradients:i32 = 8;
fn gradient_color(value: f32) -> vec3<f32> {
    // Clamp the input value to the range [0.0, 1.0]
    let t = clamp(value, 0.0, 1.0);

    // Define gradient colors
    let colors = array<vec3<f32>, numGradients>(
        vec3<f32>(0.65, 0.45, 0.25),
        vec3<f32>(0.65, 0.45, 0.25),
        vec3<f32>(0.65, 0.45, 0.25)*0.7,
        vec3<f32>(0.65, 0.45, 0.25)*0.5,
        vec3<f32>(0.65, 0.55, 0.25)*0.7,
        vec3<f32>(0.65, 0.45, 0.25)*0.6,
        vec3<f32>(0.45, 0.27, 0.07),
        vec3<f32>(0.45, 0.27, 0.07)
    );

    // Determine segment and local interpolation factor
    let segment = t * ( f32(numGradients) - 1.0 ); // Map t to range [0, numGradients]
    let index = floor(segment); // Segment index
    let local_t = fract(segment); // Local interpolation factor

    // Interpolate between two consecutive colors
    return mix(colors[i32(index)], colors[i32(index + 1)], local_t);
}
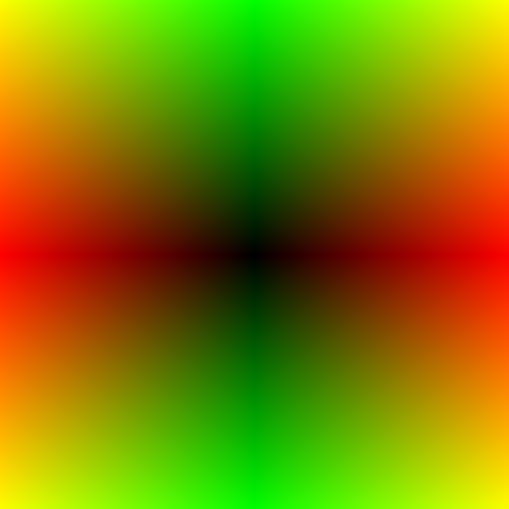
Some other color values
Other gradient values for the color range.
const numGradients:i32 = 8;
fn gradient_color(value: f32) -> vec3<f32> {
    // Clamp the input value to the range [0.0, 1.0]
    let t = clamp(value, 0.0, 1.0);

    let col0 = vec3<f32>(111/255.0, 85/255.0, 60.0/255.0);
    let col1 = vec3<f32>(139/255.0, 118/255.0, 99.0/255.0);
    let col2 = vec3<f32>(45/255.0, 31/255.0, 21.0/255.0);

    // Define gradient colors
    let colors = array<vec3<f32>, numGradients>(
        col0,
        col0,
        col0,
        col1,
        col1,
        col1,
        col2 * 1.5,
        col2
    );

    // Determine segment and local interpolation factor
    let segment = t * ( f32(numGradients) - 1.0 ); // Map t to range [0, numGradients]
    let index = floor(segment); // Segment index
    let local_t = fract(segment); // Local interpolation factor

    // Interpolate between two consecutive colors
    return mix(colors[i32(index)], colors[i32(index + 1)], local_t);
}
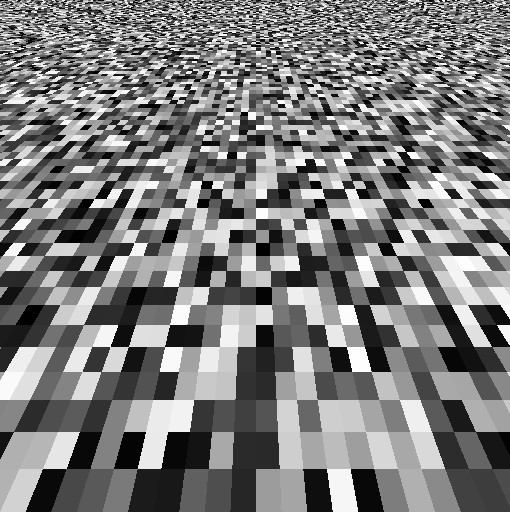
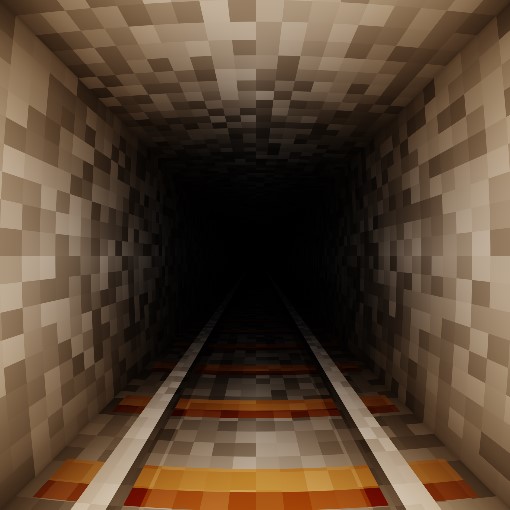
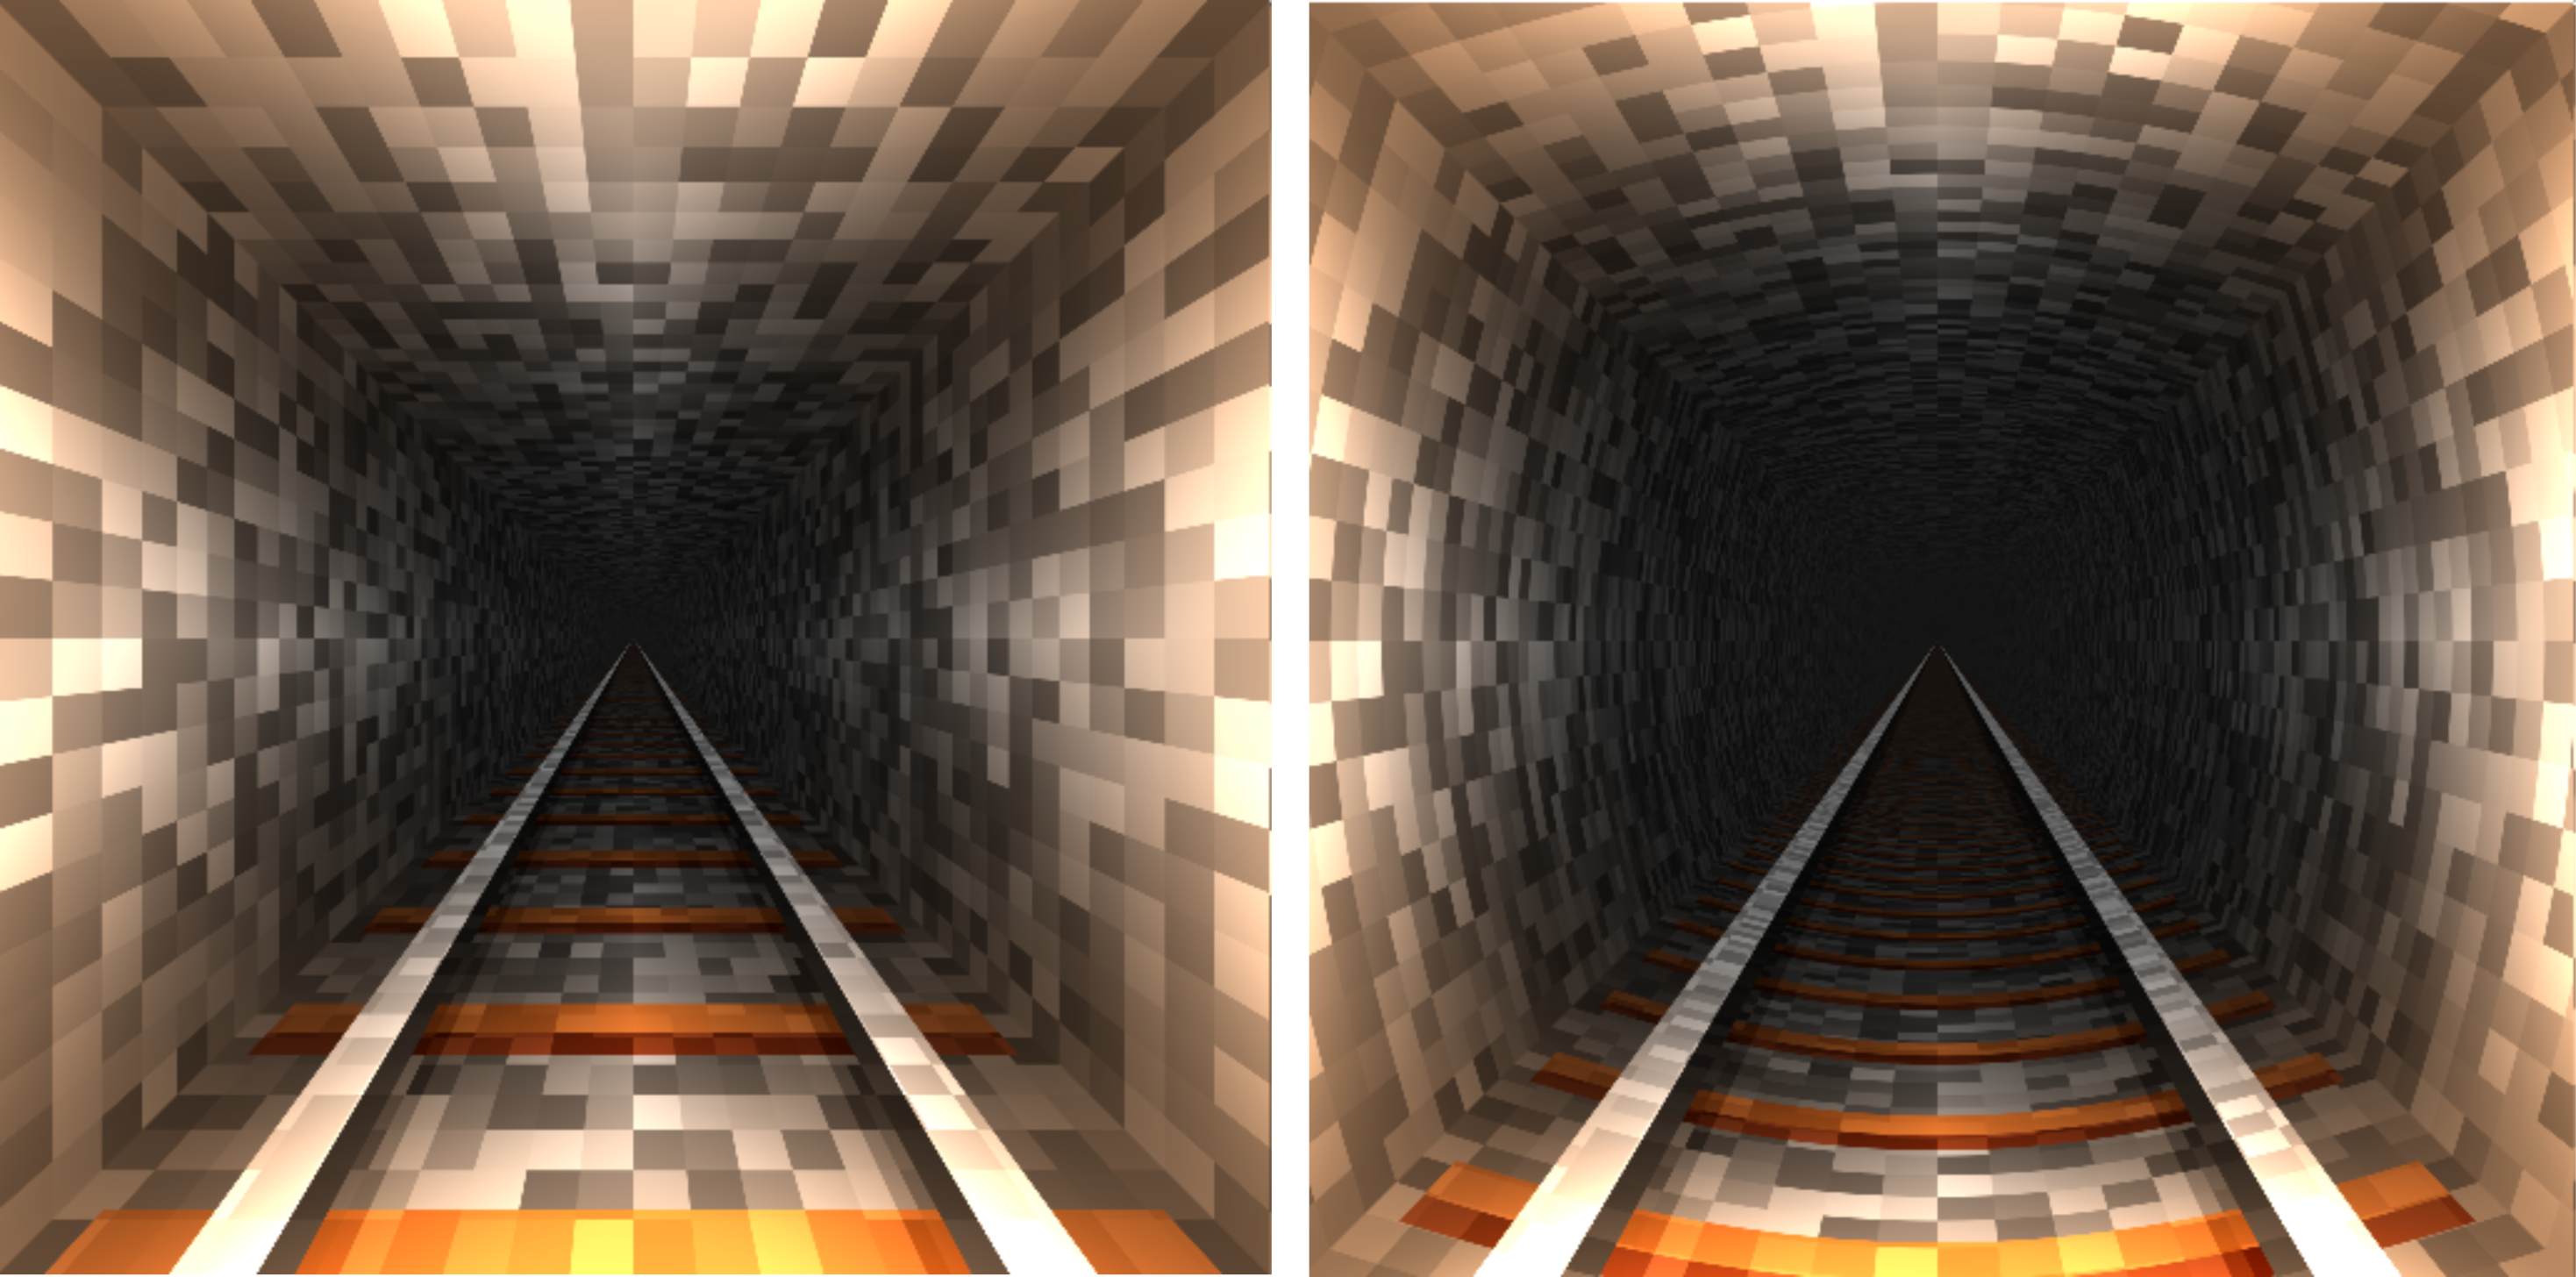
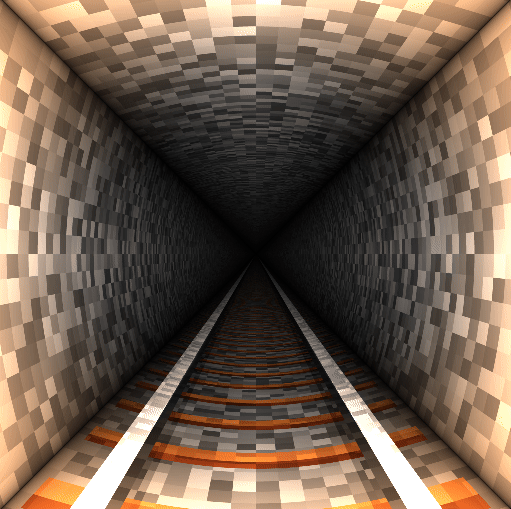
Minecraft Tunnel
Let's go a bit further - the tunnel is fun and interesting - but it can do with a few more tweaks! Add some multisampling to smooth out some of those jaggedy edges, also a few more colors and a train rail at the bottom.
Minecraft tunnel with some extra bells and whistles.
// Generates a pseudo-random value based on a 2D input vector
fn random2(point: vec2<f32>) -> f32 {
    let seed = dot(point, vec2<f32>(127.1, 311.7)); // Generate a hash seed using dot product
    return fract(sin(seed) * 43758.5453123);        // Return a pseudo-random fractional value
}

// Custom smoothstep function for smooth interpolation
fn mysmoothstep(edge_start: f32, edge_end: f32, value: f32) -> f32 {
    let t = clamp((value - edge_start) / (edge_end - edge_start), 0.0, 1.0); // Clamp and normalize value
    return t * t * (3.0 - 2.0 * t); // Cubic Hermite interpolation for smooth transition
}

// Fragment shader main function
@fragment
fn main(@location(0) input_coords: vec2<f32>) -> @location(0) vec4<f32> {
    // Scale the input coordinates
    var pixel_coords = input_coords;

    // Initialize colors
    var black = vec3<f32>(0); // Base color (black)
    var white = vec3<f32>(1); // Secondary color (white)
    var total_color = black;   // Accumulator for final color
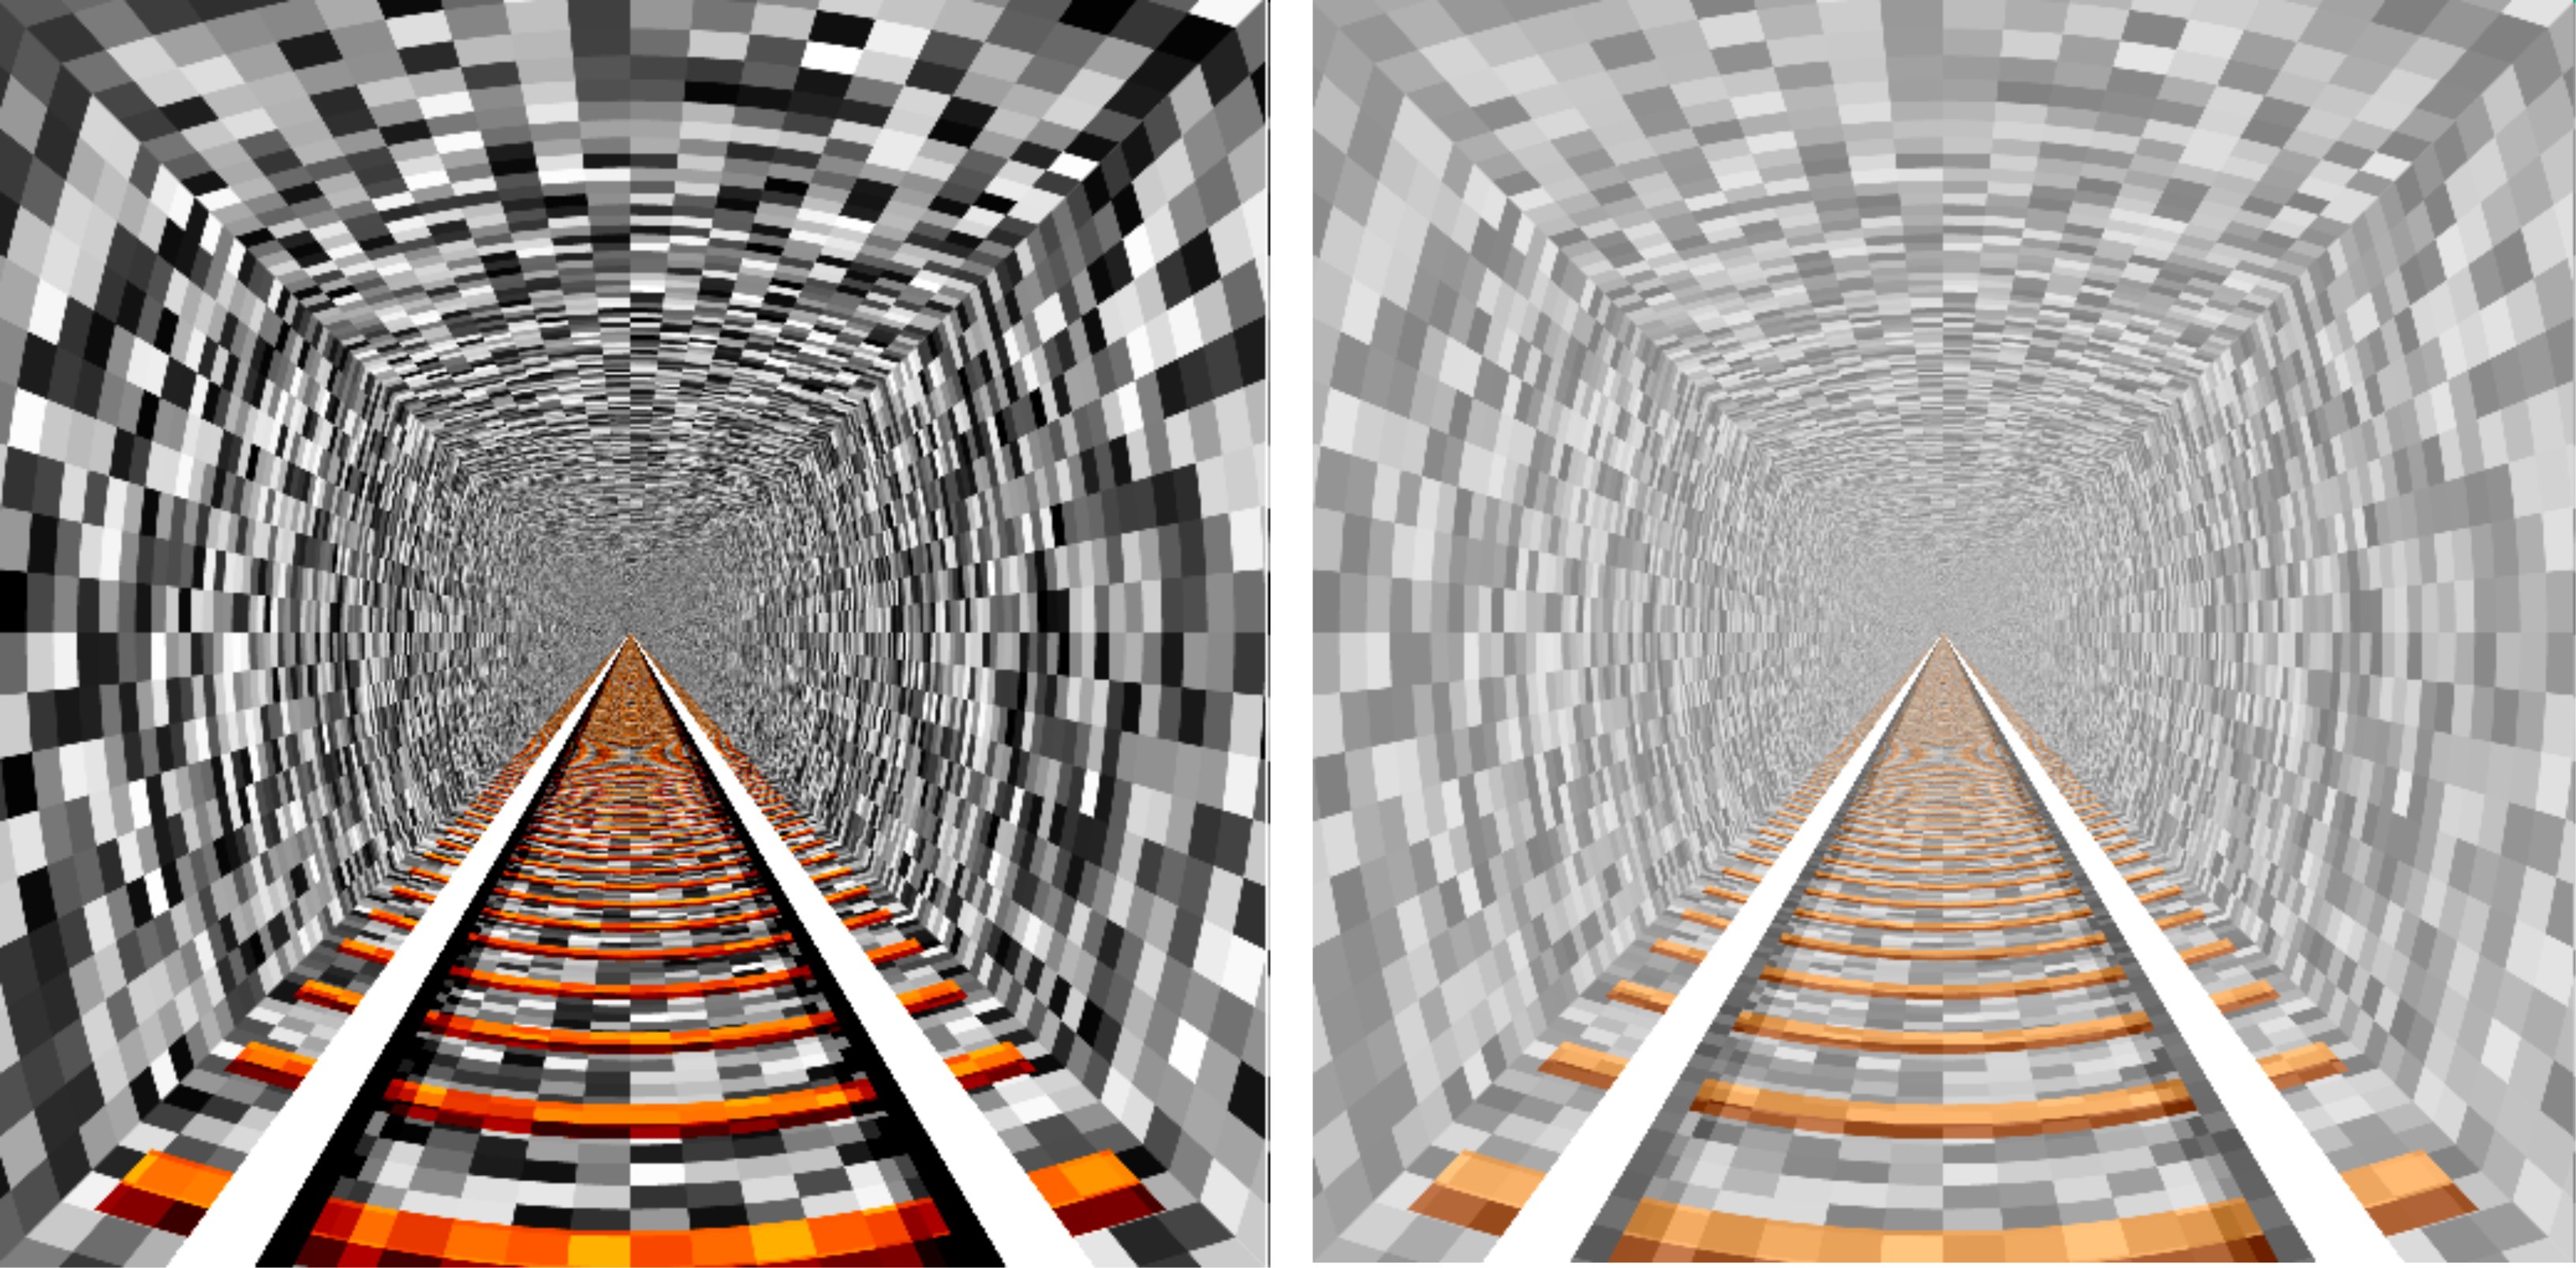
Multiple samples for each pixel to smooth out jaggedyness (anti-aliasing).
<?php
    // Perform anti-aliasing by sampling the pixel multiple times
    for (var sample_x: i32 = 0; sample_x < NUM_SAMPLES; sample_x = sample_x + 1) {
        for (var sample_y: i32 = 0; sample_y < NUM_SAMPLES; sample_y = sample_y + 1) {
            // Offset for sub-pixel sampling
            var sample_offset = (vec2<f32>(f32(sample_x), f32(sample_y)) / f32(NUM_SAMPLES)) - 0.5;
            sample_offset *= 1.0/resolution;

            // Calculate normalized coordinates -1.0 to 1.0
            var normalized_coords = (2.0 * pixel_coords + sample_offset - 1.0);

            // Compute additional parameters for distortion and patterns
            let normalized_x = normalize(normalized_coords).x;
Add a bit of normalization to the coordinates to 'round' the edges - so it's less square.
<?php
            // warp the tunnel so it is 'rounded' a bit instead of flat edges
            normalized_coords *= length(normalized_coords) * 0.9 + 0.1;

            let abs_coords = abs(normalized_coords); // 1-0-1 - mirror positive side
Scale the pixelated block size - smaller or larger blocks.
<?php
            // Scaling and timing factors for animation and patterns
            let size = 10.0;
            let time = mytimer * 8.0;
            let max_component = max(abs_coords.x, abs_coords.y);
            let inverse_max = size / max_component;

            // Intermediate calculations for texture and hash lookups
            let texture_coords = vec2<f32>(inverse_max + time, 0.0);
            let cell_coords = floor(normalized_coords * inverse_max + texture_coords.yx);

            // Generate noise for two color channels
            let noise_x = vec3<f32>(random2(floor(normalized_coords * inverse_max + texture_coords.xy)));
            var noise_y = vec3<f32>(random2(cell_coords + 0.0));
Extra lines of code for adding a train track to the bottom of the tunnel.
<?php
            // Add in the train tracks to the bottom
            if (normalized_coords.y < 0.0) {
                // Additional noise values for variations
                let noise_g = random2(cell_coords + 0.2);
                let noise_h = random2(cell_coords + 0.3);

                // Threshold-based patterns
                let pattern_threshold = step(abs(normalized_x), 0.68);
                let abs_normalized_x = abs(normalized_x);
                let edge_check_0 = step(abs(abs_normalized_x - 0.5), 0.08);
                let edge_check_1 = step(abs(abs_normalized_x - 0.5), 0.03);
                let edge_check_2 = step(abs(abs_normalized_x - 0.55), 0.04);

                // wooden blocks
                noise_y = mix(noise_y, vec3<f32>(0.7, -0.05, -0.5) - noise_g * 0.5, step(sin(texture_coords.x + 1.5), -0.9) * pattern_threshold);
                noise_y = mix(noise_y, vec3<f32>(0.9, 0.2, -0.5) + noise_h * 0.5, step(sin(texture_coords.x + 0.45), -0.8) * pattern_threshold);
                // metal track
                noise_y -= edge_check_0 * 0.4;
                noise_y = mix(noise_y, vec3<f32>(-0.2) * noise_h * 2.0, edge_check_1);
                noise_y = mix(noise_y, vec3<f32>(3.0) - noise_h * 1.1, edge_check_2);
            }
Map the noise to the horizontal and vertical - use an if statement so it creates flat edges (square).
<?php
            // Horizontal and vertical edges of the tunnel
            var sample_color: vec3<f32>;
            if (abs_coords.x > abs_coords.y) {
                sample_color = noise_x;
            } else {
                sample_color = noise_y;
            }
Soften the colors.
<?php
            // Adjust base color and mix with patterns
            sample_color = 0.5 + sample_color * 0.4;
Get the edge values to darken the corners of the tunnel.
<?php
            // Smooth transitions and edge blending
            let diagonal_distance = abs(-dot(abs_coords, vec2<f32>(-1.0, 1.0)));
            sample_color = mix(black, sample_color, pow(diagonal_distance,0.3) );
Mixing in a bit of color to make the grayscale walls a bit more interesting.
<?php
            // Background gradient blending
            let background_color = vec3<f32>(0.78, 0.57, 0.4) * 5.5 * mysmoothstep(5.0, -0.4, length(normalized_coords));
            sample_color *= mix(sample_color, background_color, mysmoothstep(0.2, 2.5, length(normalized_coords) * 1.0));

            // Accumulate color for anti-aliasing
            total_color += sample_color;
        }
    }

    // Average accumulated color across all samples
    total_color /= f32(NUM_SAMPLES * NUM_SAMPLES);

    // return the final color
    return vec4<f32>(total_color, 1.0);
}
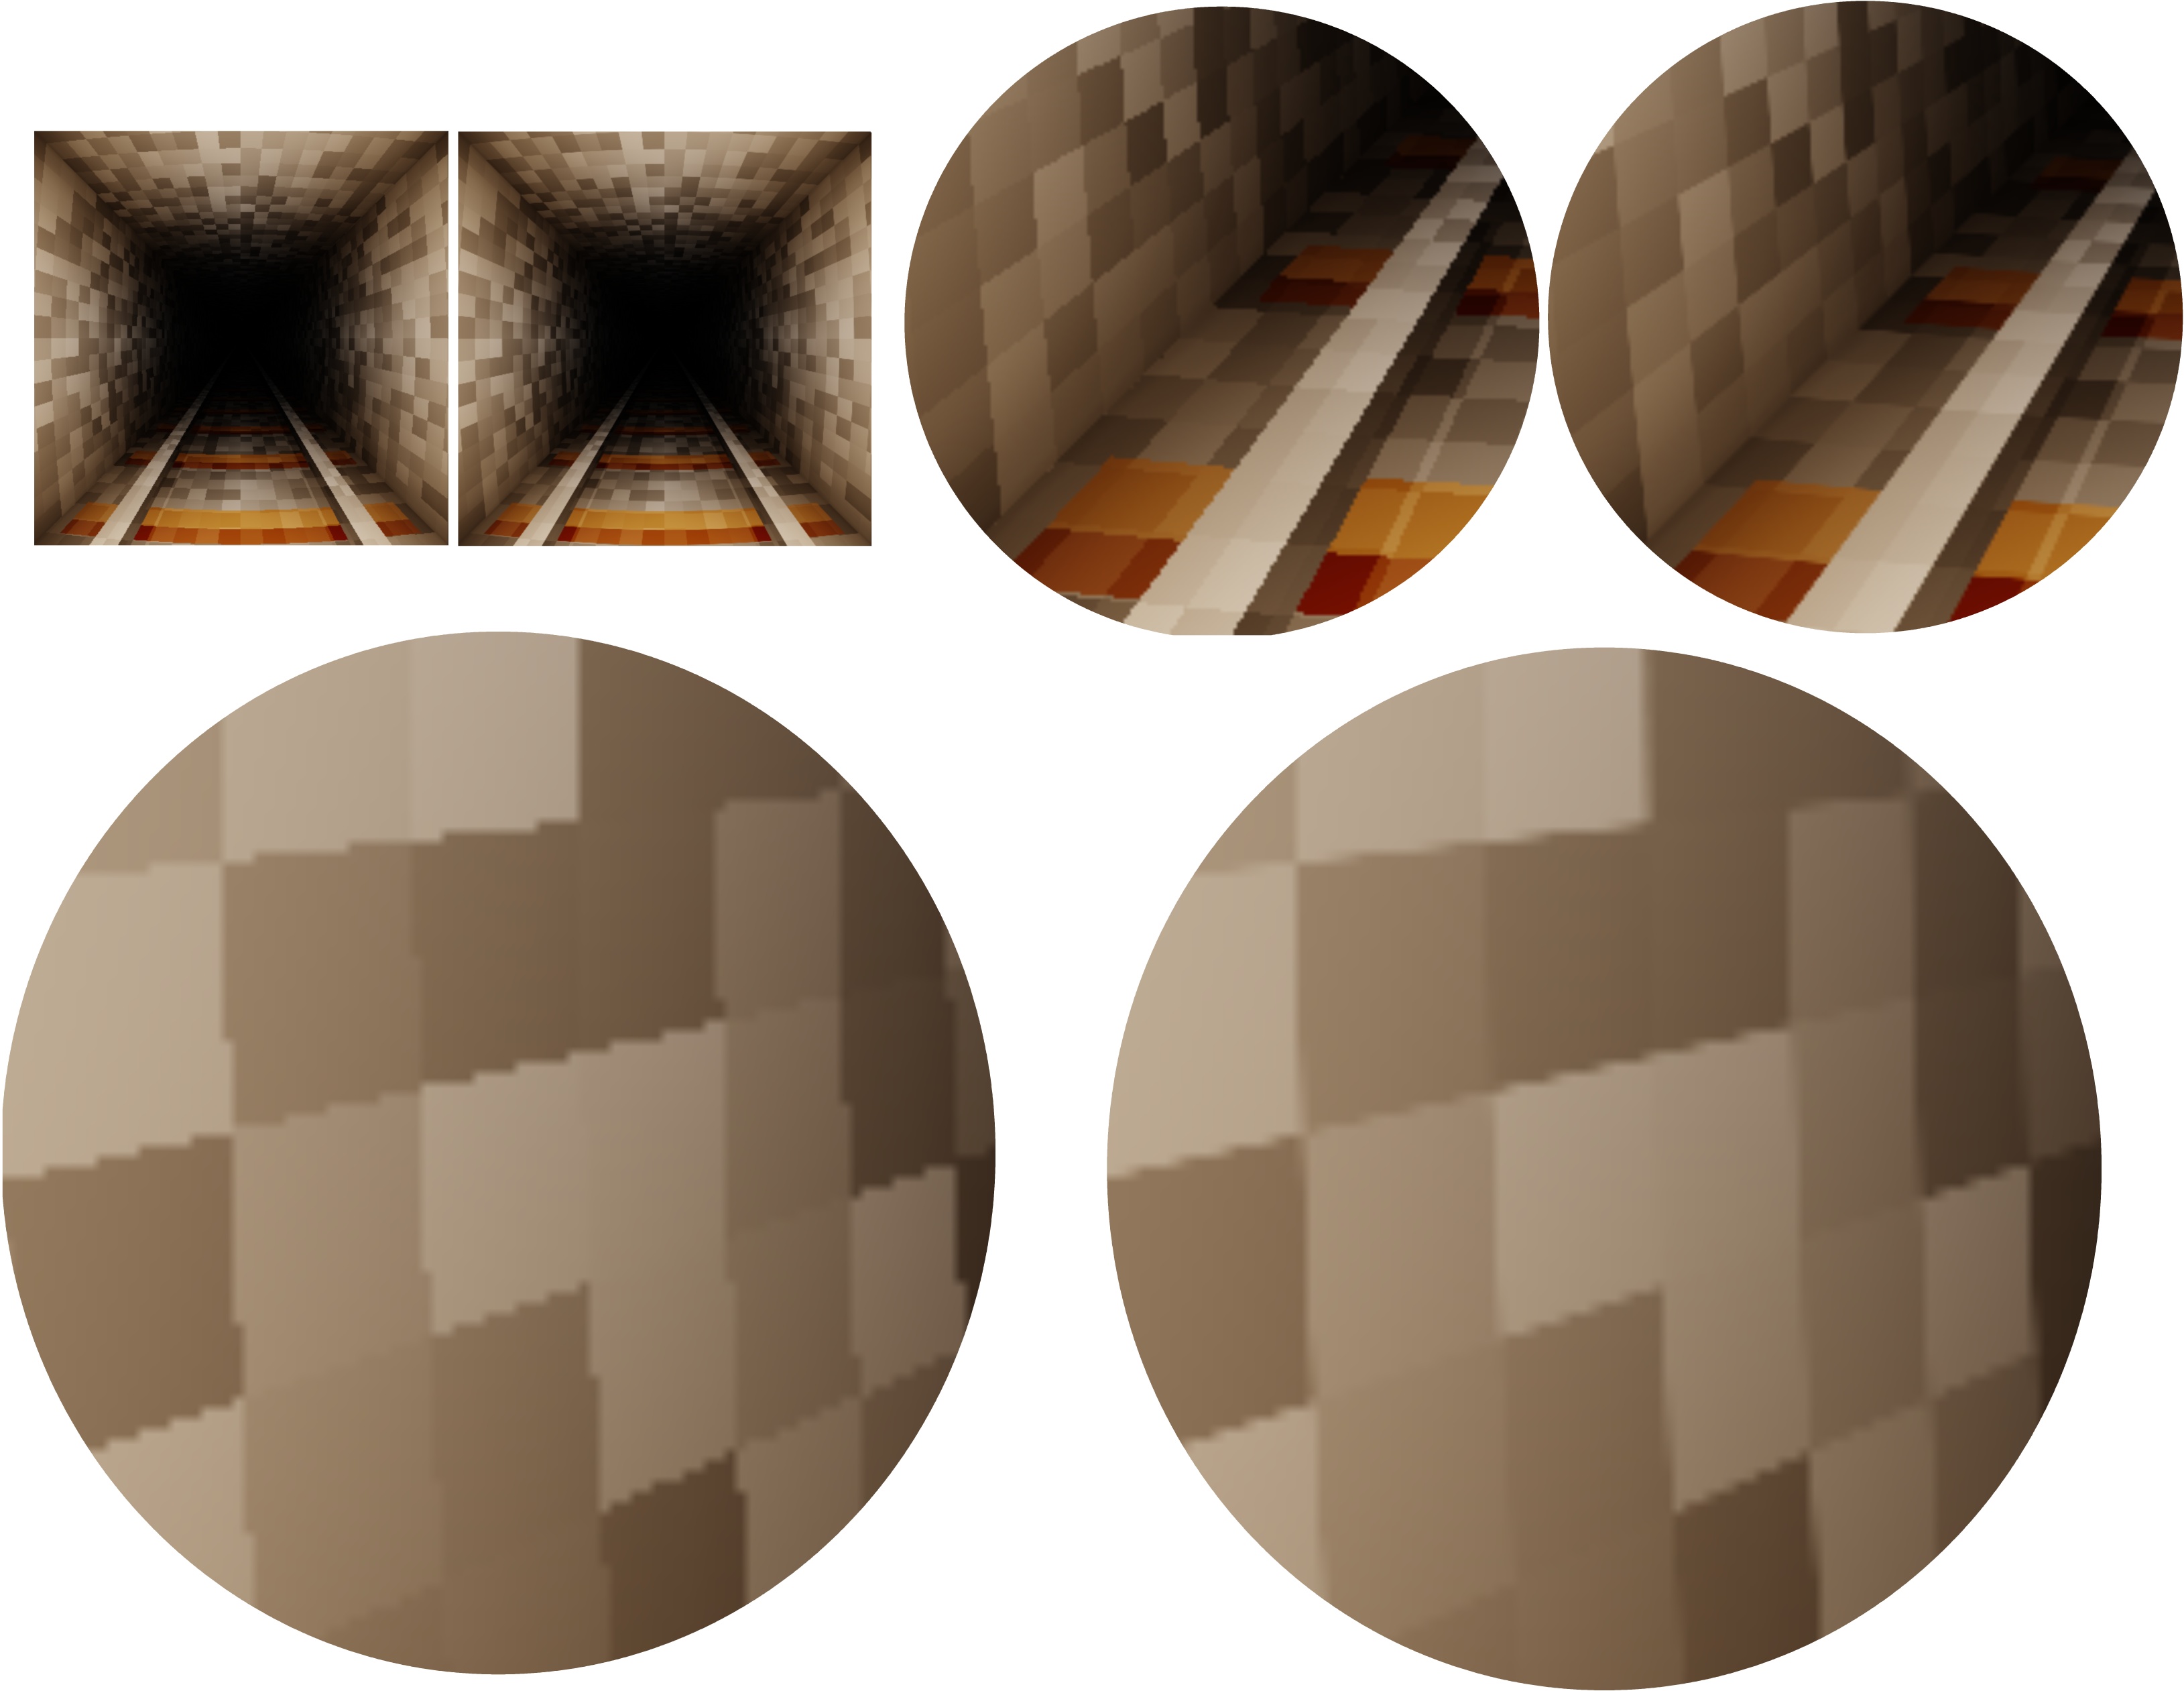
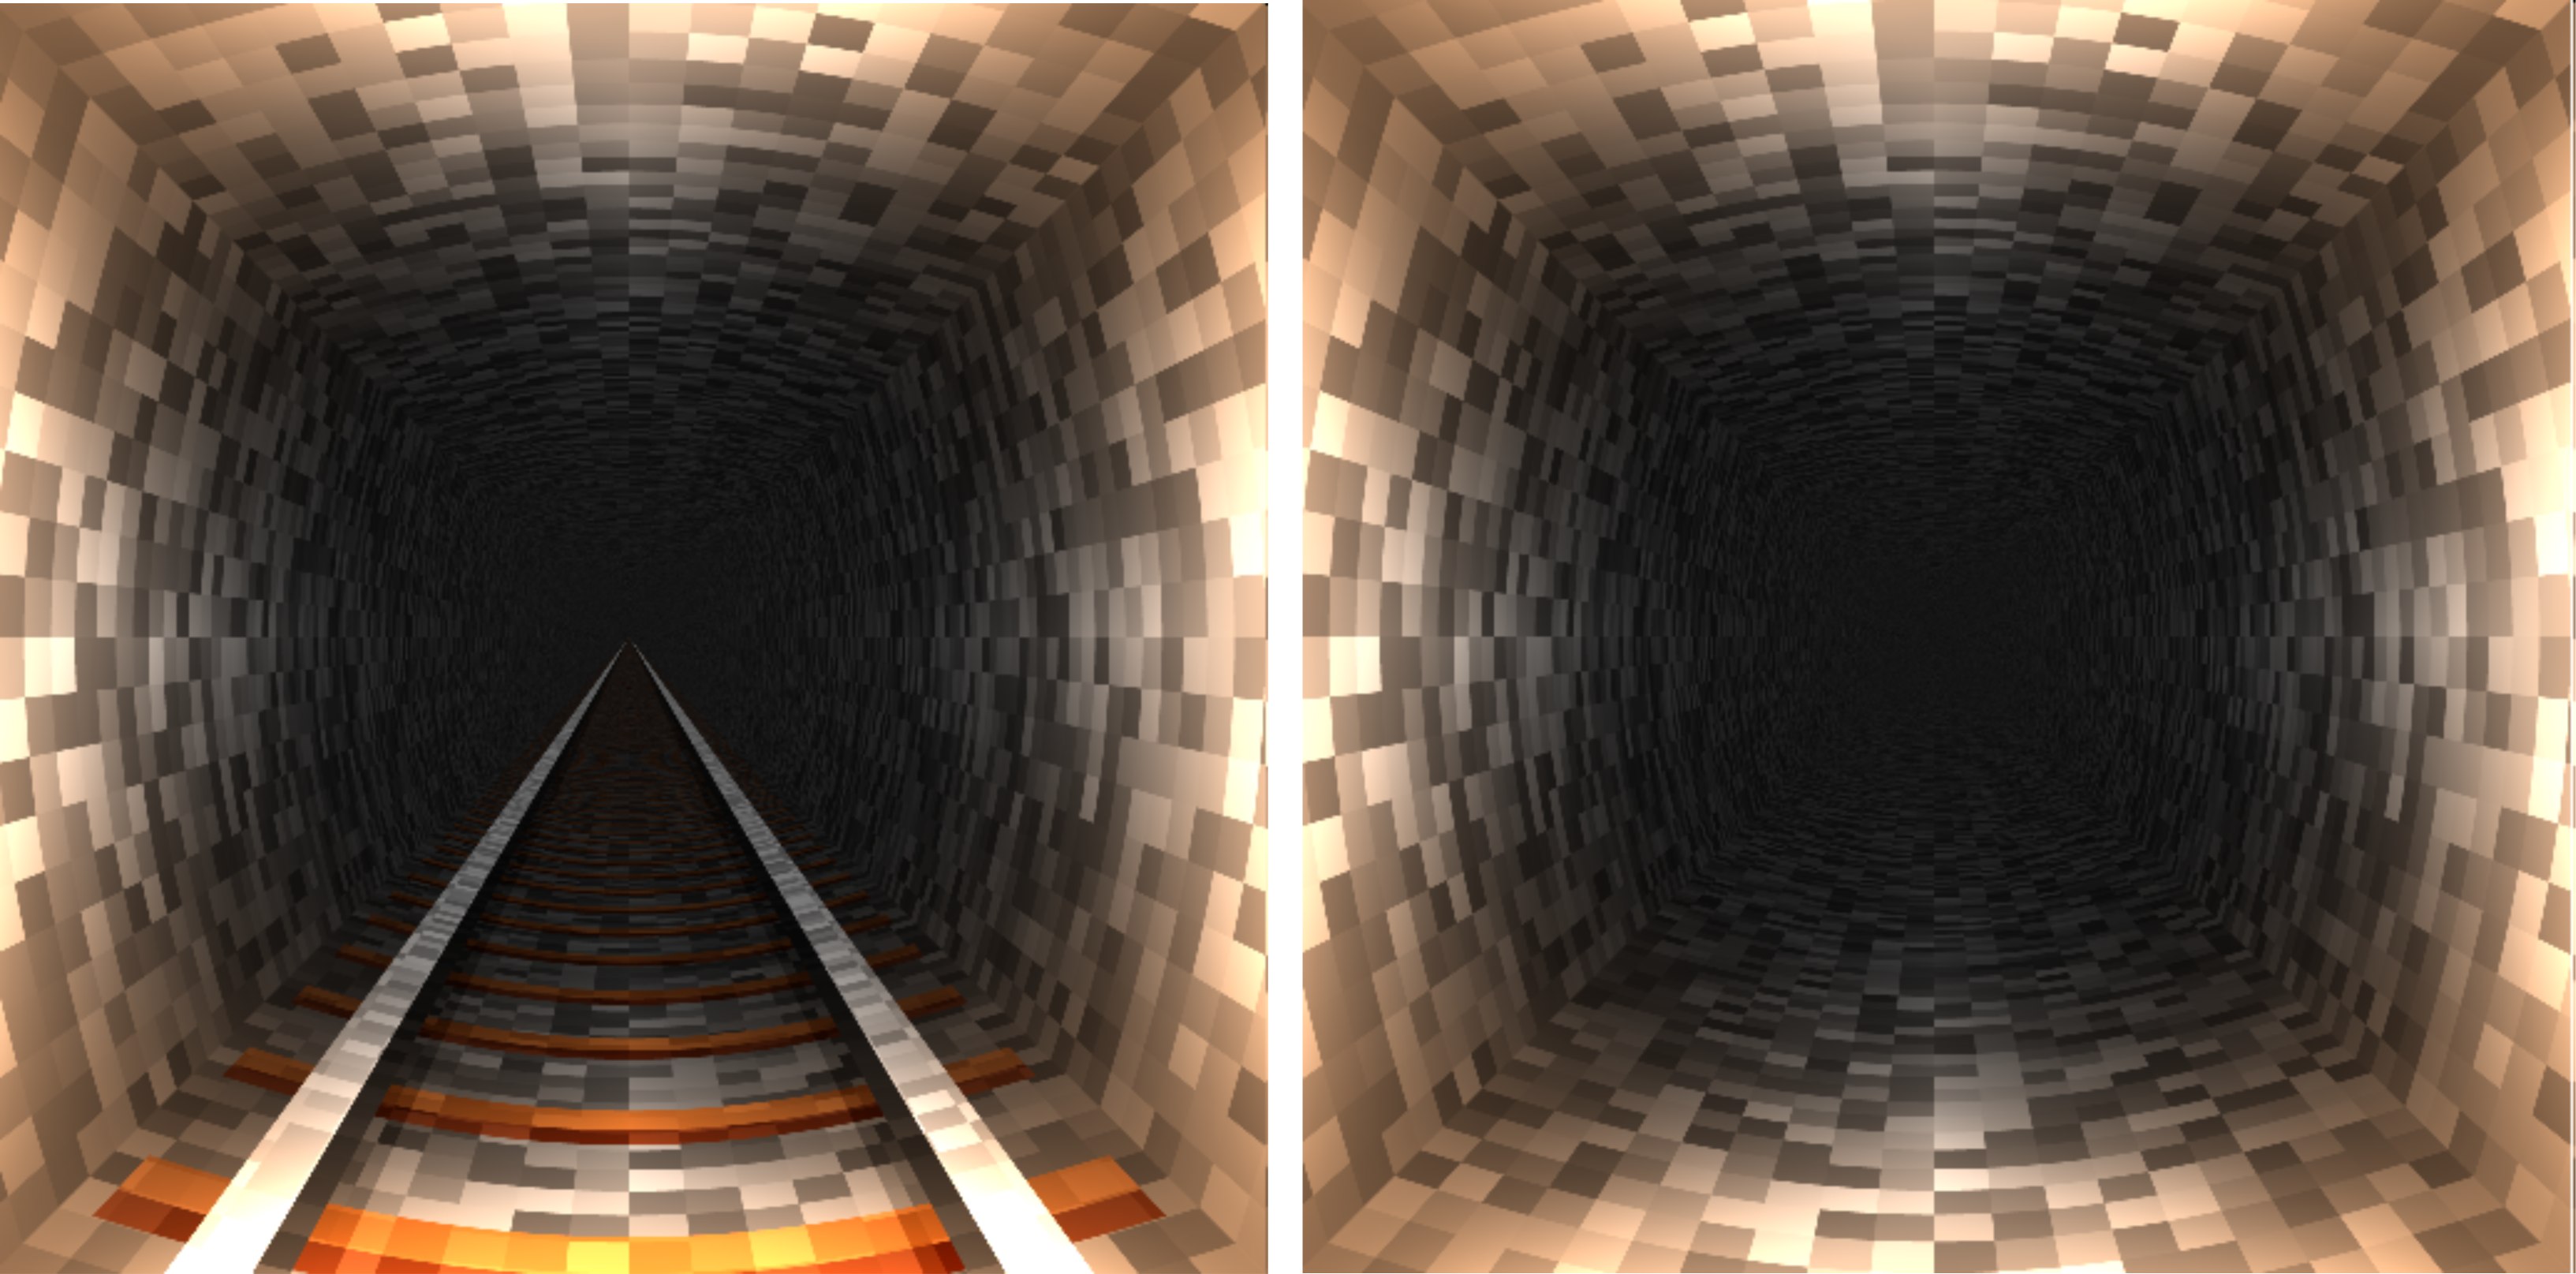
Animation for the tunnel - see its effect as you move along inside.
Things to Try
• Shift the origin point so the train tunnel seems to move left and right as it moves forward
• Other color schemes
• Interaction - mouse cursor or keyboard can be used to speedup/slowdown the animation
• Try adding a 3d box or train (e.g., sdf model of a train or character on the tracks)