As well as writing to data buffers (arrays of numbers) you can also write to textures. Essentially, textures are just arrays of colors. In this example, you'll visualizing the workgoups on the compute shader using a texture pattern. The texture is copied back to the client side as a `buffer'. This buffer is then written to a HTML Canvas so you can visualize the output.
This example helps you understand how the computational load is distributed across threads into workgroups and dispatch sizes, it also gives you some insights into how texture buffers works.
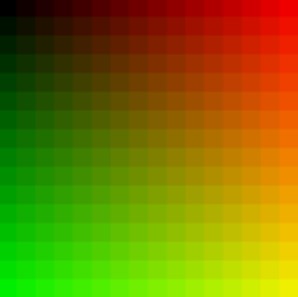
The output for this example is a texture with
16x16
blocks (each block is
8x8
).
The example dispatches
16x16
workgroups, each workgroup consisting of
8x8
blocks (which are represented as filled
8x8
solid color blocks in the image).
The texture is
128x128
(e.g.,
128/16==8
) so the number of dispatched workgroups and the workgroup size match (i.e.,
16x8=128
).
The shader invocation is done with this line:
dispatchWorkgroups(16, 16)
- which defines how many workgroups to launch.
That means that we execute the shader with
16
work groups in the
X
and
Y
dimensions (note the default for the Z dimension is 1 if not specified).
Most importantly, we use the globalId (if we enumerate all work items linearly, the
globalId
would be that of the index) of the current work item.
In this case, these values go from 0 to 128 on each dimension (
16
work groups
x8
work items
=128
shader executions), but the most important thing is the next line: to access the image, texture access function (textureStore) that takes integral values, ranged from
0
to texture size
1
.
Textures are handled different in compute shaders than in graphics shaders (fragment shaders), where texture coordinates are floating point variables and the values are normalized between 0.0 to 1.0. It's done differently on the compute shaders in part to avoid any kind of filterings, roundings, or inaccuracies at the moment of writing into a texture.
Complete Code
Let's go through the complete code to see how it all fits together. The first thing we do is define the wgsl compute shader - which is stored in a string constant called
computeShader
.
The to top of the compute shader defines the storage texture binding (
rgba32float
). The texture can only be used for writing. To write to the texture, you can't just access it like an array using an index, instead you've got to use the builtin function
textureStore
. This takes the
texture_storage_2d
variable, index of the pixel (
vec2<u32>
and the color
vec4<f32>
).
// Compute shader code
const computeShader = `
@group(0) @binding(0) var myTexture: texture_storage_2d<rgba32float, write>;

@compute @workgroup_size(8, 8)
fn main(@builtin(global_invocation_id) globalId      : vec3<u32>,
        @builtin(local_invocation_id)  localId       : vec3<u32>,
        @builtin(workgroup_id)         workgroupId   : vec3<u32>,
        @builtin(num_workgroups)       workgroupSize : vec3<u32>
        )
{
    var position = vec2<i32>( globalId.xy );
    var color    = vec4<f32>( vec3<f32>(workgroupId) / vec3<f32>(workgroupSize) , 1.0);

    textureStore(myTexture, position, color );
}
`;
Each thread is mapped to a pixel. The pixel index is identified in the compute shader using the
global_invocation_id
(which is the
globalId
variable). In addition to the
globalId
, there is a
localId
, which is the index within the smaller group (
0 to 8
in the x-dimension). The workgroup number and workgroup size are also provided which let you know the index of the local group within the larger grid.
Visualize how what the different builtin variables mean.
We add a helper function called
log(..)
which allows us to pring debug information to the main window (instead of just to the debug console).
<?php
let div = document.createElement('div');
document.body.appendChild( div );
div.style['font-size'] = '20pt';
function log( s )
{
  console.log( s );
  let args = [...arguments].join(' ');
  div.innerHTML += args + '<br><br>';
}
Just to kick things off, and to check the log function and the code is running, we send the message `WebGPU Compute Example` to the log function.
<?php
log('WebGPU Compute Example');
Simple check to see if the WebGPU API is available - it might be turned off? If it isn't, a message will be sent to the output window and the program will end.
if (!navigator.gpu) { log("WebGPU is not supported (or is it disabled? flags/settings)"); return; }
Instead of just copying the texture back directly to another texture buffer - the texture data is copied to a staging buffer so that we can iterate over the pixels in JavaScript. So we create `buffer3` which should be large enough to hold the image data. It also requires the
GPUBufferUsage.MAP_READ
flag, so the data can be mapped to a JavaScript array.
// Note this buffer is not linked to the 'STORAGE' compute (used to bring the data back to the CPU)
const buffer3 = new Float32Array( imgWidth * imgHeight * 4 );
const gbuffer3 = device.createBuffer({ size:  buffer3.byteLength, usage: GPUBufferUsage.COPY_DST | GPUBufferUsage.MAP_READ});
device.queue.writeBuffer(gbuffer3, 0, buffer3);
Not necessary, but we write data to the staging buffer (as an initialization) - set to
0
. As the
Float23Array
contents are initialized to
0
.
The binding group layout should match the data type (texture buffer) and be the same as what we set in the wgsl compute shader. For this example, there is only a single output buffer (texture).
Access the staging buffer and copy the data across to a JavaScript array. The array data is copied to a HTML Canvas output (see the result on screen). The copied data is an array of floating point values which represented the red, green, blue and alpha values for the image. This process is encapsulated in a helper function called
rgba32FloatToCanvas(..)
.
// Read buffer.
await gbuffer3.mapAsync(GPUMapMode.READ);
const arrayBuffer = gbuffer3.getMappedRange();
const result = new Float32Array(arrayBuffer);

// debug print some of the array values - chck they're correct
//log('array content 0:', result[0]);


function rgba32FloatToCanvas(array, width, height) {
    // Create a canvas element
    var canvas = document.createElement('canvas');
    canvas.style.border = '1px solid blue';
    canvas.width = width;
    canvas.height = height;
    var ctx = canvas.getContext('2d');
    canvas.style.width  = '300px';
    canvas.style.height = '300px';


    // Create an ImageData object from the Float32Array
    var imageData = ctx.createImageData(width, height);
    var data = imageData.data;
    for (var i = 0; i < array.length; i += 4) {
        data[i + 0] = array[i + 0] * 255;         // Red channel
        data[i + 1] = array[i + 1] * 255; // Green channel
        data[i + 2] = array[i + 2] * 255; // 255; // Blue channel
        data[i + 3] = 255;//array[i + 3] * 255; // Alpha channel
    }

    // Put the ImageData onto the canvas
    ctx.putImageData(imageData, 0, 0);

    // Append the canvas to the document body (for demonstration)
    document.body.appendChild(canvas);
}

// Call the function to draw the image
rgba32FloatToCanvas(result, imgWidth, imgHeight);
For this example, we have hard coded the numbers, for instance
passEncoder.dispatchWorkgroups( 16, 16 );
was set to 16, however, you can make things more flexible by using a calcuated value
This way, as you change the image size, the result will automatically work.
A word of caution - if the image dimensions are not a power of 2 (divisible by 8) the result will be a fraction (not a whole number) - which could cause 'fewer' dispatches than what are needed. So you'll need to round the number up and also make sure you check for limits in the compute shader.
For example, if the image is
122x122
pixels in size, then
122/8=15.25
- dispatch
15.25
workgroups - which will be rounded to
15
. But 15 isn't enough for every pixel to have a thread!
15x15x8x8=14400
- while there are
122x122=14884
pixels. So just be sure to round up the calculation to 16, then their will be more available threads than less.
Things to Try
• Try other texture formats (intead of rgba - try a black and white one)
• Try other workgroup and dispatch sizes
• Try other colors and patterns