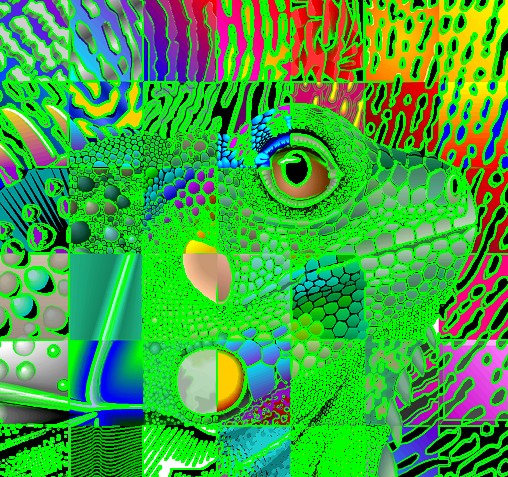
Their are different ways of creating a glow effect. For this example, we compbine two steps.
1. Edge Detection: Use a Sobel filter or a similar technique to detect edges in the image.
2. Glow Effect: Blur the edges and add a bright color to them to create the glow effect.
Combining these two steps creates a 'neon-like' glow effect.
Complete Code
<?php
let div = document.createElement('div');
document.body.appendChild( div );
div.style['font-size'] = '20pt';
function log( s )
{
  console.log( s );
  let args = [...arguments].join(' ');
  div.innerHTML += args + '<br><br>';
}

log('WebGPU Compute Example');

async function loadTexture(fileName = "https://webgpulab.xbdev.net/var/images/test512.png",
                           width=512, height=512) {
  console.log('loading image:', fileName);
  // Load image
  const img = document.createElement("img");
  img.src = fileName;

  await img.decode();

  const originalWidth = img.width;
  const originalHeight = img.height;

  const imageCanvas = document.createElement('canvas');
  imageCanvas.width = width;
  imageCanvas.height = height;
  const imageCanvasContext = imageCanvas.getContext('2d');

  // Draw the image onto the canvas, resizing it to the specified width and height
  imageCanvasContext.drawImage(img, 0, 0, width, height);

  const imageData = imageCanvasContext.getImageData(0, 0, width, height);
  const textureData = imageData.data;
  console.log('textureData.byteLength:', textureData.byteLength);

  const basicTexture = device.createTexture({
    size: [width, height, 1],
    format: "rgba8unorm",
    usage: GPUTextureUsage.COPY_DST | GPUTextureUsage.TEXTURE_BINDING
  });

  await device.queue.writeTexture(
    { texture: basicTexture },
    textureData,
    { bytesPerRow: width * 4 },
    [width, height, 1]
  );

  return { w: width, h: height, t: basicTexture };
}


if (!navigator.gpu) { log("WebGPU is not supported (or is it disabled? flags/settings)"); return; }

const adapter = await navigator.gpu.requestAdapter();
const device  = await adapter.requestDevice();

const imgWidth = 512;
const imgHeight = imgWidth;

// ----------------------------------------------------------

const texture0         = await loadTexture( 'https://webgpulab.xbdev.net/var/images/test512.png', imgWidth );
//const texture1         = await loadTexture( 'https://webgpulab.xbdev.net/var/images/avatar.png', imgWidth);

// ----------------------------------------------------------

// Basic canvas which will be used to display the output from the compute shader

let canvasa = document.createElement('canvas');
document.body.appendChild( canvasa ); canvasa.height = canvasa.width = imgWidth;
const context = canvasa.getContext('webgpu');
const presentationFormat = navigator.gpu.getPreferredCanvasFormat();
console.log('presentationFormat:', presentationFormat );

context.configure({ device: device,
                    usage: GPUTextureUsage.RENDER_ATTACHMENT | GPUTextureUsage.COPY_SRC | GPUTextureUsage.COPY_DST,
                    format: "rgba8unorm" /*presentationFormat*/  });

let canvasTexture = context.getCurrentTexture();

// ----------------------------------------------------------

// Output texture - output from the compute shader written to this texture
// Copy this texutre to the 'canvas' - needs to be the same size as the output
// canvas size
const texture1 = device.createTexture({
  size: [imgWidth, imgHeight, 1],
  format: "rgba8unorm",
  usage: GPUTextureUsage.COPY_DST | GPUTextureUsage.COPY_SRC | GPUTextureUsage.TEXTURE_BINDING | GPUTextureUsage.STORAGE_BINDING
});

// ----------------------------------------------------------


const timerUniformBuffer = device.createBuffer({
  size: 4,
  usage: GPUBufferUsage.UNIFORM | GPUBufferUsage.COPY_DST
});

const timestep  = new Float32Array( [0.0] );

device.queue.writeBuffer(timerUniformBuffer,   0, timestep             );


// ----------------------------------------------------------

const GCOMPUTE = GPUShaderStage.COMPUTE;

// Bind group layout and bind group
const bindGroupLayout = device.createBindGroupLayout({
  entries: [ {binding: 0, visibility: GCOMPUTE, texture: { sampleType: "float" }   },
             {binding: 1, visibility: GCOMPUTE, buffer:  { type: "uniform"     }   },
             {binding: 2, visibility: GCOMPUTE, storageTexture: {format:"rgba8unorm", access:"write-only", viewDimension:"2d"}   }
           ]
});

const bindGroup = device.createBindGroup({
    layout: bindGroupLayout,
    entries: [  {   binding: 0,  resource: texture0.t.createView()         },
                  {   binding: 1,  resource: { buffer: timerUniformBuffer  } },
                {   binding: 2,  resource: texture1.createView()           }
    ]
});


// Compute shader code
const computeShader = `
@group(0) @binding(0) var myTexture0:  texture_2d<f32>; // input texture image
@group(0) @binding(1) var<uniform>     mytimer   : f32; // timer increments each frame
@group(0) @binding(2) var myTexture1:  texture_storage_2d<rgba8unorm, write>; // output image

// Sobel filter kernels
const sobelX: array<array<f32, 3>, 3> = array(
    array(-1.0, 0.0, 1.0),
    array(-2.0, 0.0, 2.0),
    array(-1.0, 0.0, 1.0)
);

const sobelY: array<array<f32, 3>, 3> = array(
    array(-1.0, -2.0, -1.0),
    array(0.0, 0.0, 0.0),
    array(1.0, 2.0, 1.0)
);

fn sobelEdgeDetection(uv: vec2<f32>, imgSize: vec2<f32>) -> f32 {
    var edgeX: f32 = 0.0;
    var edgeY: f32 = 0.0;

    for (var i: i32 = -1; i <= 1; i = i + 1) {
        for (var j: i32 = -1; j <= 1; j = j + 1) {
            let offset = vec2<f32>(f32(i), f32(j)) / imgSize;
            let sample = textureLoad(myTexture0, vec2<i32>(uv * imgSize + vec2<f32>(f32(i), f32(j))), 0).r;
            edgeX = edgeX + sample * sobelX[i + 1][j + 1];
            edgeY = edgeY + sample * sobelY[i + 1][j + 1];
        }
    }

    return length(vec2<f32>(edgeX, edgeY));
}

// Function to apply glow effect
fn applyGlow(color: vec4<f32>, glowAmount: f32, glowColor: vec4<f32>) -> vec4<f32> {
    return mix(color, glowColor, glowAmount);
}

@compute @workgroup_size(8, 8)
fn main(@builtin(global_invocation_id) globalId      : vec3<u32>,
        @builtin(local_invocation_id)  localId       : vec3<u32>,
        @builtin(workgroup_id)         workgroupId   : vec3<u32>,
        @builtin(num_workgroups)       workgroupSize : vec3<u32>
        )
{
    var imgWidth  = f32( ${imgWidth}  );
    var imgHeight = f32( ${imgHeight} );

    var imgSize = vec2<f32>(imgWidth, imgHeight);

    var coords = vec2<f32>(f32(globalId.x), f32(globalId.y));
    var uv = coords / imgSize; // normalize coordinates to 0.0 - 1.0 range

    // Load the color from the input texture
    var color = textureLoad(myTexture0, vec2<i32>(uv * imgSize), 0);

    // Detect edges using Sobel filter
    var edgeStrength = sobelEdgeDetection(uv, imgSize);

    // Apply the glow effect
    var glowColor = vec4<f32>(0.0, 1.0, 0.0, 1.0); // Neon glow color
    var glowAmount = smoothstep(0.2, 1.0, edgeStrength); // Adjust the range for glow effect
    var finalColor = applyGlow(color, glowAmount, glowColor);

    // Store the result in the output texture
    textureStore(myTexture1, vec2<i32>(globalId.xy), finalColor);
}
`;


// Pipeline setup
const computePipeline = device.createComputePipeline({
    layout :   device.createPipelineLayout({bindGroupLayouts: [bindGroupLayout]}),
    compute: { module    : device.createShaderModule({code:computeShader}),
               entryPoint: "main" }
});


timestep[0] = timestep[0] + 0.1;
device.queue.writeBuffer(timerUniformBuffer,   0, timestep             );


// Commands submission
const commandEncoder = device.createCommandEncoder();
const passEncoder = commandEncoder.beginComputePass();
passEncoder.setPipeline(computePipeline);
passEncoder.setBindGroup(0, bindGroup);
passEncoder.dispatchWorkgroups( imgWidth/8, imgWidth/8 );
await passEncoder.end();


canvasTexture = context.getCurrentTexture();

await
commandEncoder.copyTextureToTexture( { texture: texture1 },
                                    { texture: canvasTexture },
                                    { width:imgWidth, height:imgHeight, depthOrArrayLayers:1} );

// Submit GPU commands.
const gpuCommands = commandEncoder.finish();
await device.queue.submit([gpuCommands]);
Things to Try
• Try other colors for the glow effect
• Mix in a timer so the flow effect animates
• Combine the glow effect with image filters