Color Triangle (Rainbow)
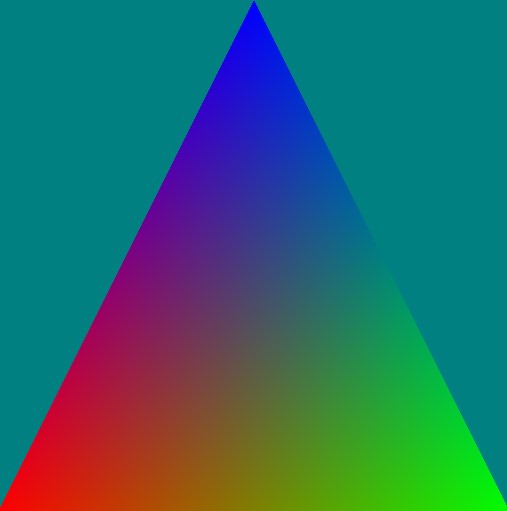
Color triangle on screen
Functions Used: setVertexBuffer(), setIndexBuffer(), drawIndexed(), createBuffer(), getMappedRange(), getContext(), requestAdapter(), getPreferredCanvasFormat(), createCommandEncoder(), beginRenderPass(), setPipeline(), draw(), end(), submit(), getCurrentTexture(), createView(), createShaderModule()
interpolated - that why you get those pretty rainbow colors and not just hard red, green and blue.
/*
WebGPU Example - Color Triangle
Simple uncluttered example (no libraries)
Key details:
- Index buffer (faces), vertices, color, depth buffer, shaders,
*/
let canvas = document . createElement ( 'canvas' );
document . body . appendChild ( canvas );
canvas . width = canvas . height = 512 ;
const adapter = await navigator . gpu . requestAdapter ();
const device = await adapter . requestDevice ();
const context = canvas . getContext ( 'webgpu' );
const presentationSize = [ canvas . width ,
canvas . height ]
const presentationFormat = navigator . gpu . getPreferredCanvasFormat ();
context . configure ({ device : device , alphaMode : "opaque" , // old way compositingAlphaMode: "opaque"
format : presentationFormat ,
size : presentationSize });
const vertWGSL = `
struct VSOut {
@builtin(position) Position: vec4<f32>,
@location(0) color : vec3<f32>,
};
@vertex
fn main(@location(0) inPos : vec3<f32>,
@location(1) inColor: vec3<f32>) -> VSOut
{
var vsOut: VSOut;
vsOut.Position = vec4<f32>(inPos, 1.0);
vsOut.color = inColor;
return vsOut;
}
`;
const fragWGSL = `
@fragment
fn main(@location(0) inColor: vec3<f32>) -> @location(0) vec4<f32>
{
return vec4<f32>(inColor, 1.0);
}
`;
const positions = new Float32Array ([- 1.0 , - 1.0 , 0.0 , // Position Vertex Buffer Data
1.0 , - 1.0 , 0.0 ,
0.0 , 1.0 , 0.0 ]);
const colors = new Float32Array ([ 1.0 , 0.0 , 0.0 , // Color Vertex Buffer Data
0.0 , 1.0 , 0.0 ,
0.0 , 0.0 , 1.0 ]);
const indices = new Uint16Array ( [ 0 , 1 , 2 ]); // Index Buffer Data
const createBuffer = ( arrData , usage ) => {
const buffer = device . createBuffer ({ size : (( arrData . byteLength + 3 ) & ~ 3 ),
usage : usage ,
mappedAtCreation : true });
if ( arrData instanceof Float32Array )
{ (new Float32Array ( buffer . getMappedRange ())). set ( arrData ) }
else
{ (new Uint16Array ( buffer . getMappedRange ())). set ( arrData ) }
buffer . unmap ();
return buffer ;
}
// Declare buffer handles (GPUBuffer)
var positionBuffer = createBuffer ( positions , GPUBufferUsage . VERTEX );
var colorBuffer = createBuffer ( colors , GPUBufferUsage . VERTEX );
var indexBuffer = createBuffer ( indices , GPUBufferUsage . INDEX );
const pipeline = device . createRenderPipeline ({
layout : 'auto' ,
vertex : { module : device . createShaderModule ({ code : vertWGSL }),
entryPoint : 'main' ,
buffers : [ { arrayStride : 12 , attributes : [{ shaderLocation : 0 ,
format : "float32x3" ,
offset : 0 }] },
{ arrayStride : 12 , attributes : [{ shaderLocation : 1 ,
format : "float32x3" ,
offset : 0 }] }
]
},
fragment : { module : device . createShaderModule ({ code : fragWGSL }),
entryPoint : 'main' ,
targets : [ { format : presentationFormat } ],
},
primitive : {
topology : "triangle-list" ,
cullMode : 'back'
},
depthStencil : {
format : "depth24plus" ,
depthWriteEnabled : true ,
depthCompare : "less"
}
});
const depthTexture = device . createTexture ({
size : [ canvas . width , canvas . height , 1 ],
format : "depth24plus" ,
usage : GPUTextureUsage . RENDER_ATTACHMENT
})
const renderPassDescription = {
colorAttachments : [{
view : context . getCurrentTexture (). createView (),
loadOp : "clear" , clearValue : [ 0 , 0.5 , 0.5 , 1 ], // clear screen to color
storeOp : 'store'
}],
depthStencilAttachment : {
view : depthTexture . createView (),
depthLoadOp : "clear" , depthClearValue : 1 ,
depthStoreOp : "store" ,
}
};
function frame ()
{
renderPassDescription . colorAttachments [ 0 ]. view = context . getCurrentTexture (). createView ();
const commandEncoder = device . createCommandEncoder ();
const renderPass = commandEncoder . beginRenderPass ( renderPassDescription );
renderPass . setPipeline ( pipeline );
renderPass . setVertexBuffer ( 0 , positionBuffer );
renderPass . setVertexBuffer ( 1 , colorBuffer );
renderPass . setIndexBuffer ( indexBuffer , 'uint16' );
renderPass . drawIndexed ( 3 , 1 );
renderPass . end ();
device . queue . submit ([ commandEncoder . finish ()]);
}
frame ();
// only update when moving the mouse (modified to update all time)
onmousemove = function() {
frame ();
}
console . log ( 'ready...' );
Resources and Links
LINK ]