Matrices introduce high level control which is well suited to the GPU. GPU's love matrices! They're very parallel and can be added to the vertex pipeline very easily.
Matrices and triangles - bringing transforms, projections, cameras, ... into the picture using uniforms and layouts.
Before we jump into adding matrices into our WebGPU program, let's just clarify what matrices are! Matrices are just arrays of numbers (similar to vectors). For example, a 3x3 matrix is just 9 floating point numbers:
[0, 0, 0, 0, 0, 0, 0, 0, 0]
While it's stored in memory as a flat array of numbers, we usually visuase and think of matrices in their 2d form (3 rows and 3 columns):
[ 0, 0, 0
  0, 0, 0,
  0, 0, 0 ]
Matrices are built on top of linear algebra. There are a set of rules for how to combine them together so that they have a special meaning. For example, to combine two matrices together - you don't add them, you would `multiply` them.
Power of Matrices in Computer Graphics
Matrices are a powerful (indespensible) concept in computer graphics. They enable us to combine multiple simple and complex transforms in a single form which can be quickly and easily applied to all vectors.
The 3 main matrices you use in computer graphics are the `model' transform, `view' (transform) and the `projection' transform. When these three matrices are combined they're referred to as the `modelviewprojection` or `MVP`.
The represent the local tranform for the shape, the transform to position the shape relative to the camera and the final transform (the projection) is to add depth (things get smaller as they get further away).
Matrix Libraries
To make our life easier, there are a number of free open source libraries available online - one of the most popular and well know is the
We can also load the script dynamically on-the-fly - however, to ensure the script is ready and loade on time - we load the script using a
fetch
function (using asyncrhonous
await
).
<?php
let promise      = await fetch('https://cdnjs.cloudflare.com/ajax/libs/gl-matrix/2.6.0/gl-matrix-min.js');
let text         = await promise.text();
let script       = document.createElement('script');
script.type      = 'text/javascript';
script.async     = false;
script.innerHTML = text;
document.body.appendChild(script);
Some test cases of how to use the matrix library:
<?php
let m = mat4.create();
console.log( m );
console.log( String(m) );

console.log('m instanceof Float32Array: ', m instanceof Float32Array );

let v = vec4.create();
console.log( v );
console.log( String(v) );

v.x = 2;
console.log( v );

let r = vec4.create();
vec4.transformMat4( r, v, m );
console.log( r );

console.log('**list all methods available in vec4:**');
for (let key in vec4)
{
    console.log( key  );
}

m[4] = 4;
m[5] = 5;
console.log( String(m) );
Of course, you don't want to manually go looping over all of your vertices and applying the transform on the CPU! Instead, you can take advantage of the GPU and the vertex shader. You can setup the matrix, copy it across to the GPU, link it up with the graphics pipeline - and you're all set to go.
Key things:
• You'll usually work with mat4 matrices and vec4 - so you can do all transforms (including projection)
• Usually the `projection` and `view` matrices are common to the scene but each mesh/shape has their own local `model` transform
• Matrix transforms are combined through multiplication
• Identity matrix is a special type of matrix (all zero except for 1's along the diagonal) - when combined with any other matrix it does not change anythign (sort of like multiplying it by the number 1)
Matrix Helper Function (Build Matrices)
To help you manage your matrices you can construct a simple help function - pass in the camera location (and target) and the local transform. The projection matrix is left as as the default (which uses the canvas dimensions).
function buildMatrix( p, r, s ) // position, rotation, scale
{
    // if not set fall back to default values
    if (!s) s = {x:1, y:1, z:1};
    if (!r) r = {x:0, y:0, z:0};
    if (!p) p = {x:0, y:0, z:0};

    // Create the matrix in Javascript (using matrix library)
    const modelMatrix          = mat4.create();

    // create the model transform with a rotation and translation
    let translateMat = mat4.create();   mat4.fromTranslation( translateMat, Object.values(p) );
    let rotateXMat   = mat4.create();   mat4.fromXRotation(rotateXMat, r.x);
    let rotateYMat   = mat4.create();   mat4.fromYRotation(rotateYMat, r.y);
    let rotateZMat   = mat4.create();   mat4.fromZRotation(rotateZMat, r.z);
    let scaleMat     = mat4.create();   mat4.fromScaling(scaleMat, Object.values(s) );

    mat4.multiply(modelMatrix, modelMatrix,   translateMat);
    mat4.multiply(modelMatrix, modelMatrix,   rotateXMat);
    mat4.multiply(modelMatrix, modelMatrix,   rotateYMat);
    mat4.multiply(modelMatrix, modelMatrix,   rotateZMat);
    mat4.multiply(modelMatrix, modelMatrix,   scaleMat);
    return modelMatrix;
}

// build a model matrix (scale, rotate and position it wherever we want)
let modelMatrix = buildMatrix();

// setup the projection
let projectionMatrix = mat4.create();
mat4.perspective(projectionMatrix, Math.PI / 2, canvas.width / canvas.height, 0.001, 5000.0);

// camera `lookat` - camera is at -4 units down the z-axis looking at '0,0,0'
let viewMatrix = mat4.create();
mat4.lookAt(viewMatrix, [0,0,-4],  [0,0,0], [0, 1, 0]);
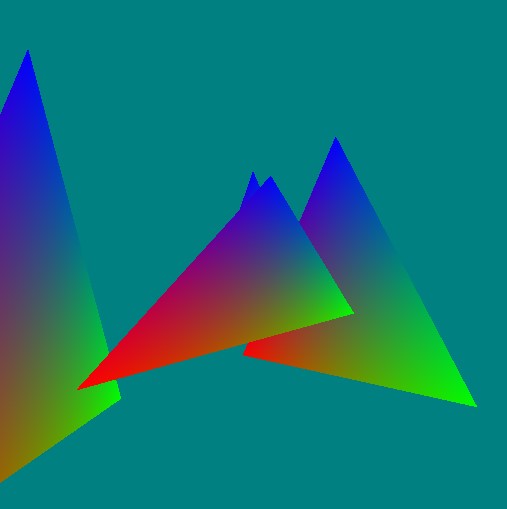
As a simple example, we'll place a few triangles in the scene and have the camera revolve around them using a sine function.
All the triangles will be positioned using a `model` matrix (so it's the same triangle, but with a different transforms).
We construct a GPU buffer for the 3 matrices as follows:
As we rotate the camera around - so that we can see triangles from the front and back (i.e., not culled) - we set the cullmode to 'none' in the pipeline renderer when created:
Since we're going to do multiple render passes with different transforms - that means we'll need to clear the first time (so the backgrounds is cleared) - but on every subsequent render the new contents are added to the output.
....
    const renderPassDescription = {
      colorAttachments: [{
        view: context.getCurrentTexture().createView(),
        loadOp: (k==0 ? "clear":"load"),  // only clear for the first render pass draw
        clearValue: [0, 0.5, 0.5, 1], // clear screen to color
        storeOp: 'store'
....
A final update is to the vertex shader - each vertex is transformed by the model view projection matrices. We combine them together (by multiplication) and then apply it to the position by multiplication! It's that easy!
@vertex
fn main(@location(0) inPos  : vec3<f32>,
        @location(1) inColor: vec3<f32>) -> VSOut
{
    var mvp = transforms.projection * transforms.view * transforms.model;

    var vsOut: VSOut;
    vsOut.Position = mvp * vec4<f32>(inPos, 1.0); // apply transform to position
    vsOut.color    = inColor;
    return vsOut;
}
Full Working Example
Bring all the bits and pieces together and look at the complete code:
/*
    WebGPU Example - Color Triangle
    Simple uncluttered example (no libraries)

    Key details:
    - Index buffer (faces), vertices, color, depth buffer, shaders,
*/
let promise      = await fetch('https://cdnjs.cloudflare.com/ajax/libs/gl-matrix/2.6.0/gl-matrix-min.js');
let text         = await promise.text();
let script       = document.createElement('script');
script.type      = 'text/javascript';
script.async     = false;
script.innerHTML = text;
document.body.appendChild(script);

let canvas = document.createElement('canvas');
document.body.appendChild( canvas );
canvas.width  = canvas.height = 512;

const adapter = await navigator.gpu.requestAdapter();
const device  = await adapter.requestDevice();
const context = canvas.getContext('webgpu');

const presentationSize   = [ canvas.width,
                             canvas.height ]

const presentationFormat = navigator.gpu.getPreferredCanvasFormat();

context.configure({ device : device,
                    format : presentationFormat,
                    size   : presentationSize });
const vertWGSL = `
struct Transforms {
    model      : mat4x4<f32>,
    view       : mat4x4<f32>,
    projection : mat4x4<f32>,
};
@group(0) @binding(0) var<uniform> transforms : Transforms;

struct VSOut {
    @builtin(position) Position: vec4<f32>,
    @location(0)       color   : vec3<f32>,
};

@vertex
fn main(@location(0) inPos  : vec3<f32>,
        @location(1) inColor: vec3<f32>) -> VSOut
{
    var mvp = transforms.projection * transforms.view * transforms.model;

    var vsOut: VSOut;
    vsOut.Position = mvp * vec4<f32>(inPos, 1.0);
    vsOut.color    = inColor;
    return vsOut;
}
`;

const fragWGSL = `
@fragment
fn main(@location(0) inColor: vec3<f32>) -> @location(0) vec4<f32>
{
    return vec4<f32>(inColor, 1.0);
}
`;

const positions = new Float32Array([-1.0, -1.0, 0.0,   // Position Vertex Buffer Data
                                     1.0, -1.0, 0.0,
                                     0.0,  1.0, 0.0 ]);
const colors    = new Float32Array([ 1.0, 0.0, 0.0,    // Color Vertex Buffer Data
                                     0.0, 1.0, 0.0,
                                     0.0, 0.0, 1.0  ]);
const indices   = new Uint16Array( [ 0, 1, 2 ]);       // Index Buffer Data

const createBuffer = (arrData, usage) => {
  const buffer = device.createBuffer({ size            : ((arrData.byteLength + 3) & ~3),
                                       usage           : usage,
                                       mappedAtCreation: true  });
  if ( arrData instanceof Float32Array )
  { (new Float32Array(buffer.getMappedRange())).set(arrData) }
  else
  { (new Uint16Array (buffer.getMappedRange())).set(arrData) }
  buffer.unmap();
  return buffer;
}

// Declare buffer handles (GPUBuffer)
var positionBuffer = createBuffer(positions, GPUBufferUsage.VERTEX);
var colorBuffer    = createBuffer(colors,    GPUBufferUsage.VERTEX);
var indexBuffer    = createBuffer(indices,   GPUBufferUsage.INDEX);

// ----------------------------------------------------------------

function buildMatrix( p, r, s ) // position, rotation, scale
{
    // if not set fall back to default values
    if (!s) s = {x:1, y:1, z:1};
    if (!r) r = {x:0, y:0, z:0};
    if (!p) p = {x:0, y:0, z:0};

    // Create the matrix in Javascript (using matrix library)
    const modelMatrix          = mat4.create();

    // create the model transform with a rotation and translation
    let translateMat = mat4.create();   mat4.fromTranslation( translateMat, Object.values(p) );
    let rotateXMat   = mat4.create();   mat4.fromXRotation(rotateXMat, r.x);
    let rotateYMat   = mat4.create();   mat4.fromYRotation(rotateYMat, r.y);
    let rotateZMat   = mat4.create();   mat4.fromZRotation(rotateZMat, r.z);
    let scaleMat     = mat4.create();   mat4.fromScaling(scaleMat, Object.values(s) );

    mat4.multiply(modelMatrix, modelMatrix,   translateMat);
    mat4.multiply(modelMatrix, modelMatrix,   rotateXMat);
    mat4.multiply(modelMatrix, modelMatrix,   rotateYMat);
    mat4.multiply(modelMatrix, modelMatrix,   rotateZMat);
    mat4.multiply(modelMatrix, modelMatrix,   scaleMat);
    return modelMatrix;
}

// build a model matrix (scale, rotate and position it wherever we want)
let modelMatrix = buildMatrix();

// setup the projection
let projectionMatrix = mat4.create();
mat4.perspective(projectionMatrix, Math.PI / 2, canvas.width / canvas.height, 0.001, 5000.0);

// default camera `lookat` - camera is at -4 units down the z-axis looking at '0,0,0'
let viewMatrix = mat4.create();
mat4.lookAt(viewMatrix, [0,0,-4],  [0,0,0], [0, 1, 0]);


let mvpUniformBuffer = device.createBuffer({
  size: 64*3,
  usage: GPUBufferUsage.UNIFORM | GPUBufferUsage.COPY_DST
});

device.queue.writeBuffer(mvpUniformBuffer,      0,      modelMatrix);
device.queue.writeBuffer(mvpUniformBuffer,      64,     viewMatrix);
device.queue.writeBuffer(mvpUniformBuffer,      128,    projectionMatrix);

// ----------------------------------------------------------------

let sceneUniformBindGroupLayout = device.createBindGroupLayout({
  entries: [
    { binding: 0, visibility: GPUShaderStage.VERTEX,   buffer:  { type: "uniform"  }   }
  ]
});

let uniformBindGroup = device.createBindGroup({
  layout:   sceneUniformBindGroupLayout,
  entries: [
    { binding : 0, resource: { buffer: mvpUniformBuffer        } }
   ],
});

// ----------------------------------------------------------------

const pipeline = device.createRenderPipeline({
  layout: device.createPipelineLayout({bindGroupLayouts: [sceneUniformBindGroupLayout]}),
  vertex:    { module     : device.createShaderModule({code   : vertWGSL }),
               entryPoint : 'main',
               buffers    : [ { arrayStride: 12, attributes: [{ shaderLocation: 0,
                                                                format: "float32x3",
                                                                offset: 0  }]         },
                              { arrayStride: 12, attributes: [{ shaderLocation: 1,
                                                                format: "float32x3",
                                                                offset: 0  }]         }
    ]
  },
  fragment:  { module     : device.createShaderModule({ code  : fragWGSL }),
               entryPoint : 'main',
               targets    : [ {format: presentationFormat } ],
  },
  primitive: {
    topology: "triangle-list",
    frontFace: "cw",
    cullMode: 'none'
  },
  depthStencil: {
    format: "depth24plus",
    depthWriteEnabled: true,
    depthCompare: "less"
  }
});

const depthTexture = device.createTexture({
  size: [canvas.width, canvas.height, 1],
  format: "depth24plus",
  usage:  GPUTextureUsage.RENDER_ATTACHMENT
})


let counter = 0.0;

function frame()
{
  // setup a transform for each triangle
  let tris = [  { p:{x:0,y:0,z:0}, r:{x:0,y:0.0,z:0.0}, s:{x:1.0, y:1.0,z:1.0} },
                { p:{x:1,y:0,z:0}, r:{x:0,y:0.2,z:0.0}, s:{x:1.0, y:1.1,z:1.0} },
                { p:{x:0,y:0,z:2}, r:{x:0,y:2.0,z:0.0}, s:{x:0.7, y:1.2,z:1.0} },
                { p:{x:1,y:0,z:1}, r:{x:0,y:1.4,z:0.0}, s:{x:1.0, y:0.5,z:0.5} } ];

  // loop over each triangle and render it
  tris.forEach( (t,k)=>{

    let modelMatrix = buildMatrix(t.p, t.r, t.s);
    // update the local matrix for each triangle draw differently
    device.queue.writeBuffer(mvpUniformBuffer,      0,      modelMatrix);

    // Rotate the camera around the origin in the circle
    let cameraEye = [ Math.cos(counter)*3.0, 0.0, Math.sin(counter)*3.0 ];
    mat4.lookAt(viewMatrix, cameraEye,  [0,0,0], [0, 1, 0]);
    device.queue.writeBuffer(mvpUniformBuffer,      64,     viewMatrix);

    // simple counter
    counter += 0.001;


    const renderPassDescription = {
      colorAttachments: [{
        view: context.getCurrentTexture().createView(),
        loadOp: (k==0 ? "clear":"load"),
        clearValue: [0, 0.5, 0.5, 1], // clear screen to color
        storeOp: 'store'
      }],
      depthStencilAttachment: {
        view: depthTexture.createView(),
        depthLoadOp: (k==0 ? "clear":"load"),
        depthClearValue: 1,
        depthStoreOp: "store",
      }
    };

    renderPassDescription.colorAttachments[0].view = context.getCurrentTexture().createView();
      const commandEncoder = device.createCommandEncoder();
      const renderPass = commandEncoder.beginRenderPass(renderPassDescription);

    renderPass.setBindGroup(0, uniformBindGroup);
    renderPass.setPipeline(pipeline);
    renderPass.setVertexBuffer(0, positionBuffer);
    renderPass.setVertexBuffer(1, colorBuffer);
    renderPass.setIndexBuffer(indexBuffer, 'uint16');
    renderPass.drawIndexed(3,1);
    renderPass.end();
    device.queue.submit([commandEncoder.finish()]);
  });

  // animate - keep updating
  requestAnimationFrame(frame);
}

frame();


console.log('ready...');
Resources
• WebGPU Lab Example (Matrices & Triangles) [LINK]
Visitor:
Copyright (c) 2002-2026 xbdev.net - All rights reserved.
Designated articles, tutorials and software are the property of their respective owners.