Object Selection (Working with World and Screen Space)
Objects in the 3d world can't just be selected - there are a few factors you need to account for. For instance, the camera and projection matrix - which will rotate and move the objects around - while the projection matrix will make it smaller as it gets further away.
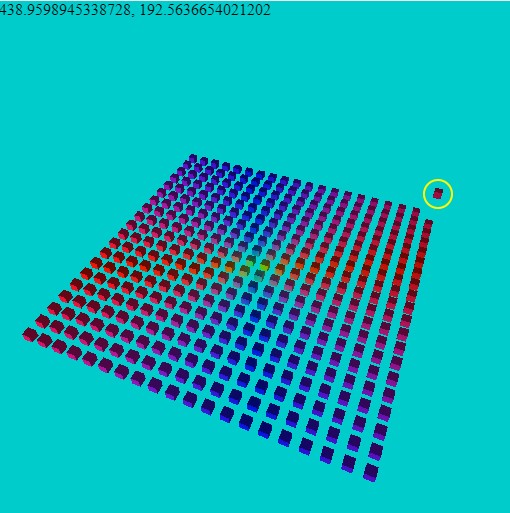
Working with objects in 3 dimensional scenes. The figure shows us taking the position for a cube and then drawing a circle around the cube in 2d screen space with a 'div' element. As the cubes all move around the circle keeps track of the selected on with a circle.
There is two ways of doing this - we convert the 3d object into the 2d world (squash it from 3d into 2d - as the graphics vertex stage does). Or we can take a mouse position and convert it into 3d world coordinates (i.e., point to a 3d ray into the scene).
• World to Screen
• Screen to World
The following example gives you an example of a function for converting a world point (3d) to a 2d screen location:
function worldToScreen( point3D, canvas, model, view, projection )
{
    // Create a homogeneous 4D vector for the point
    const point4D = vec4.fromValues(point3D[0], point3D[1], point3D[2], 1);

    // Model-view-projection matrix (combination of projection and view matrices)
    const mvpMatrix = mat4.create();
    mat4.multiply(mvpMatrix, mvpMatrix, projection);
    mat4.multiply(mvpMatrix, mvpMatrix, view);
    mat4.multiply(mvpMatrix, mvpMatrix, model);

    // Transform point to clip space
    const clipSpace = vec4.create();
    vec4.transformMat4(clipSpace, point4D, mvpMatrix);

    // Perform perspective division to get NDC
    const ndcX = clipSpace[0] / clipSpace[3];
    const ndcY = clipSpace[1] / clipSpace[3];
    const ndcZ = clipSpace[2] / clipSpace[3];

    // Map NDC to screen space
    const screenWidth  = canvas.width;
    const screenHeight = canvas.height;
    const screenX = (ndcX + 1) * 0.5 * screenWidth;
    const screenY = (1 - ndcY) * 0.5 * screenHeight;
    const screenZ = ndcZ;

    // screenX, screenY now contain the 2D screen coordinates of the 3D point
    // screenZ can be used if you need depth information in screen space
    return { x:screenX, y:screenY, z:screenZ };
}
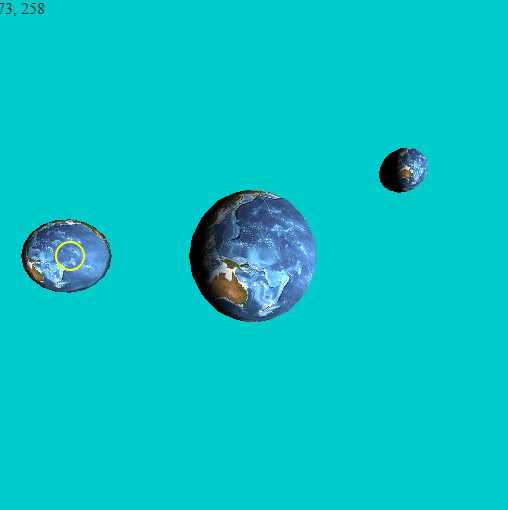
Place multiple spheres on screen (world orbs) - move the cursor around to see which is closest to the mouse.
// Load matrix library on dynamically (on-the-fly)
let matprom = await fetch( 'https://cdnjs.cloudflare.com/ajax/libs/gl-matrix/2.6.0/gl-matrix-min.js' );
let mattex  = await matprom.text();
var script   = document.createElement('script');
script.type  = 'text/javascript';
script.innerHTML = mattex;
document.head.appendChild(script);

// -------------
let canvas = document.createElement('canvas');
canvas.style.border = '0px solid blue';
canvas.style.position = 'absolute';
canvas.style.left = '0px';
canvas.style.top  = '0px';
canvas.style.margin = 0;
canvas.style.padding = 0;
document.body.appendChild( canvas ); canvas.height=canvas.width=512;

const context = canvas.getContext('webgpu');
const adapter = await navigator.gpu.requestAdapter();
const device  = await adapter.requestDevice();
const presentationFormat = navigator.gpu.getPreferredCanvasFormat();
context.configure({ device: device, format: presentationFormat  });

const presentationSize   = [ canvas.width, canvas.height ];

// ----------------------

const projectionMatrix     = mat4.create();
const viewMatrix           = mat4.create();

mat4.perspective(projectionMatrix, Math.PI / 2, canvas.width / canvas.height, 0.001, 500.0)
mat4.lookAt(viewMatrix, [0, 0, -4],  [0, 0, 0], [0, 1, 0]);

let mvpUniformBuffer = device.createBuffer({
  size: 64*3,
  usage: GPUBufferUsage.UNIFORM | GPUBufferUsage.COPY_DST
});
device.queue.writeBuffer(mvpUniformBuffer, 64,  viewMatrix );
device.queue.writeBuffer(mvpUniformBuffer, 128, projectionMatrix );

// ----------------------

let shaderWGSL = `
@vertex
fn vsmain() -> @builtin(position) vec4<f32>
{  return vec4<f32>(1.0); }

@fragment
fn psmain() -> @location(0) vec4<f32>
{ return vec4<f32>(1.0, 0.0, 0.5, 1.0); }
`;

const depthTexture = device.createTexture({
  size   : presentationSize,
  format : 'depth24plus',
  usage  : GPUTextureUsage.RENDER_ATTACHMENT,
});

const shaderModule        = device.createShaderModule({ code : shaderWGSL });

const pipeline = device.createRenderPipeline({
  layout: 'auto',
  vertex:      {   module: shaderModule, entryPoint: 'vsmain',
                   buffers: [ ]
               },
  fragment:    {   module: shaderModule, entryPoint: 'psmain',
                   targets: [ { format: presentationFormat } ]
               },
  primitive:   {   topology: 'triangle-strip' },
  depthStencil:{
                  depthWriteEnabled: true,
                  depthCompare     : 'less',
                  format           : 'depth24plus' }
});

let spheres = [];
for (let n=0; n<3; n++)
{
      let sphere0 = new sphere();
    await sphere0.create(device, presentationFormat, presentationSize );
      spheres.push( sphere0 );
}
spheres[0].getMeshData().p = {x:5, y:0, z:3};
spheres[1].getMeshData().p = {x:-7, y:4, z:8};

//-----------------------

function worldToScreen( point3D, canvas, model, view, projection )
{
    // Create a homogeneous 4D vector for the point
    const point4D = vec4.fromValues(point3D[0], point3D[1], point3D[2], 1);

    // Model-view-projection matrix (combination of projection and view matrices)
    const mvpMatrix = mat4.create();
    mat4.multiply(mvpMatrix, mvpMatrix, projection);
    mat4.multiply(mvpMatrix, mvpMatrix, view);
    mat4.multiply(mvpMatrix, mvpMatrix, model);

    // Transform point to clip space
    const clipSpace = vec4.create();
    vec4.transformMat4(clipSpace, point4D, mvpMatrix);

    // Perform perspective division to get NDC
    const ndcX = clipSpace[0] / clipSpace[3];
    const ndcY = clipSpace[1] / clipSpace[3];
    const ndcZ = clipSpace[2] / clipSpace[3];

    // Map NDC to screen space
    const screenWidth  = canvas.width;
    const screenHeight = canvas.height;
    const screenX = (ndcX + 1) * 0.5 * screenWidth;
    const screenY = (1 - ndcY) * 0.5 * screenHeight;
    const screenZ = ndcZ;

    // screenX, screenY now contain the 2D screen coordinates of the 3D point
    // screenZ can be used if you need depth information in screen space
    return { x:screenX, y:screenY, z:screenZ };
}

// Display the pos in the top left using 'div'
let divcoords = document.createElement('div');
document.body.appendChild( divcoords );
divcoords.style.position = 'absolute';
divcoords.style.left     = '0px';
divcoords.style.top      = '0px';

// draw a round div on screen over the cube
let divpoint = document.createElement('div');
document.body.appendChild( divpoint );
divpoint.style.position          = 'absolute';
divpoint.style.borderRadius         = '50% 50% 50% 50%';
divpoint.style.border            = '2pt solid yellow';
divpoint.style.width             = '30px';
divpoint.style.height            = '30px';
divpoint.style.boxSizing         = 'border-box';


var mousePos = {x:0, y:0};

//------------------------

async function draw()
{

  {
  const commandEncoder = device.createCommandEncoder();
  const renderPassDescriptor =  { // GPURenderPassDescriptor
        colorAttachments: [ { view:context.getCurrentTexture().createView(),
                              loadOp:"clear",
                              clearValue:[0.0, 0.8, 0.8, 1],
                              storeOp:'store' },
                          ],
        depthStencilAttachment: {
                 view:  depthTexture.createView(),
                 depthLoadOp: "clear",
                 depthClearValue: 1.0,
                 depthStoreOp: 'store',
              }
  };
  const passEncoder = commandEncoder.beginRenderPass(renderPassDescriptor);
  passEncoder.setPipeline(pipeline);
  passEncoder.draw(3, 1, 0, 0);
  passEncoder.end();
  await device.queue.submit([commandEncoder.finish()]);
  }

  // ------------------------------------------

  spheres.forEach( s=>{
      s.draw( device, context, depthTexture, viewMatrix, projectionMatrix );

    let sphereRadius = s.getMeshData().s.x; // assume equal scaling

    let spherePos = [0,0,0]; // position sphere is embedded in modelMatrix (this would be offset from center)
    let screenPos = worldToScreen( spherePos, canvas, s.getModelMatrix(), viewMatrix, projectionMatrix );

    divcoords.innerHTML = `${mousePos.x}, ${mousePos.y}`;

    if ( Math.abs(screenPos.x-mousePos.x)<30 &&
         Math.abs(screenPos.y-mousePos.y)<30 )
    {
        divpoint.style.left = (screenPos.x-15) + 'px'; // div offset center - half width
        divpoint.style.top  = (screenPos.y-15) + 'px';
    }


  });

  requestAnimationFrame(draw);
}
draw();

document.onmousemove = function( ev )
{
   mousePos.x = ev.clientX;
   mousePos.y = ev.clientY;
}

console.log('done...');
World to screen and vice versa is a valuable tool in many aspects - beyond simply `picking` items. Also useful for annotation, hud systems and more.