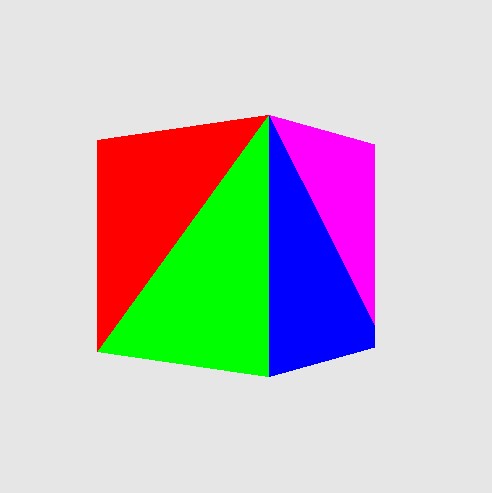
Rotating Cube (Voxel)
cube ! You might know it from voxel worlds like Minecraft or Roboblox. Cubes are like small 3d pixels (but instead of pixels they can represent small geometric elements in the 3d world). If they get small enough - and you have enough of them - you can create highly realistic world.
The famous 3D cube - think of a cube as 'virtual' lego blocks.
Functions Used: getContext(), requestAdapter(), getPreferredCanvasFormat(), createCommandEncoder(), beginRenderPass(), setPipeline(), draw(), end(), submit(), getCurrentTexture(), createView(), createShaderModule()
WARNING
triangles . Voxels are popular due to their interlocking ability - like lego!
const canvas = document . createElement ( 'canvas' );
document . body . appendChild ( canvas );
canvas . width = canvas . height = 512 ;
const gpu = navigator . gpu ;
console . log ( 'navigator.gpu:' , gpu );
const adapter = await gpu . requestAdapter ();
const device = await adapter . requestDevice ();
const context = canvas . getContext ( 'webgpu' );
const presentationFormat = navigator . gpu . getPreferredCanvasFormat (); // context.getPreferredFormat(adapter); - no longer supported
context . configure ({
device ,
format : presentationFormat
});
////////////////////////////////////////
// Create vertex buffers and load data
////////////////////////////////////////
const cubeVertexSize = 4 * 8 ; // Byte size of one cube vertex.
const cubePositionOffset = 0 ;
const cubeColorOffset = 4 * 4 ; // Each float 4 bytes
const cubeVertexCount = 36 ;
// unit cube
let cubeVertexArray = new Float32Array ([
// float4 position, float4 color
1 , - 1 , 1 , 1 , 1 , 0 , 0 , 1 ,
- 1 , - 1 , 1 , 1 , 1 , 0 , 0 , 1 ,
- 1 , - 1 , - 1 , 1 , 1 , 0 , 0 , 1 ,
1 , - 1 , - 1 , 1 , 0 , 1 , 0 , 1 ,
1 , - 1 , 1 , 1 , 0 , 1 , 0 , 1 ,
- 1 , - 1 , - 1 , 1 , 0 , 1 , 0 , 1 ,
1 , 1 , 1 , 1 , 0 , 0 , 1 , 1 ,
1 , - 1 , 1 , 1 , 0 , 0 , 1 , 1 ,
1 , - 1 , - 1 , 1 , 0 , 0 , 1 , 1 ,
1 , 1 , - 1 , 1 , 1 , 0 , 1 , 1 ,
1 , 1 , 1 , 1 , 1 , 0 , 1 , 1 ,
1 , - 1 , - 1 , 1 , 1 , 0 , 1 , 1 ,
- 1 , 1 , 1 , 1 , 0 , 1 , 1 , 1 ,
1 , 1 , 1 , 1 , 0 , 1 , 1 , 1 ,
1 , 1 , - 1 , 1 , 0 , 1 , 1 , 1 ,
- 1 , 1 , - 1 , 1 , 1 , 0 , 1 , 1 ,
- 1 , 1 , 1 , 1 , 1 , 0 , 1 , 1 ,
1 , 1 , - 1 , 1 , 1 , 0 , 1 , 1 ,
- 1 , - 1 , 1 , 1 , 1 , 1 , 1 , 1 ,
- 1 , 1 , 1 , 1 , 1 , 1 , 1 , 1 ,
- 1 , 1 , - 1 , 1 , 1 , 1 , 1 , 1 ,
- 1 , - 1 , - 1 , 1 , 0 , 0 , 0 , 1 ,
- 1 , - 1 , 1 , 1 , 0 , 0 , 0 , 1 ,
- 1 , 1 , - 1 , 1 , 0 , 0 , 0 , 1 ,
1 , 1 , 1 , 1 , 1 , 0 , 0 , 1 ,
- 1 , 1 , 1 , 1 , 1 , 0 , 0 , 1 ,
- 1 , - 1 , 1 , 1 , 1 , 0 , 0 , 1 ,
- 1 , - 1 , 1 , 1 , 0 , 1 , 0 , 1 ,
1 , - 1 , 1 , 1 , 0 , 1 , 0 , 1 ,
1 , 1 , 1 , 1 , 0 , 1 , 0 , 1 ,
1 , - 1 , - 1 , 1 , 1 , 0 , 1 , 1 ,
- 1 , - 1 , - 1 , 1 , 1 , 0 , 1 , 1 ,
- 1 , 1 , - 1 , 1 , 1 , 0 , 1 , 1 ,
1 , 1 , - 1 , 1 , 1 , 1 , 0 , 1 ,
1 , - 1 , - 1 , 1 , 1 , 1 , 0 , 1 ,
- 1 , 1 , - 1 , 1 , 1 , 1 , 0 , 1
]);
// unit cube - so scale to +/- 0.5
for ( let i = 0 ; i < cubeVertexArray . length / 8 ; i ++)
{
for ( let k = 0 ; k < 8 ; k ++)
{
const indx = i * 8 + k ;
if ( k < 3 ) cubeVertexArray [ indx ] = cubeVertexArray [ indx ] * 0.4 ;
}
}
const numVertices = cubeVertexArray . length / 8 ;
console . log ( 'numVertices:' , numVertices );
console . assert ( cubeVertexCount == numVertices );
const gpuBuffer = device . createBuffer ({
size : cubeVertexArray . byteLength ,
usage : GPUBufferUsage . VERTEX | GPUBufferUsage . COPY_DST
});
device . queue . writeBuffer ( gpuBuffer , 0 , cubeVertexArray );
/////////////////////////////////////////////
// Create uniform buffers and binding layout
/////////////////////////////////////////////
const vertexUniformBuffer = device . createBuffer ({
size : 4 , // single float for the timer
usage : GPUBufferUsage . UNIFORM | GPUBufferUsage . COPY_DST
});
let timeData = new Float32Array ( 1 );
timeData [ 0 ] = 0.0 ;
device . queue . writeBuffer ( vertexUniformBuffer , 0 , timeData );
const sceneUniformBindGroupLayout = device . createBindGroupLayout ({
entries : [ { binding : 0 , visibility : GPUShaderStage . VERTEX , buffer : { type : "uniform" } }
]
});
const sceneUniformBindGroup = device . createBindGroup ({
layout : sceneUniformBindGroupLayout ,
entries : [ { binding : 0 , resource : { buffer : vertexUniformBuffer } }
]
});
///////////////////////////
// Create render pipeline
///////////////////////////
let basicVertWGSL = `
@binding(0) @group(0) var<uniform> timer : f32;
struct VertexOutput {
@builtin(position) Position : vec4<f32>,
@location(0) fragColor : vec4<f32>,
@location(1) fragPosition : vec4<f32>
};
@vertex
fn main(@location(0) position : vec4<f32>,
@location(1) color : vec4<f32>) -> VertexOutput {
// bit of trig math to rotate around 'y' axis
var p = position.xyz;
var newP = vec4<f32>( p.x*cos(timer) - p.z*sin(timer),
p.y,
p.z*cos(timer) + p.x*sin(timer),
1.0);
// add a bit of 'perspective' - gets smaller further away
newP = vec4<f32>(newP.xyz*0.5, 1.0/(newP.z + 2.0) );
var output : VertexOutput;
output.Position = newP;
output.fragColor = color;
output.fragPosition = newP;
return output;
}
`;
let = basicPixelWGSL = `
@fragment
fn main(@location(0) fragColor: vec4<f32>,
@location(1) fraPosition: vec4<f32>) -> @location(0) vec4<f32> {
return fragColor;
// if you want a 'constant' color for the shape
// return vec4<f32>(1.0, 0.0, 0.0, 1.0);
}
`;
const pipeline = device . createRenderPipeline ({
layout : device . createPipelineLayout ({ bindGroupLayouts : [ sceneUniformBindGroupLayout ]}),
vertex : {
module : device . createShaderModule ({
code : basicVertWGSL
}),
entryPoint : "main" ,
buffers : [ { arrayStride : cubeVertexSize ,
attributes : [ { shaderLocation : 0 , offset : cubePositionOffset , format : 'float32x4' }, // position
{ shaderLocation : 1 , offset : cubeColorOffset , format : 'float32x4' } // color
] } ]
},
fragment : {
module : device . createShaderModule ({ code : basicPixelWGSL }),
entryPoint : "main" ,
targets : [{ format : presentationFormat }]
},
primitive : {
topology : "triangle-list" ,
cullMode : 'back'
},
depthStencil : {
format : "depth24plus" ,
depthWriteEnabled : true ,
depthCompare : "less"
}
});
///////////////////////////
// Render pass description
///////////////////////////
const depthTexture = device . createTexture ({
size : [ canvas . width , canvas . height , 1 ],
format : "depth24plus" ,
usage : GPUTextureUsage . RENDER_ATTACHMENT
})
const renderPassDescription = {
colorAttachments : [{
view : context . getCurrentTexture (). createView (),
loadOp : "clear" , clearValue : [ 0.9 , 0.9 , 0.9 , 1 ], // clear screen color
storeOp : 'store'
}],
depthStencilAttachment : {
view : depthTexture . createView (),
depthLoadOp : "clear" , depthClearValue : 1 ,
depthStoreOp : "store" ,
// stencilLoadValue: 0,
// stencilStoreOp: "store"
}
};
let timer = 0 ;
function draw () {
// update uniform buffer
timeData [ 0 ] += 0.005 ;
device . queue . writeBuffer ( vertexUniformBuffer , 0 , timeData );
// Swap framebuffer
renderPassDescription . colorAttachments [ 0 ]. view = context . getCurrentTexture (). createView ();
const commandEncoder = device . createCommandEncoder ();
const renderPass = commandEncoder . beginRenderPass ( renderPassDescription );
renderPass . setPipeline ( pipeline );
renderPass . setVertexBuffer ( 0 , gpuBuffer );
renderPass . setBindGroup ( 0 , sceneUniformBindGroup );
renderPass . draw ( numVertices , 1 , 0 , 0 );
renderPass . end ();
device . queue . submit ([ commandEncoder . finish ()]);
requestAnimationFrame ( draw );
};
draw ();
console . log ( 'ready..' );
You might notice this if you run the example - or if you look at the image very closly - but the back of the cube is slightly getting clipped when it rotates. This is because there isn't any camera or projection matrix set - it's drawing the unit cube in the unit space (i.e., anything outside the +/- 1 is clipped by the renderer - usually the camera and projection matrix would transform your geometry into this area).
Things to Try
Resources and Links
LINK ]