Texture Mapping
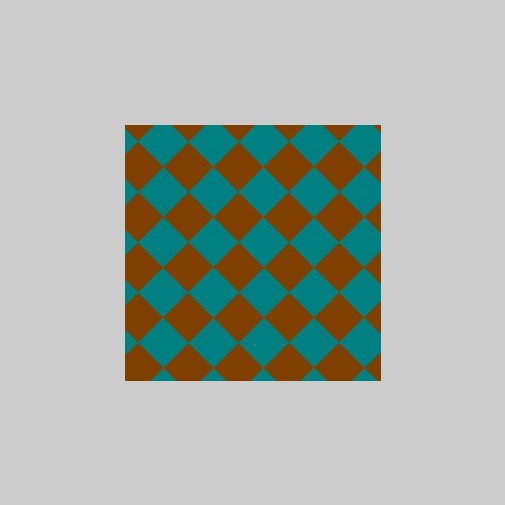
Basic textured square - the texture is generated - simple xor square grid.
Functions Used: setVertexBuffer(), setIndexBuffer(), drawIndexed(), createBuffer(), getMappedRange(), getContext(), requestAdapter(), getPreferredCanvasFormat(), createCommandEncoder(), beginRenderPass(), setPipeline(), draw(), end(), submit(), getCurrentTexture(), createView(), createShaderModule()
texture coordinates .
function createTexture ( device )
{
const imgWidth = 256 ;
const imgHeight = 256 ;
const textureSampler = device . createSampler ({
minFilter : "linear" ,
magFilter : "linear"
});
const basicTexture = device . createTexture ({
size : [ imgWidth , imgHeight , 1 ],
format : presentationFormat , // "bgra8unorm", // "rgba8unorm",
usage : 0x2 | 0x4 // GPUTextureUsage.COPY_DST | GPUTextureUsage.TEXTURE_BINDING
});
const imageCanvas = document . createElement ( 'canvas' );
imageCanvas . width = imgWidth ;
imageCanvas . height = imgHeight ;
const imageCanvasContext = imageCanvas . getContext ( '2d' );
const imageData = imageCanvasContext . getImageData ( 0 , 0 , imageCanvas . width , imageCanvas . height );
let textureData = new Uint8Array ( imgWidth * imgHeight * 4 );
for ( let y = 0 ; y < imgHeight ; y ++) {
for ( let x = 0 ; x < imgWidth ; x ++) {
const index = ( y * imgWidth + x ) * 4 ;
let r = Math . sin ( 32 * x / imgHeight ) + Math . sin ( 32 * y / imgHeight ) > 0.0 ? 0 : 128 ;
let g = Math . sin ( 32 * x / imgHeight ) + Math . sin ( 32 * y / imgHeight ) > 0.0 ? 64 : 128 ;
let b = Math . sin ( 32 * x / imgHeight ) + Math . sin ( 32 * y / imgHeight ) > 0.0 ? 128 : 0 ;
textureData [ index + 0 ] = r
textureData [ index + 1 ] = g
textureData [ index + 2 ] = b
textureData [ index + 3 ] = 255.0 ; // No alpha
}
}
device . queue . writeTexture ( { texture : basicTexture },
textureData ,
{ offset : 0 ,
bytesPerRow : imgWidth * 4 ,
rowsPerImage : imgHeight
},
[ imgWidth , imgHeight , 1 ] );
return { t : basicTexture , s : textureSampler };
}
// Load matrix library on dynamically (on-the-fly)
let matprom = await fetch ( 'https://cdnjs.cloudflare.com/ajax/libs/gl-matrix/2.6.0/gl-matrix-min.js' );
let mattex = await matprom . text ();
var script = document . createElement ( 'script' );
script . type = 'text/javascript' ;
script . innerHTML = mattex ;
document . head . appendChild ( script );
// -------------
let canvas = document . createElement ( 'canvas' );
document . body . appendChild ( canvas ); canvas . height = canvas . width = 512 ;
const context = canvas . getContext ( 'webgpu' );
const adapter = await navigator . gpu . requestAdapter ();
const device = await adapter . requestDevice ();
const presentationFormat = navigator . gpu . getPreferredCanvasFormat ();
context . configure ({ device : device , format : presentationFormat });
function createTexture ( device )
{
const imgWidth = 256 ;
const imgHeight = 256 ;
const textureSampler = device . createSampler ({
minFilter : "linear" ,
magFilter : "linear"
});
const basicTexture = device . createTexture ({
size : [ imgWidth , imgHeight , 1 ],
format : presentationFormat , // "bgra8unorm", // "rgba8unorm",
usage : 0x2 | 0x4 // GPUTextureUsage.COPY_DST | GPUTextureUsage.TEXTURE_BINDING
});
const imageCanvas = document . createElement ( 'canvas' );
imageCanvas . width = imgWidth ;
imageCanvas . height = imgHeight ;
const imageCanvasContext = imageCanvas . getContext ( '2d' );
const imageData = imageCanvasContext . getImageData ( 0 , 0 , imageCanvas . width , imageCanvas . height );
let textureData = new Uint8Array ( imgWidth * imgHeight * 4 );
for ( let y = 0 ; y < imgHeight ; y ++) {
for ( let x = 0 ; x < imgWidth ; x ++) {
const index = ( y * imgWidth + x ) * 4 ;
let r = Math . sin ( 32 * x / imgHeight ) + Math . sin ( 32 * y / imgHeight ) > 0.0 ? 0 : 128 ;
let g = Math . sin ( 32 * x / imgHeight ) + Math . sin ( 32 * y / imgHeight ) > 0.0 ? 64 : 128 ;
let b = Math . sin ( 32 * x / imgHeight ) + Math . sin ( 32 * y / imgHeight ) > 0.0 ? 128 : 0 ;
textureData [ index + 0 ] = r
textureData [ index + 1 ] = g
textureData [ index + 2 ] = b
textureData [ index + 3 ] = 255.0 ; // No alpha
}
}
device . queue . writeTexture ( { texture : basicTexture },
textureData ,
{ offset : 0 ,
bytesPerRow : imgWidth * 4 ,
rowsPerImage : imgHeight
},
[ imgWidth , imgHeight , 1 ] );
return { t : basicTexture , s : textureSampler };
}
function createTexturedSquare ( device )
{
let positionVertex = new Float32Array ([
0.5 , 0.5 , 0.0 ,
- 0.5 , 0.5 , 0.0 ,
0.5 , - 0.5 , 0.0 ,
- 0.5 , - 0.5 , 0.0
]);
const vBuffer = device . createBuffer ({ size : positionVertex . byteLength ,
usage : GPUBufferUsage . VERTEX | GPUBufferUsage . COPY_DST });
device . queue . writeBuffer ( vBuffer , 0 , positionVertex );
let uvVertex = new Float32Array ([
1.0 , 1.0 ,
0.0 , 1.0 ,
1.0 , 0.0 ,
0.0 , 0.0 ,
]);
const uvBuffer = device . createBuffer ({ size : uvVertex . byteLength ,
usage : GPUBufferUsage . VERTEX | GPUBufferUsage . COPY_DST });
device . queue . writeBuffer ( uvBuffer , 0 , uvVertex );
// return the vertex and texture buffers
return { v : vBuffer , t : uvBuffer };
}
function createMatrixUniform ( )
{
// Create the matrix in Javascript (using matrix library)
const projectionMatrix = mat4 . create ();
const viewMatrix = mat4 . create ();
const viewProjectionMatrix = mat4 . create ();
mat4 . perspective ( projectionMatrix , Math . PI / 2 , canvas . width / canvas . height , 0.001 , 500.0 )
mat4 . lookAt ( viewMatrix , [ 0 , 0 , 1.0 ], [ 0 , 0 , 0 ], [ 0 , 1 , 0 ]);
mat4 . multiply ( viewProjectionMatrix , projectionMatrix , viewMatrix );
// Create a buffer using WebGPU API (copy matrix into it)
const matrixUniformBuffer = device . createBuffer ({
size : viewProjectionMatrix . byteLength ,
usage : GPUBufferUsage . UNIFORM | GPUBufferUsage . COPY_DST
});
device . queue . writeBuffer ( matrixUniformBuffer , 0 , viewProjectionMatrix );
return matrixUniformBuffer ;
}
let shaderWGSL = `
@group(0) @binding(0) var<uniform> viewProjectionmMatrix : mat4x4<f32>;
struct vsout {
@builtin(position) Position: vec4<f32>,
@location(0) uvs : vec2<f32>
};
@vertex
fn vsmain(@location(0) pos : vec3<f32>,
@location(1) uvs : vec2<f32>) -> vsout
{
var r:vsout;
r.Position = viewProjectionmMatrix * vec4<f32>(pos, 1.0);
r.uvs = uvs;
return r;
}
@group(0) @binding(1) var mySampler: sampler;
@group(0) @binding(2) var myTexture: texture_2d<f32>;
@fragment
fn psmain(@location(0) uvs: vec2<f32>) -> @location(0) vec4<f32>
{
return textureSample(myTexture, mySampler, uvs );
//return vec4<f32>(1.0, 0.0, 0.5, 1.0);
} `;
const textureData = createTexture ( device );
const squareBuffer = createTexturedSquare ( device );
const matrixUniformBuffer = createMatrixUniform ();
const shaderModule = device . createShaderModule ({ code : shaderWGSL });
// Define the layout information for the shader (uniforms)
const sceneUniformBindGroupLayout = device . createBindGroupLayout ({
entries : [{ binding : 0 , visibility : GPUShaderStage . VERTEX , buffer : { type : "uniform" } },
{ binding : 1 , visibility : GPUShaderStage . FRAGMENT , sampler : { type : "filtering" } },
{ binding : 2 , visibility : GPUShaderStage . FRAGMENT , texture : { sampleType : "float" , viewDimension : "2d" } },
]
});
const sceneUniformBindGroup = device . createBindGroup ({
layout : sceneUniformBindGroupLayout ,
entries : [{ binding : 0 , resource : { buffer : matrixUniformBuffer } },
{ binding : 1 , resource : textureData . s },
{ binding : 2 , resource : textureData . t . createView () },
]
});
const pipeline = device . createRenderPipeline ({
layout : device . createPipelineLayout ({ bindGroupLayouts : [ sceneUniformBindGroupLayout ]}),
vertex : { module : shaderModule , entryPoint : 'vsmain' ,
buffers : [
{ arrayStride : 4 * 3 , attributes : [ { shaderLocation : 0 , offset : 0 , format : 'float32x3' } ] },
{ arrayStride : 4 * 2 , attributes : [ { shaderLocation : 1 , offset : 0 , format : 'float32x2' } ] }
]
},
fragment : { module : shaderModule , entryPoint : 'psmain' ,
targets : [ { format : presentationFormat } ]
},
primitive : { topology : 'triangle-strip' },
});
function draw ()
{
const commandEncoder = device . createCommandEncoder ();
const renderPassDescriptor = { // GPURenderPassDescriptor
colorAttachments : [ { view : context . getCurrentTexture (). createView (),
loadOp : "clear" ,
clearValue : [ 0.8 , 0.8 , 0.8 , 1 ], // clear screen to color/rgba
storeOp : 'store' } ] };
const passEncoder = commandEncoder . beginRenderPass ( renderPassDescriptor );
passEncoder . setViewport ( 0.0 , 0.0 , // x, y
canvas . width , canvas . height , // width, height
0 , 1 ); // minDepth, maxDepth
passEncoder . setPipeline ( pipeline );
passEncoder . setVertexBuffer ( 0 , squareBuffer . v );
passEncoder . setVertexBuffer ( 1 , squareBuffer . t );
passEncoder . setBindGroup ( 0 , sceneUniformBindGroup );
passEncoder . draw ( 4 , 1 , 0 , 0 );
passEncoder . end ();
device . queue . submit ([ commandEncoder . finish ()]);
//requestAnimationFrame(frame);
}
draw ();
console . log ( 'done...' );
Resources and Link
LINK ]