|
/***************************************************************************/
/*
*/
/* File: game.cpp
*/
/*
*/
/***************************************************************************/
#include
<d3dx8.h>
#include
<d3d8.h>
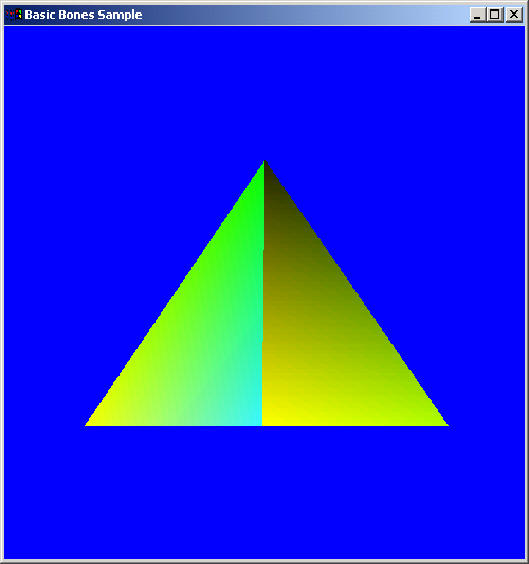
// The function takes the position of our pyramid in our world and renders
// it... simple as that!.
void
draw_pyramid(float x,
float y, float
z)
{
struct my_vertex
{
FLOAT x, y, z; // D3DFVF_XYZ
DWORD colour; // D3DFVF_DIFFUSE
};
my_vertex v[] =
{
{-0.5f + x, -0.5f + y, 0.5f + z, 0xfffcff00},
//[1] - front
{ 0.0f + x, 0.5f + y, 0.0f + z, 0xff00ff00},
//[2]
{ 0.5f + x, -0.5f + y, 0.5f + z, 0xff33f9ff},
//[3]
{ 0.5f + x, -0.5f + y, -0.5f + z, 0xff55ff00},
// - back
{ 0.0f + x, 0.5f + y, 0.0f + z, 0xffff2200},
//
{-0.5f + x, -0.5f + y, -0.5f + z, 0xf4f2ff00},
//
{-0.5f + x, -0.5f + y, -0.5f + z, 0xffffff11},
// - left
{ 0.0f + x, 0.5f + y, 0.0f + z, 0xffff2200},
//
{-0.5f + x, -0.5f + y, 0.5f + z, 0xff88ff00},
//
{ 0.5f + x, -0.5f + y, 0.5f + z, 0xffffff00},
// - right
{ 0.0f + x, 0.5f + y, 0.0f + z, 0xff222200},
//
{ 0.5f + x, -0.5f + y, -0.5f + z, 0xffaaff00}
//
};
UINT my_vertex_description = (D3DFVF_XYZ | D3DFVF_DIFFUSE);
IDirect3DVertexBuffer8 * DX_vb;
g_pD3DDevice->CreateVertexBuffer( sizeof(v),
0, my_vertex_description, D3DPOOL_MANAGED, &DX_vb );
// Copy our array which is in computer memory over
to the directX memory.. using that pointer we
// just created etc.
unsigned char
*temp_pointer_vb;
DX_vb->Lock(0,0, &temp_pointer_vb, 0);
memcpy(temp_pointer_vb, v, sizeof(v) );
DX_vb->Unlock();
g_pD3DDevice->SetRenderState(D3DRS_LIGHTING, FALSE);
g_pD3DDevice->SetTextureStageState(0, D3DTSS_COLOROP, D3DTOP_SELECTARG1);
g_pD3DDevice->SetTextureStageState(0,D3DTSS_COLORARG1, D3DTA_DIFFUSE);
// Draw our triangle.
g_pD3DDevice->SetStreamSource(0, DX_vb, sizeof(my_vertex));
g_pD3DDevice->SetVertexShader(my_vertex_description);
g_pD3DDevice->DrawPrimitive(D3DPT_TRIANGLELIST, 0, 4);
DX_vb->Release();
}
// Not really done much matrix stuff yet!.. but be patient!
void
Render()
{
if(!g_pD3DDevice)return;
// Clear the back buffer to a blue color
g_pD3DDevice->Clear( 0, NULL, D3DCLEAR_TARGET|D3DCLEAR_ZBUFFER,
D3DCOLOR_XRGB(0,0,255), 1.0f, 0 );
// These few lines of code is so that our 3D
pyramid rotates while the program is running.
static float
angle = 0.0f;
angle += 0.001f;
//~~~*~~~~ Create a matrix
D3DXMATRIX mx;
//~~~*~~~~ Do somthing to our empty matrix.
D3DXMatrixRotationY(&mx, angle ); // angle in
radians...eg. 1 degree = PI/180
//~~~*~~~~ Use the matrix! No use having a matrix
if we don't use it!
g_pD3DDevice->SetTransform(D3DTS_WORLD, &mx);
// CALL OUR PYRAMID FUCTION HERE!!!!!!!!!
draw_pyramid(0.0f, 0.0f, 0.0f);
// After rendering the scene we display it.
g_pD3DDevice->Present( NULL, NULL, NULL, NULL );
}
void
mainloop()
{
Render();
} |