Fur Effects -
Teddies, Cats,
Hair ....
by bkenwright@xbdev.net
Have you ever watched Monsters Inc? Or other movies like Shrek? Or
possibly played a computer game on your xbox where the hero character has
realistic looking fur, and wondered just how you could do that? I bet you
thought it was really really hard. I mean when I think back, I used to
have ideas of modelling a single hair then multiplying it by a few thousand
times!..which would take one large amount of processing...definitely not
possible for games or for simple cool effects :)
One particular technique of creating good looking fur without killing
yourself with maths and algorithms and weeks of processing time, is to use shell
texturing! Remember those words, "Shell Texturing". As there's lots of
information on generating Fur or Hair using shell texturing. Sometimes mixed in
with the subject of volume shadowing and volume effects in 3D! The effect once
you've grasped it!...which of course you should have once you've read my
extremely informative and simplified tutorial allow you to expand into other
areas, such as fields of grass, hair on a head, trees in a forest, or other
things.
Now this is not one of those easy tutorials that you can swish through, well
I couldn't....so your going to have to stock up on coffee to get through this
puppy! Lots of basic principles which are really simple and you'll kick
yourself for not thinking of them earlier, and then there's a few ideas which are
messy to implement...easy in theory...but the code is a bit complicated to see
how it's doing it.
Feedback is always welcome on this....sort of a trial and error thing for
me...reading articles and testing out new ideas that come to me while watching
tv :) There's all sorts of things going on with fur! But it's well worth the
trouble.
I've supplied all my code, with different levels of complexity and ways of doing
things, so you can look through it and see how the basics work, or to add more
advanced things in, light inter-fur lighting or fur gravity/forces etc.
Well it's going to be a late night for me... I've taken a few screenshots of
the various steps of the code so you can look at how the fur looks on different
objects.
Lets have a look at the basic idea of layers and textures. I mean, what
do these layers look like close up? What will we get? Well below is
a few diagrams showing the basic idea of how we use textured layers to create a
fur/hair effect. Now the secret to how this works is by using the Alpha
value! As we render each layer we only see the values which have an alpha
value greater than 0. So for we scatter the surface with noise dots, and
make them some colour and also set their alpha value to 1. For all the
rest of the texture we won't see, so we just set its alpha to 0.
We then have a single noise texture, which if we wanted could be used to
generate a very basic fur model! We do this by multiplying the surface
normal by the texture, so if we have 5 layers, we would render the texture 5
times on our model, each time extruding our texture surface out using the
surface normal. Increasing the number of layers creates finer and finer
hairs.
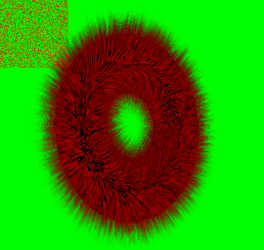
To show this in action I did simple Shader/DirectX demo just to make sure
you've got this simple principle of layers! Even though the code uses
vertex and pixel shaders to produce the fur effect, it is possible to create fur
effects without shaders, it just means that you have to perform the additional
vertex processing within your program without passing it along to the graphics
card. If you understand the principles of how the fur is generated it
shouldn't be to complicated to produce a non-shader fur demo.
I put together a simple demo - a simple main.cpp and a
fur.fx file which uses a single texture to generate a fur/hair effect which
you can play with - adjusting the number of layers, fur length, density,
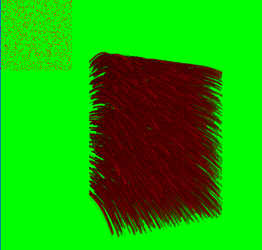
bias the tips with force effects and zoom in etc... A screenshot on
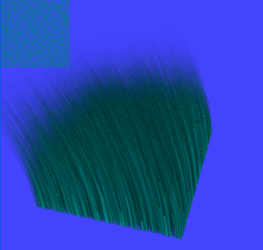
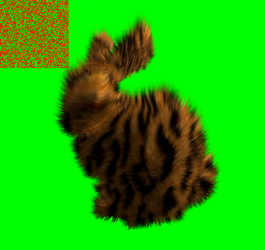
the right shows the code running.
The top left hand corner of the screen is used to show
the texture - nothing much as you can see - just a plain texture with noise
blobs plotted across the surface. Of course all the surface except the
blobs of noise has an alpha value of 0, so its see through.
The demo with practically no effort at all could be expanded to produce a
field of grass swaying in the wind! Wow eh? And it doesn't use
that much computational power - so you could create a massive field of
grass, that looks almost picture perfect in your game and wouldn't cost you
an arm and leg in cpu/gpu power.
This is still only a simple model, it's at its bare basics here - as we've
not added varying density so that the fur is thicker or thinner as it
approaches the tips, also spikes...the hairs are the same thickness all the
way up, we can fix that. Then of course there's adding in textures, so
our hair is the same colour as our textured surface.
And of course there's lighting! The simple demo uses basic diffuse
(directional) lighting model...only a few extra lines...which of course you
can comment out and see it with and without - but it doen'st really show the
hair shadows. We can add this later by using UV offsets for each layer
to create a per hair lighting, sweet stuff eh!
|
Download
Source Code ( 11kb)
|
Lets take a look at what the main parts of code look like, and see if I can
explain whats happening. Below shows the HLSL (High Level Shader Language)
Shader which is used to produce the fur effect. We call the shader for
each fur layer, and pass it along a parameter FurLength, which is used to
determine which layer where at. The single line of code which is most
important in the code is:
float3 P = IN.position.xyz + (IN.normal *
FurLength);
Where we have our IN.position.xyz input vertice information, and of course
IN.normal which is the vertice normal and finally FurLength which is a value
from 0 to some max length. So for example, when FurLength is 0, our output
vertice data is just the object surface. Then we increment FurLength by some
amount for the next layer, e.g. to 1.0, then our next value for P is projected
out by some amount producing the next shell or layer...then we increment our
layer again and FurLength increases again and we render another
shell/layer...eventually producing a fur effect.
File: fur.fx |
|
/*****************************************************************************/
/*
*/
/* File: fur.fx
*/
/* www.xbdev.net
*/
/*
*/
/*****************************************************************************/
/*
Verty basic fur/hair demo showing how to generate realistic looking
fur/hair
using Shaders and DirectX.
*/
/*****************************************************************************/
float
FurLength = 0;
float
UVScale = 1.0f;
float
Layer = 0; // 0 to 1 for the level
float3
vGravity = float3(0,-2.0,0);
float4
vecLightDir = float4(0.8,0.8,1,0);
//------------------------------------
texture
FurTexture;
sampler
TextureSampler = sampler_state;
//------------------------------------
// transformations
float4x4
worldViewProj : WORLDVIEWPROJ;
float4x4
matWorld : WORLD;
//------------------------------------
struct
vertexInput {
float3 position :
POSITION;
float3 normal : NORMAL;
float4 texCoordDiffuse : TEXCOORD0;
};
struct
vertexOutput {
float4 HPOS : POSITION;
float4 T0 : TEXCOORD0;
// fur alpha
float3 normal : TEXCOORD1;
};
//------------------------------------ ( vs 1.1 )
vertexOutput VS_TransformAndTexture(vertexInput IN)
{
vertexOutput OUT = (vertexOutput)0;
//** MAIN LINE ** MAIN LINE ** MAIN LINE ** MAIN
LINE ** MAIN LINE **//
//** MAIN LINE ** MAIN LINE ** MAIN LINE ** MAIN
LINE ** MAIN LINE **//
//This single line is responsible for creating the
layers! This is it! Nothing
//more nothing less!
float3 P = IN.position.xyz + (IN.normal *
FurLength);
//Modify our normal so it faces the correct
direction for lighting if we
//want any lighting
float3 normal =
normalize(mul(IN.normal, matWorld));
// Couple of lines to give a swaying effect!
// Additional Gravit/Force Code
vGravity = mul(vGravity, matWorld);
float k = pow(Layer,
3); // We use the pow function, so that only the
tips of the hairs bend
// As layer goes from 0
to 1, so by using pow(..) function is still
// goes form 0 to 1,
but it increases faster! exponentially
P =
P + vGravity*k;
// End Gravity Force Addit Code
OUT.T0 = IN.texCoordDiffuse * UVScale; // Pass
long texture data
// UVScale?? Well we scale the fur texture alpha
coords so this effects the fur thickness
// thinness, sort of stretches or shrinks the fur
over the object!
OUT.HPOS = mul(float4(P,
1.0f), worldViewProj); // Output Vertice Position
Data
OUT.normal = normal; // Output Normal
return OUT;
}
//----------------------------------- ( ps 1.3 )
float4
PS_Textured( vertexOutput IN): COLOR
{
float4 FurColour =
tex2D( TextureSampler, IN.T0 ); // Fur
Texture - alpha is VERY IMPORTANT!
float4 FinalColour = FurColour;
//--------------------------
//Basic Directional Lighting
float4 ambient = {0.3, 0.3, 0.3, 0.0};
ambient = ambient * FinalColour;
float4 diffuse = FinalColour;
FinalColour = ambient + diffuse * dot(vecLightDir,
IN.normal);
//End Basic Lighting Code
//--------------------------
FinalColour.a = FurColour.a;
//return FinalColour; // fur colour only!
return FinalColour;
// Use texture colour
//return float4(0,0,0,0); // Use for totally
invisible! Can't see
}
|
The code should work with even the simplest shaders - and will run with
vertex shaders vs1.1 and ps1.3 - but with later shader versions, you can
implement loops within the script where by you can move all the fur details to
the effect file.
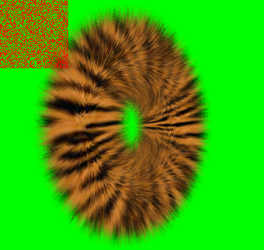
Producing multiple fur textures for the different layers (Organising our
Code, Fur Class)
To take our code to the next level, we create a XFurTexture(..) class which
will be responsible for generating our textures! I say texture's', as for
the next stage we'll use multiple textures for our fur, a different texture for
each layer. We can of course use the same texture for each layer...for
example we could have 20 textures, but spead them across 60 layers for find
detail. But we still have multiple textures. This allows us to
create even more stunning and realistic fur/hair.
With the exception of putting the fur class all the other parts of the code
are more or less the same.
|
Download Source Code (15kb)
|
By adding multiple textures - a different texture for each layer we can
create more realistic looking fur/hair. This is done by modifying the
density across the layers, so that as we approach the tips we have less and
less hair, while at the base we have more. We can achieve
this by understanding how the srand() random function works, and using it to
generate the various random noise textures for each layer. As if you
set the seed value for srand(), we know that each time we call srand() it
will produce the same random values. So for each layer, we set the
seed value, then call srand() for a certain density, so for example we would
generate 1000 random pixel points on our base surface, but at the top layer
where the tips of our fur are, we would only plot 100 pixels. I
say that we must set the seed value the same for each time we generate our
fur texture layers, so that our hairs form single hairs from base to tip! |
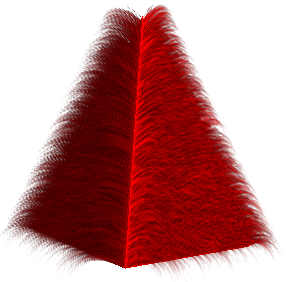
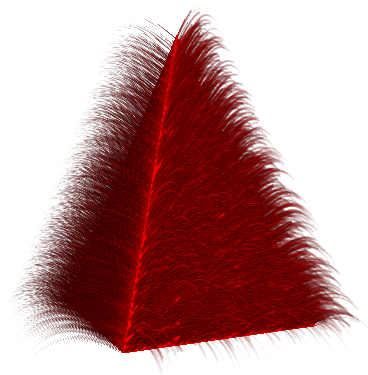
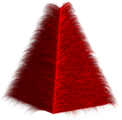
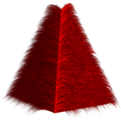
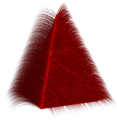
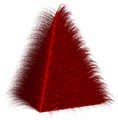
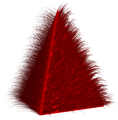
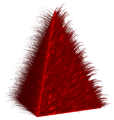
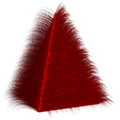
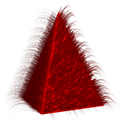
To show how the number of layers effects our output, I did a few screenshots
of a simple pyramid with various numbers of layers, ranging from 2 to 60 skins.
The more layers you have the finner the detail your hairs have, you do find that
the more layers means the more time it takes to render....but more than often
30ish layers seems to produce pretty good results. Again if you have
extremely long wavy hair and want picture perfect quality, you may find that you
need 60+ layers. You can run the demo programs and use the 'Home', 'End'
keys to increase or decrease the number of layers that is rendered so you can
play around with the values you get.
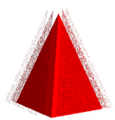
Layers : 2
|
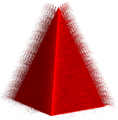
Layers : 6 |
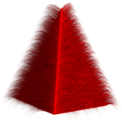
Layers : 15 |
Layers : 30 |
Layers : 60 |
Varying Density with Length
The density is how many hairs are pair layer - so for example a fixed density
across all the layers would be 1000 and would be pretty dense, while reducing
the density linearly from the inner layer to the outer layer produces a more
realistic and varying density. Of course we can use other functions to
create sparse rough looking textures by varying them non-linearly.
Fixed |
Linear |
Power 2 |
Power 3 |
Sine |
Mixed (Lin & Pow5) |
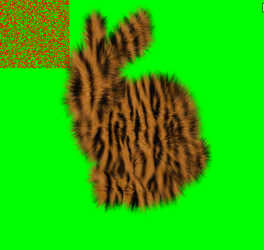
Loading X File and Rendering a Fur Surface
The previous couple of demos have used only a simple flat surface. With
a few extra lines, and using the 'D3DXLoadMeshFromX(..)'
API we can load a 3D X File and render fur to its surface. The code has
been simplified a bit so that it's easier to make out. Also doesn't contain
all the extra keyboard input information so you can fiddle with values such as
fur length.
IDEA!
Have you ever looked at fur? I mean if you look closely, you'll notice
that all the fur/hairs arn't all exactly the same colour. So by
introducing an extra 3 lines into our colour generation code, we can generate
fur with slight randomness to colour, note that the randomness is only slight,
but gives an improved realness.
|
// hair color
// Slightly random plus or minus small amount fixed colour
D3DXCOLOR
col;
col.r =
rnd(0.9, 0.9); // ie. 0.9, 0.3, 0.3 is brown (rgb)
col.g =
rnd(0.3, 0.5);
col.b =
rnd(0.3, 0.7);
col.a =
1.0f; |
Not much code, but gives each of the hairs their own individuality.
Remember though, that each hair must keep its same colour across its layers,
which is the reason why we keep setting the seed value for our random function. rnd(..) is a random function value which
generates a float random value from min
to max value.
|
const
float INV_RAND_MAX = 1.0 / (RAND_MAX + 1);
inline
float rnd(float
max=1.0) { return max * INV_RAND_MAX *
rand(); }
inline
float rnd(float
min, float max) {
return min + (max - min) * INV_RAND_MAX * rand(); } |
|
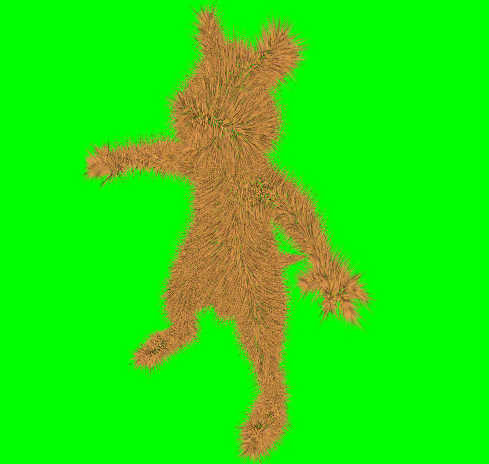
It's a MOUSE!!!
For the 3D Model (X-File) I used a simple model of a
mouse (mouse.x), as someone said to me, it looks like an alien, but it is a
mouse character :)
Would look good with a few bones and a bit of animation, but
the code is only a simple version.
There's 'No Lighting' or 'Drag & Move' or any other such code
in this demo...was kept very simple. The code loads a simple mesh
model, applies the basic fur texture layers to the model and renders it.
That simple.
Efficiency! - If you look at the code is very simple, the
code has been done so you can go step by step over the various stages.
So if your going to make this demo into something for release, look into
optimising it first! As I've done a lot of creating and releasing of
resources in the main loop.
He's Hollow I hear you say? Well yup, the code only
renders the fur. So if you want him to have an additional skin,
surface or something, then you just render a black surface or coloured
surface of the 3d object before rendering the fur.
The fur stands out a great deal, by stands out I mean that
the individual hairs are quiet noticeble across the object even though we
have no lighting in the demo. This is mainly due to hair contrast
colour being made darker at the base compared to the tips.
Also as I mentioned above the hairs are given a slight
difference in colour across the texture - so they're still the same colour
plus or minus a slight randomness.
|

Download Source Code (59kb) |
MMmmmm Donuts!!
Well we all know that Homers favourite food is donuts, also sometimes
referred to as torus shapes in the 3D world. Using a simple 3D algorithm
to generate the 3D Donut including its texture coords and normals, we apply the
fur algorithm to it.
|
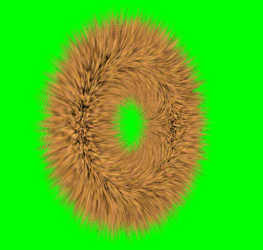
Download Source Code (50kb)
|
|
Fur Shadowing (Inter Fur-Shadowing)
It's not so noticeble in some of the demos, as we have varying alpha values
from base to tip, so as the hairs overlap the separate hairs stand out more.
But if we had a constant set of hairs with fixed alpha values you'd notice that
the hairs sort of mix together. Making it less obvious that we have
multiple hairs.
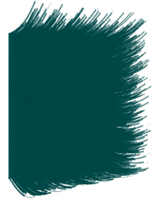
No InterFur Shadowing |
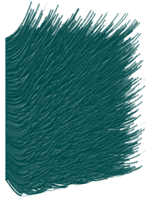
Per Hair Shadowing Offset |
Lets examine how we achieve this inter-fur shadowing. The principle is
very simple, but at the cost of having to render each fur layer an additional
time. It works by taking each layer and offsetting the uv coordinates very
slightly, using the surface normal as a bias as well, so that each layers dots
or hairs are offset. Rather than just render the same colour though - as
we are trying to generate a shadow effect, we convert the rgb offset value to a
grey shadow. This grey offset is rendered underneath each layer, so that
as the layers are built up as for the original layers for the fur, we get a
shadowing effect, which makes the individual hairs stand out more.
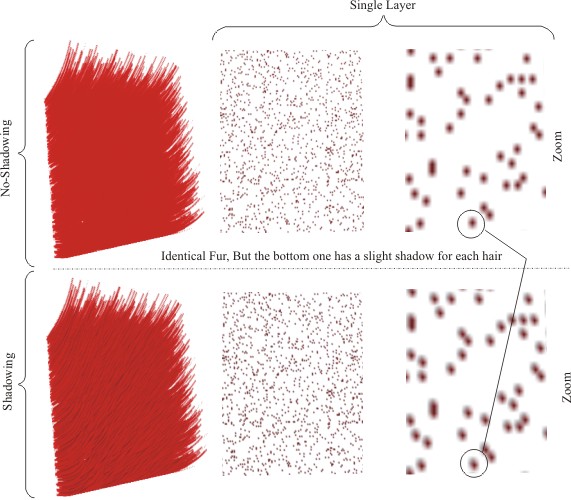
I suppose my simple diagram above doesn't show the effect to well, I suppose
the results might stand out a bit more if you bias the shadow a bit, so instead
of using a grey value for the shadow, you could use a pure black, i.e.
float4(1,1,1, fcolor.a) for the last line, so that the hairs really have a
strong shadow. Of course the shadows don't really look realistic then, but
thats the beauty of code, you can test out different methods to see what results
you get.
| Inter-Fur Shadows Effect |
|
....
vertexOutput VS_Shadow_TransformAndTexture(vertexInput IN)
{
vertexOutput OUT = (vertexOutput)0;
float3 P = IN.position.xyz + (IN.normal *
FurLength);
float4 normal = mul(IN.normal,
matWorld);
//---Additional Gravit/Force Code----
vGravity = mul(vGravity, matWorld);
float k = pow(Layer,
3); // We use the pow function, so that only the
tips of the hairs bend
// As layer goes from 0
to 1, so by using pow(..) function is still
// goes form 0 to 1,
but it increases faster! exponentially
P =
P + vGravity*k;
//---End Gravity Force Addit Code----
// We want the fur in the center of the object, as
where doing offsets! So if we just
// use the normal, when it's facing in the z
direction, the center of the object mesh,
// then it will be the same when we scale it
larger. So we modify the normal so we
// have larger values in the center and less on
the edge for use in our offset inter
// fur shading! If thats makes any sense?...not
the best explanation I've ever done :(
float4 znormal = 1 -
dot(normal, float4(0,0,1,0));
// Works pretty well though, even if you just do
this below, and just use the normal!
//float4 znormal = normal;
OUT.T0 = IN.texCoordDiffuse * UVScale;
OUT.T1 = IN.texCoordDiffuse * UVScale + znormal * 0.0011;
// UVScale?? We only multiply the UVScale by the
T0 & T1 as this is our Fur Alpha value!, hence
// scaling this value scales the fur across your
object...so reducing it makes the fur thicker,
// increasing it makes it thinner. We don't do it
to our T2 output as this is our texture
// coords for our texture...and we don't want to
effect this
OUT.HPOS = mul(float4(P,
1.0f), worldViewProj);
OUT.normal = normal;
return OUT;
}
//---------------------------------------------------------------------------//
float4
PS_Shadow_Textured( vertexOutput IN ): COLOR
{
float4 furcolr =
tex2D( TextureSampler, IN.T0 );
float4 furcolr_offset =
tex2D( TextureSampler, IN.T1 );
//??We use a simple offset trick to give
individual hair shadows. Works by using
//the normal - furcolor_offset in the direction
of the normal of the triangle
//face.
//Of course we scale this by a value so our offset
is only small, but just
//enough to give some individual hair lighting
//--------------------------
float4 color = furcolr_offset - furcolr;
float4 fcolor = color;
fcolor.a = color.a;
//--------------------------
//??We have our offset colour - but of course our
fur colour could be a single
// colour, red or just green! So we want this as
a grey, as we are concerned
// with the fur shadows!
//-------------------------
// From RGB to YUV
// Y
= 0.299R + 0.587G + 0.114B
// U
= 0.492 (B-Y)
// From YUV to RGB
// R = Y + 1.140V
// G = Y - 0.395U - 0.581V
// B = Y + 2.032U
// Y is the luma, and contains most of the
information of the image
float4 Y =
float4(0.299, 0.587, 0.114, 0.0f);
fcolor = dot(Y, fcolor);
// grey output
//-------------------------
return fcolor;
//return float4(1.0f, 1.0f, 1.0f, 0.3f); //rrggbbaa
}
....
|
Not shown in the vertex/pixel shader code above is the addition of about 4
lines that allow us to introduce basic lighting to our surface. Simple
directional lighting added to the basic rendering of the shells, not the shadow
shells the fur layers gives a slightly more eye catching effect.
|
Definitely worth testing out the demo to see the difference
that inter-fur shadowing has. Few things make the demo a bit more
catchy is that the surface and hairs have the added directional lighting
added to it, so that gives an even more eye stunning effect.
If you comment out the basic directional lighting code
in the shader demo you'll see the effects inter-fur shadows just as well
|
Download Source Code (16kb) |
IDEA!
By experimenting with the code you can produce a while variety of effects.
One such effect which jumps to mind is biasing the colour of the hairs for
different layers or uv texture values. Alternatively once you get to
texturing, you could only put hair in places where the surface is a particular
colour for example. You could have it so that when you model a character,
you make his head blue!...pure blue!...when you render the whole head, you could
apply a fur algorithm to only the surface that is blue!
At this stage we have a relatively reasonable looking effect, which could be
used as is, but as they say you can always go further. But it's worth
noting that our vertex and pixel shader code, or HLSL is implemented using only
the very basic shaders, vertex shaders 1.1+ and pixel shaders 1.3+, so the
effects should work on even basic graphic cards.
Textured Fur
|
Download Source Code (50kb)
|
|
|
|
Download Source Code (50kb) |
|
Download Source Code (50kb)
|
|
|
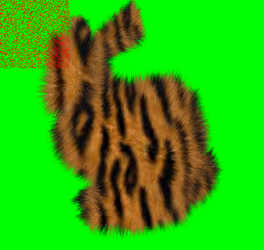
May the Force be with
you!
Forces, such as gravity or wind or movement forces take the fur to that
realistic dynamic level that isn't as hard as you think!
Using a simple biasing and of course the simple Newton Laws of
force (F=ma) and Hooks Spring Law (F=kx) we can add a bit more to our fur
demo. Simply by draging the bunny adds to the fur movement, it's not
perfect, just a basic swishing back and forth in the x and y direction so
you can see the fur working better. The biasing of the fur is
done by adding to the to the Positioning of each layer of the fur. So
that it's not so linear, I use a slight adjustment of power of 3, so that the
outer layers are effected more than the inner layers...giving a curving on
the tips. You can increase and decrease the fur length by
pressing <Up> and <Down> keys in the demo, so that the forces are really
notable. Of course the code could do with a bit more tweaking so it's
a bit more bouncy...but it works. |
Download Source Code
(50kb) |
Below shows the code snippet from the Shader code that adds to the forces to
the fur...you can also just comment the code out with comments /* */ and it
should still work. Might be an idea to just put the fur force code into a
function later on so it's more structured, but I thought it was pretty simple to
keep as it is, as it's only a few lines.
| Code Snippet From Fur.fx |
|
...
// Additional Gravit/Force Code
vGravity = mul(vGravity, matWorld);
//float pp = 3.14 * 0.5 * Layer; // depth paramete
//float A = dot(normal, vGravity); //A is the
angle between surface normal and gravity vector
float k = pow(Layer,
3); // We use the pow function, so that only the
tips of the hairs bend
// As layer goes from 0
to 1, so by using pow(..) function is still
// goes form 0 to 1,
but it increases faster! exponentially
P =
P + vGravity*k;
// End Gravity Force Addit Code
... |
Remember the code is repeated in two parts in the shader code, the fur
rendering part and of course is repeated in the shadow shader code so our inter
hair shadows are in the same place.
Improvements / Further Work
* Addition of Fins
* Fur texture is averaged over the current mesh, using the original fur
colour texture - calculate each triangles size and exact tu/tv values for the
fur texture individually.
* Optimise the render loop
* Organise the shader code more to use functions
* Do some performance work triangles vs FPS.
 |
Other Graphics Related Texts You Might Find Interesting |
 |


|